"WebRTC is new front in the long war for an open and unencumbered web."
Brendan Eich, Mozilla CTO
Today we will talk about WebRTC: how it works and how we can use it. WebRTC is an API project created by the World Wide Web Consortium (W3C). The project supports browser-to-browser applications for voice calling,video chat, and P2P file sharing without the need for both internal and external plugins. We are using WebRTC in one of our current projects. The application that we've developed creates rooms with many clients with video/audio chat.
And what is under the hood?
The main tasks that can be solved by WebRTC:
- acquiring audio and video;
- communicating audio and video.
Сorresponding JavaScript API`s:
- MediaStream;
- RTCPeerConnection.
There is one simple example of using getUserMedia (sharing video from your device camera to tag <video>):
var constraints = {video: true};
function successCallback(stream) {
 var video = document.querySelector("video");
 video.src = window.URL.createObjectURL(stream);
}
navigator.getUserMedia(constraints, successCallback);
In the example you can see calling getUserMedia function with two arguments. The first argument constraints in getting only video. The second argument is a callback in case of succesful connection – we just publish stream to video tag.
One more example (your device screen sharing):
var constraints = {
   video: {
      mandatory: {
         chromeMediaSource: 'screen'
      }
   }
};
navigator.webkitGetUserMedia(constraints, gotStream);
Looks good? Of course!!!
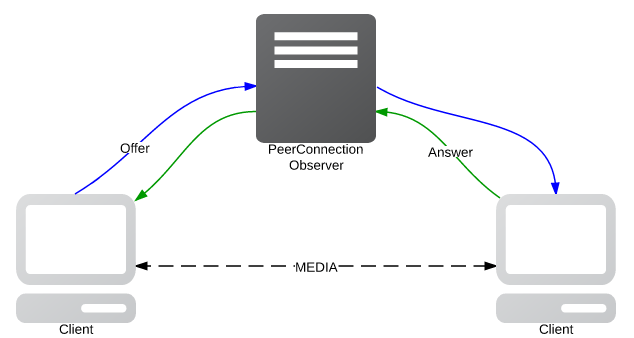
A different story is peer to peer connection. We'd like to provide you one example to illustrate how we can use it:
pc = new  RTCPeerConnection(null);
pc.onaddstream = gotRemoteStream;
pc.addStream(localStream);
pc.createOffer(gotOffer);
function  gotOffer(desc) {
 pc.setLocalDescription(desc);
 sendOffer(desc);
}
function gotAnswer(desc) {
 pc.setRemoteDescription(desc);
}
function gotRemoteStream(e) {
 attachMediaStream(remoteVideo, e.stream);
}
At the begining, we create new RTCPeerConnection. When it's connected, we get the stream in a callback gotRemotestream and attach it to the video element on our page. At the same time, we get a remote video description using gotRemoteStream feature and send thе offer to another end of the connection (gotOffer).
This method has a lot of issues and one of them is how to create infrastructure in order to divide our clients into rooms (routing the streams to the clients). Fortunately, there are some services which can help us.
(Code examples from Google I/O 13)

Opentok:
In one of our projects we used OpenTok – service which provides infrastructure and API to solve the problems mentioned above. There are ClientSDK and ServerSDK. I would like to tell you only about PHP and JavaScript interaction (for more info about Android or iOS visit official website Opentok).
The OpenTok PHP SDK enables you to generate sessions and tokens for OpenTok applications. Here is an example that shows how to get sessionID and token in PHP:
use OpenTok\OpenTok;
use OpenTok\MediaMode;
use OpenTok\Session;
$opentok = new OpenTok($apiKey, $apiSecret);
// Create a session that attempts to use peer-to-peer streaming:
$session = $opentok->createSession();
// Store this sessionId in the database for later use
$sessionId = $session->getSessionId();
// Generate a Token from just a sessionId (fetched from a database)
$token = $opentok->generateToken($sessionId);
$apiKey, $apiSecret – you can get it in OpenTok personal dashboard, to gain an access you must register.
We use session and token to create a chat in browser (through JavaScript). At the moment, we are creating connection on JavaScript with session and token giving from OpenTok API:
var session = OT.initSession(apiKey, sessionId);
session.connect(token, function(error) {
// If the connection is successful, initialize a publisher and publish to the session
if (!error) {
     var publisher = OT.initPublisher('publisher', {
      insertMode: 'append',
      width: '100%',
      height: '100%'
     });
     session.publish(publisher);
} else {
     console.log('There was an error connecting to the session:', error.code, error.message);
     session.on('streamCreated', function(event) {
      session.subscribe(event.stream, 'subscriber', {
       insertMode: 'append',
       width: '100%',
       height: '100%'
      });
OT.initPublisher – the first argument is id of DOM element that is used for broadcasting video from our device camera session.on('streamCreated', callback) – fired when remote client connects to us session.subscribe – the second argument is id of DOM element that is used for broadcasting video from remote clients
Congratulations, now we have built basic video chat!
If you have any ideas or questions go to opentok tutorial or ask our developers via info@issart.com . ISS Art team would be glad to answer your any questions!