
If you know what a smart contract is, but you don't know how to start working with it – you're in the right place. We will start with creating a contract in a sandbox, then move to the Ethereum test network, next we will create our own node and connect to it from Java code. If you aren't familiar with the Ethereum or smart contracts, you can read this article first.
Solidity is the most common language to write contracts in Ethereum. In this article we won't dive into language constructions, but will just show you the starting point. You can read about Solidity syntax in the official documentation.
Create a contract in Remix environment
We will start with creating a very simple contract from scratch in the sandbox, provided by Remix – Solidity IDE, that can run contracts inside a browser without any external connections. This is a good place to practice.
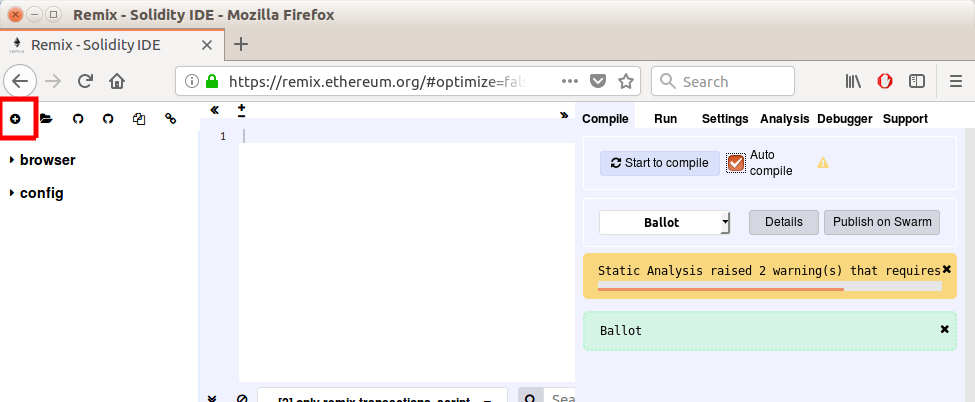
Let's create a new contract by clicking on Plus button in the upper left corner. We will name it 'forest.sol'. This is a simple contract that allows users to sponsor tree planting, so let's name it 'Forest'. The author of the contract sets the price of planting one tree. When a user sends Ether to this contract, we will increase the number of trees that this user sponsored. The author can get Ether that was sent by sponsors. Also there is an opportunity to see the contribution of each user.
pragma solidity ^0.4.21;
contract Forest {
    uint256 public treeCost;
    mapping (address => uint256) sponsorCountributions;
    address[] sponsors;
    address owner;

    // How much it will cost to grow a tree.
    // Cost in wei. 1 Ether = 10 ^ 18 wei
    function Forest(uint256 _treeCost) public {
        treeCost = _treeCost;
        owner = msg.sender;
    }

    // Add a tree. Check that sender sent ether in required amount
    // If all correct we increment a counter to sender of a payment
    function addTree() payable public {
        require(msg.value == treeCost);
        if (sponsorCountributions[msg.sender] == 0) {
            sponsors.push(msg.sender);
        }
        sponsorCountributions[msg.sender]++;
    }

    // Get sponsor contribution in percentage of all contributions
    function getSponsorContribution(address sponsor) view public returns (uint8) {
        uint256 totalTrees = 0;
        for (uint256 i = 0; i < sponsors.length; i++) {
            totalTrees += sponsorCountributions[sponsors[i]];
        }
        if (totalTrees == 0) {
            return 0;
        }
        return (uint8) (100 * sponsorCountributions[sponsor] / totalTrees);
    }

    // Get ether from contract by its owner. amount in wei
    function getEther(uint256 amount) public {
        require(msg.sender == owner);
        require(address(this).balance >= amount);
        msg.sender.transfer(amount);
    }
}
This contract is only an example, it checks the compiler version and creates a simple contract. This contract has 4 functions:
- Forest – constructor that initiates contract and sets cost for one tree. The cost is measured in weis – a minimal coin in Ethereum, one Ether = 1018 weis.
- addTree – pay for a new tree. The function is marked as payable, so a user has to send Ether from his wallet when he calls such function. We are checking the amount of Еther that user sent and if it equals the cost of one tree, we add the user as a sponsor and count his contribution.
- getSponsorContribution – shows a user's contribution to all the forest. Function is marked as view, so its execution will not produce a new transaction and will just be calculated on Ethereum node for free.
- getEther – function that allows contract's owner to get Ether from contract.
These functions show how to send Ether to contact and vice versa, change contracts state and perform read-only functions.
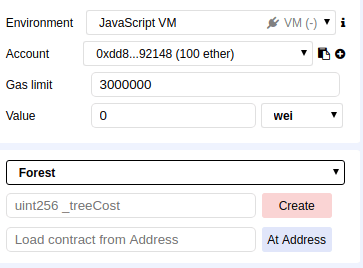
Before running a contract in Remix we should compile it – in the left toolbar select "compile" tab and click on the button "Start to compile". Next step is a contract deployment. To deploy contract, switch to the tab "Run", fill input field "_treeCost" below the contract name and click on "Create" button.
After it you will see a created contract block.
Now you can execute methods in this contract. In Remix there are 5 wallets for running in local environment, you can switch between them by selecting from "Account" drop-down list.
When you call method addTree, you should pass some Ether, to do so write this value in the text input "Value" near "Account". When you call the method getSponsorContribution, you should pass the address as string – write it in double quotes. You can get the account address by clicking on the icon left to the selected "Account" value.
Try communicating between contracts
Even if one contract is fully viable, there are many cases, when you need to get information from another contract (in Ethereum that type of contracts is called Oracles), or call other contracts to change their state. In this article we will dwell on reading information from another contract.
Every contract that has been deployed to Ethereum has an address, like any user's wallet. So to call another contract we have to know the address of the contract and its interface (what methods the contract has and their parameters). In Remix you can copy contract's address by clicking on the icon near the deployed contract's name.
Let's create a new contract "checker.sol" with this code:
pragma solidity ^0.4.21;
import "browser/forest.sol";

contract SponsorChecker {
    function isForestSponsor(address sponsor, address forestContractAddress) public view returns (bool) {
        Forest forestContract = Forest(forestContractAddress);
        uint8 percentage = forestContract.getSponsorContribution(sponsor);
        return percentage > 0;
    }
}
An important thing here is an import statement: we need it to import another contract, that we want to call.
This contract contains only one function isForestSponsor, which takes 2 arguments – sponsor's address and Forest contract's deployed address. To be able to make calls to another contract we need to create an instance of this contract and provide deployed contract's address. Next we call functions of that contract like any other objects.
To pass 2 parameters to a function you should wrap them in square brackets, like JSON array.
Install MetaMask and get test Ether
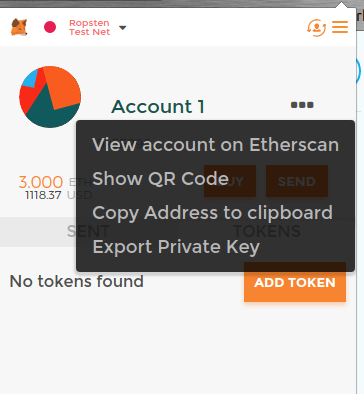
Any transaction in real Ethereum network requires a bit of Ether, the cryptocurrency of Ethereum. Even in the most used test network Ropsten you should have some Ether, but because it is a test network, you can get it for free. One of the simplest ways is to install MetaMask and create there a new account.
MetaMask can be installed as a browser plugin or you can use their own browser. We will install it as a plugin to Chrome. Go to MetaMask website and install plugin. Next you should click on the fox icon in browser plugins panel and finish installation. By default MetaMask uses main network to execute transaction, but we just want to check how it works, so change network to Ropsten by clicking on "Main network" text in the upper left corner of the plugin and choose "Ropsten test network". Now we have an Ethereum wallet, but it's empty, so let's get some coins. Click on "Buy" button and select "ROPSTEN TEST FAUCET". On the page that opened just click "request 1 Ether from faucet" and wait a minute and that's all, you have one Ether in your wallet. You can add as much Ether as you need.
Install and launch our Ethereum node
At the previous step we successfully connected to test network, but we used MetaMask as a provider for that. If we want to communicate with contracts and perform transactions, it is better to have an own Ethereum node.
To do this, we need to install one of Ethereum clients. We will use the most common client – Geth. Go to website and choose your operating system. In this article we are using Ubuntu 16.04, we have installed it from the package manager:
sudo add-apt-repository -y ppa:ethereum/ethereum
sudo apt-get update
sudo apt-get install ethereum
After installing Geth we can run it. By default Geth connects to the main network and without RPC. So run it with these arguments:
geth --rpcapi personal,db,eth,net,web3 --rpc --testnet --fast
Enabled RPC (Remote process call) interface will listen to incoming requests by default on localhost and port 8545. After start Geth will connect to other nodes and download all existing blocks to the local machine. It will take a significant amount of time because the test network occupies 14Gb. After downloading all blocks the node is ready to perform transactions and synchronize them with other nodes.
Connecting to Ethereum node from Java application
Now we have 2 contracts and a working Ethereum node. And we want to communicate with Ethereum from usual Java application. To make so, we will use library web3j. You can get it from maven repository.
To start working with Ethereum node, we will create a web3j object with default parameters:
Web3j web3 = Web3j.build(new HttpService());
The first thing that we can do with it is to check connection by getting the node version:
Web3ClientVersion web3ClientVersion = web3.web3ClientVersion().send();
String clientVersion = web3ClientVersion.getWeb3ClientVersion();
This will make a synchronous request, by changing send() to sendAsync() or observable() you can perform async requests.
As a result you should get clientVersion like this:
Geth/v1.8.2-stable-b8b9f7f4/linux-amd64/go1.9.4
Next step is to read some useful data from Ethereum. So let's check the balance of our wallet, that we created in MetaMask. To get the balance you need to know its address and you can get it from MetaMask plugin by copying it to the clipboard.
Request<?, EthGetBalance> getBalanceRequest = web3.ethGetBalance("0x5E2966E536414867Ff9D8804718000229960d15F", DefaultBlockParameterName.    LATEST);
EthGetBalance ethGetBalance = getBalanceRequest.send();
BigInteger balance = ethGetBalance.getBalance();
Both version and account balance are read-only operations, that don't produce new transactions to the Ethereum network. To perform operations (create contracts or call contracts functions) you should create and sign a transaction. To sign the transaction you need the account's private key, you can get it near the accounts address in MetaMask plugin.
To perform operations with contract you can generate wrappers for it. You can add another dependency to your java project from maven repository: web3j codegen. To make wrappers we need to have 2 files: compiled code and application binary interface (abi). You can install solidity compiler to your own computer from solidity site. For Ubuntu 16.04 you can install a compiler from package manager:
sudo add-apt-repository ppa:ethereum/ethereum
sudo apt-get update
sudo apt-get install solc
Save forest.sol from Remix to your filesystem and then run command:
solc forest.sol --bin --abi --optimize -o src/main/solidity/resources
It will generate in src/main/solidity/resources 2 files: bin and abi.
To generate wrappers you can run this code:
SolidityFunctionWrapperGenerator.main(Arrays.asList(
    "src/main/solidity/resources/forest.bin", // binary file location
    "src/main/solidity/resources/forest.abi", // abi file location
    "-o", "src/main/java", // place to store generated wrapper
    "-p", "com.issart.blog.ethereum.wrappers") // package name for generated class
    .toArray(new String[]{}));
This will generate class Forest for your contract, so now we can deploy a new contract to the test Ethereum network. To do so we need an account, which will be the sender of transactions. We will create credentials object by providing accounts private key:
Credentials credentials = Credentials.create("7777744a213b2c35997c29b481ff091c54a18aed6d688d23f3662856cd5d5bfe");
To deploy a new contract you can run this code:
Forest forest = Forest.deploy(
    web3, // configuration object
    credentials, // account credentials
    new BigInteger("30000000000"), // gas price
    new BigInteger("2000000"), // gas limit
    new BigInteger("2000")) // tree cost - parameter of our contract
    .send();
String contractAddress = forest.getContractAddress();
Gas price is set to a big amount because we use test network and Ether here is free. If you set it to a small amount, it could take more time to wait until our transaction is added to blockchain.
We can set any gas limit above estimated amount (you can see gas estimations in Remix contract details).
Tree cost is sent as a parameter to contracts constructor.
It takes some time to add a contract to blockchain. After completion we will get a contract object and have to save its address. So next time we can load this contract like this:
Forest forest = Forest.load(
    "0x23948a7057929b5e9036a7faf0ceeb6499c2ddff", // contract address
    web3,
    credentials,
    new BigInteger("30000000000"), // gas price
    new BigInteger("2000000")); // gas limit
Now we can perform operations on this contract. Let's make our contribution to planting trees (change the address to your account address):
forest.getSponsorContribution("0x5E2966E536414867Ff9D8804718000229960d15F").send()
It will return 0, because we haven't called addTree yet.
So try adding a tree:
forest.addTree(new BigInteger("2000")).send()
And again get contribution and we will get the percentage of 100.
You can see all your transactions here: just search for your contract address.
Conclusion
Now you know how to:
- Write simple contracts and run them in sandbox;
- How to create an Ethereum account and get its credentials;
- How to start your own Ethereum node;
- How to connect to Ethereum network from your Java code.