Issues
Many companies that produce really healthy beverages often need to control the quality of their products at one of the final stages.
Today we are going to discuss not the issue of checking the quality of the drink itself, but the method to control the level of liquid in the bottle and the position of the pasted label with the help of web cameras and Computer Vision.
Let's start with the analysis of the originally received input data – a set of images that were provided to solve the problem. Listed below are most common of them:

So, we have some object on the background that we will:
– define, – determine the location of the label, – determine the level of liquid, – compare the obtained values with the admissible ones.
Looking ahead, I will mention that in the future we will receive and process images directly from the webcam.
Tools
To solve this problem, we will be using OpenCV (an open source Computer Vision library), NumPy (an open source package for scientific computing with Python) and, as you may have already guessed, Python itself, that is able to bind these technologies together.
Solution
To work with the above mentioned libraries, you should import them:
import cv2 as cv
import numpy as np
Loading the image from the file:
original_img = cv.imread(file)
where 'file' is the file name including the path to it.
We adjust the image to RGB format and get the dimensions:
original_img = cv.cvtColor(original_img, cv.COLOR_BGR2RGB)
orig_img_h, orig_img_w, _ = original_img.shape
We have the image, what's next?
It is necessary to distinguish our object from the general background.
To start with, we will find the image background.
For this, we will use the OpenCV function calcBackProject(), allowing us to find the matching object based on the typical section.
To use as a typical section, we will choose a fragment of the background, representing the pasting of the left and right parts of the image, taking advantage of the fact that the bottle is located more or less in the center with a certain backlash and has some proportion relative to the entire image.
Before that, we will also cut off the non-typical extreme sections to the right and left that might hinder us from searching the background.
To make sure our code works well in systems that are quantitatively different from the one provided by the source images, we will take the above geometric parameters out to the settings file settings.ini, at the same time setting the paths of storing images and their mask:
[path]
source_dir = images			directory with source images
result_dir = result			directory with images after processing
images_mask = cam_img_*/*.png	mask of the images' file names
[geometry]
cut_border = 0.2			relative width of the cut off sections to the left and right
pre_roi_width = 0.25			width of sections to search for background at preliminary stage
roi_width = 0.2			width of specified sections to search for the background
The resulting parameters are:
import configparser
config = configparser.ConfigParser()
config.read("settings.ini")
IMAGES_MASK = config.get("path", "images_mask")
SOURCE_IMAGES_PATH = config.get("path", "source_dir")
RESULT_IMAGES_PATH = config.get("path", "result_dir")
CUT_BORDER = config.getfloat("geometry", "cut_border")
PRE_ROI_WIDTH = config.getfloat("geometry", "pre_roi_width")
ROI_WIDTH = config.getfloat("geometry", "roi_width")
Cut off non-typical extreme sections to the left and right by the value specified in parameters:
border = int(orig_img_w * CUT_BORDER)
image = original_img[:, border:orig_img_w - border]
image_h, image_w, _ = image.shape
Define the function to allocate and paste sections to search for the background:
def get_roi(img, left_border, right_border):
   img_h, img_w, _ = img.shape
   left_part = img[:, 0:left_border]
   right_part = img[:, right_border:img_w]
   return np.column_stack((left_part, right_part))
And we find these sections for the pre-search for the background:
pre_roi = get_roi(image, int(image_w * PRE_ROI_WIDTH), int(image_w - image_w * PRE_ROI_WIDTH))
We define the function to search for the background with the help of Cv.calcBackProject():
def find_background(img, roi):
   img_h, img_w, _ = img.shape
   hsv_img = cv.cvtColor(img, cv.COLOR_BGR2HSV)
   hsv_roi = cv.cvtColor(roi, cv.COLOR_BGR2HSV)
   roi_hist = cv.calcHist([hsv_roi], [0, 1], None, [180, 256], [0, 180, 0, 256])
   mask = cv.calcBackProject([hsv_img], [0, 1], roi_hist, [0, 180, 0, 256], 1)
   ksize = int(0.0025 * img_h)
   kernel = cv.getStructuringElement(cv.MORPH_ELLIPSE, (ksize, ksize))
   mask = cv.filter2D(mask, -1, kernel)
   _, mask = cv.threshold(mask, 180, 255, cv.THRESH_BINARY)
   return mask
We find the background and use it as a mask of the required object in the initial approximation:
pre_mask = cv.bitwise_not(find_background(image, pre_roi))


To find the width of the object and the excessive sections to the right and left, we will define the corresponding function based on the mask found with the help of cv.connectedComponentsWithStats(),
which finds the connected components with their coordinates and dimensions.
Let's find the element with max width and make its horizontal parameters the parameters of the required object:
def get_pre_borders(mask):
   components = cv.connectedComponentsWithStats(mask, connectivity=8, ltype=cv.CV_32S)
   _, labelmap, stats, centers = components
   st = stats[:, 2]
   largest = np.argmax(st)
   st[largest] = 0
   second = np.argmax(st)
   left = stats[second, 0]
   width = stats[second, 2]
   right = left + width
   roi_width = int(width * ROI_WIDTH)
   return left, right, roi_width
Let's narrow down the area for a more accurate search:
left_border, right_border, roi_width = get_pre_borders(pre_mask)
cut_img = image[:, (left_border - roi_width):(right_border + roi_width)]
_, cut_img_w, _ = cut_img.shape
And perform it using already mentioned functions:
roi = get_roi(cut_img, roi_width, cut_img_w - roi_width)
cut_img = cut_img[:, (roi_width - ROI_EXT):(cut_img_w - roi_width + ROI_EXT)]
background = find_background(cut_img, roi)
To determine the dimensions of the object, we will write the function get_bottle_mask(), additionally trying to cut off the "noise" outside of the object:
def get_bottle_mask(bin):
   def clean(cln_bin, larg_num):
       components = cv.connectedComponentsWithStats(cln_bin, connectivity=8, ltype=cv.CV_32S)
       _, labelmap, stats, centers = components
       st = stats[:, 4]
       largests = [np.argmax(st)]
       st[largests[0]] = 0
       largests.append(np.argmax(st))
       cln_bin = np.zeros(cln_bin.shape, dtype=np.uint8)
       cln_bin[labelmap == largests[larg_num]] = 255
       return cln_bin, stats[largests[0]]

   bin, _ = clean(bin, 1)
   bin = cv.bitwise_not(bin)
   bin, stats = clean(bin, 0)
   left = stats[0]
   top = stats[1]
   right = left + stats[2]
   bottom = top + stats[3]
   mask = bin[top:bottom, left:right]
   mask = cv.merge((mask, mask, mask))
   return mask, left, top, right, bottom
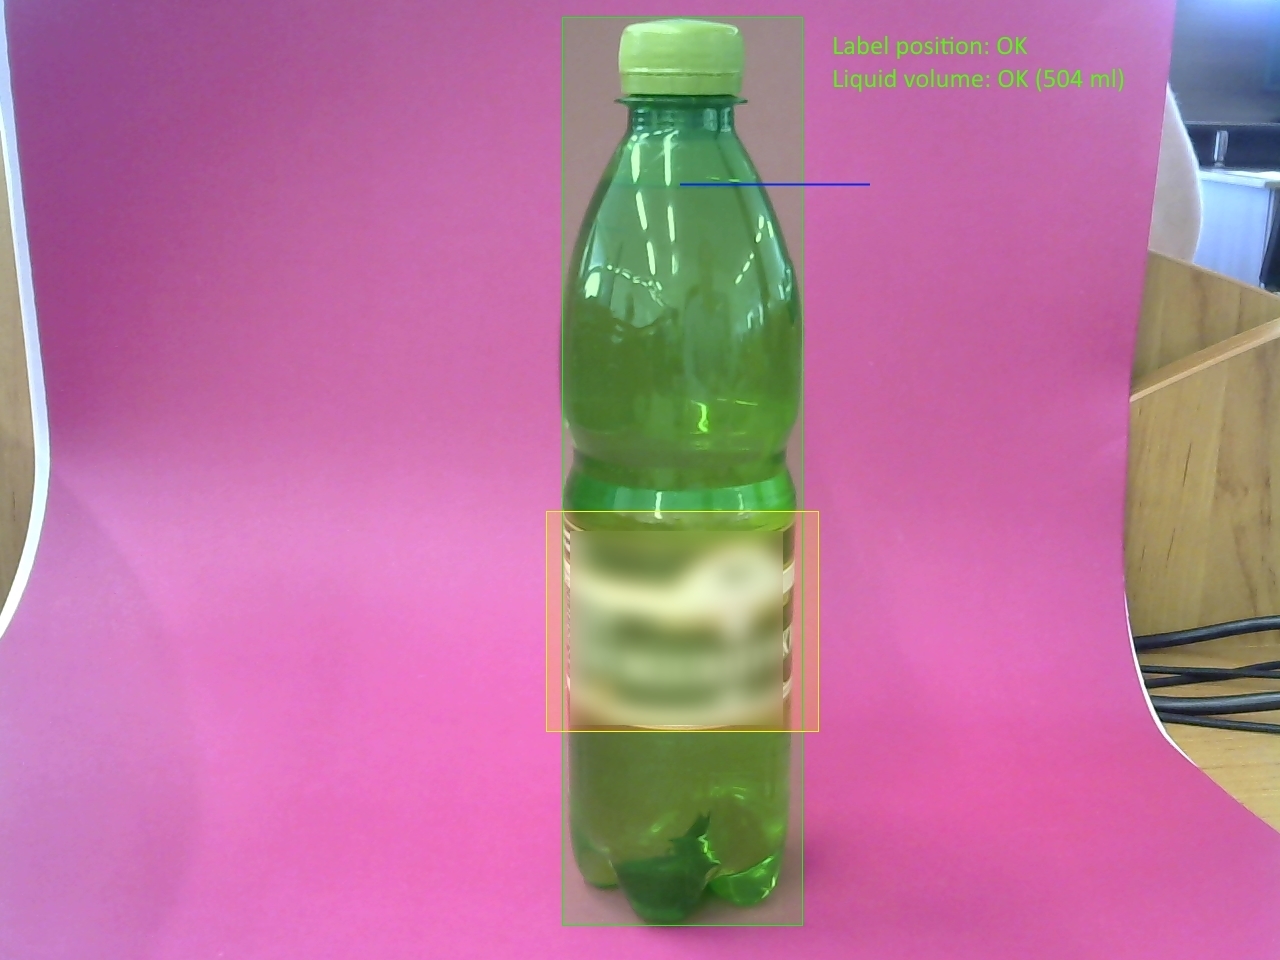
Let's see what we have as a result:
mask, left, top, right, bottom = get_bottle_mask(background)
bottle_x1 = border + left_border - ROI_EXT + left
bottle_x2 = bottle_x1 + (right - left)
bottle_y1 = top
bottle_y2 = bottom
# Get bottle by mask
cut_img = cut_img[top:bottom, left:right]
bottle = cv.bitwise_and(cut_img, mask)
bottle_h, bottle_w, _ = bottle.shape


Not bad!
Let's define, whether the label is pasted at the right height.
To do that, we will adjust the image to HSV format and using cv.inRange() we will create the filter based on HSV limits specified in the configuration file, corresponding to the extreme stripes on the label, before doing that we will blur the image a little using cv.blur() to reduce the "noise."
With the help of cv.findContours() we will get the contours based on the raw data passed the filtering.
Then we will define the dimensions of these contours and those corresponding in width to some continuous section in the central area of the image (to cut off small "noise" that passed filtering. Yet, not everything is so rosy – there might be glares, shadows, overlaps of the values of the required sections and the sections to cut off), we will assume to be boundary stripes on the label.
In our case, the cork of the bottle has very close values to the required ones, so we will just cut it off at the height specified in the settings BANG_HEIGHT.
def find_labels(img):
   img_h, img_w, _ = img.shape
   center_img = img[:, int(img_w * 0.45): int(img_w * 0.55)]
   blur = int(0.015 * img_w)
   center_img = cv.blur(center_img, (blur, blur))
   center_h, center_w, _ = center_img.shape
   img_hsv = cv.cvtColor(center_img, cv.COLOR_RGB2HSV)
   filtered = cv.inRange(img_hsv, (LABEL_H_MIN, LABEL_S_MIN, LABEL_V_MIN),
                         (LABEL_H_MAX, LABEL_S_MAX, LABEL_V_MAX))
   _, contours, _ = cv.findContours(filtered, cv.RETR_TREE, cv.CHAIN_APPROX_SIMPLE)
   label_y_arr = []
   for num, cnt in enumerate(contours):
       x, y, w, h = cv.boundingRect(cnt)
       if (w >= center_w) & (y > BANG_HEIGHT * img_h):
           label_y_arr.append(y)
           label_y_arr.append(y + h)
   min_label_y, max_label_y = 0, 0
   if label_y_arr:
       min_label_y = min(label_y_arr)
       max_label_y = max(label_y_arr)
   return min_label_y, max_label_y
Similarly, we will define the level of the liquid in the bottle by setting the search area in the parameters LIQUID_LEVEL_SEARCH_TOP, LIQUID_LEVEL_SEARCH_BOTTOM, that allows us to narrow down the parameters of the HSV filter, thereby reducing the number of false positives. If the level in the given area has not been found – the level quality control is failed.
If found, we will compare it with valid parameters, but there is more on that later.
def find_liquid_level(img):
   img_h, img_w, _ = img.shape
   top = int(img_h * (1 - LIQUID_LEVEL_SEARCH_TOP))
   bottom = int(img_h * (1 - LIQUID_LEVEL_SEARCH_BOTTOM))
   center_img = img.copy()[top:bottom, int(img_w * 0.45): int(img_w * 0.55)]
   center_h, center_w, _ = center_img.shape
   ksize = int(0.004 * img_h)
   center_img = cv.blur(center_img, (ksize, ksize))
   img_hsv = cv.cvtColor(center_img, cv.COLOR_RGB2HSV)
   filtered = cv.inRange(img_hsv,
                         (LIQUID_LEVEL_H_MIN, LIQUID_LEVEL_S_MIN, LIQUID_LEVEL_V_MIN),
                         (LIQUID_LEVEL_H_MAX, LIQUID_LEVEL_S_MAX, LIQUID_LEVEL_V_MAX))
   _, contours, _ = cv.findContours(filtered, cv.RETR_TREE, cv.CHAIN_APPROX_SIMPLE)
   level_y_arr = []
   for num, cnt in enumerate(contours):
       x, y, w, h = cv.boundingRect(cnt)
       if w >= center_w * 0.6:
           level_y_arr.append(y)
           level_y_arr.append(y + h)
   max_level_y = 0
   if level_y_arr:
       max_level_y = max(level_y_arr) + top
   return max_level_y

liquid_level_y = find_liquid_level(bottle)
liquid_level = 1 - liquid_level_y / bottle_h
volume = None
if (liquid_level > 0.) & (liquid_level < 1.):
   volume = get_volume_by_level(liquid_level)
Here get_volume_by_level() is used to convert the level of liquid to the volume (ml) based on the map of calibrated values:
def get_volume_by_level(level):
   volume = None
   keys = list(LEVEL_VOLUME_MAP.keys())
   for indx, key in enumerate(keys[:-1]):
       next_key = keys[indx + 1]
       if (level >= key) & (level < next_key):
           min = LEVEL_VOLUME_MAP[key]
           max = LEVEL_VOLUME_MAP[next_key]
           volume = int((max - min) * (level - key) / (next_key - key) + min)
           break
   return volume
LEVEL_VOLUME_MAP = {
   0.539: 400,
   0.587: 450,
   0.694: 500,
   0.838: 550
}
The more mapped 'height-volume' pairs there are, the more accurate the result is.
We make a conclusion as to the correctness of the pasted label, checking its level against the bottom of the bottle and its height (awkwardly pasted label will have a greater height) with the limits specified in the settings:
label_bottom = 1 - max_label_y / bottle_h
label_height = (max_label_y - min_label_y) / bottle_h
label_ok = (max_label_y > min_label_y) & \
          ((label_bottom > LABEL_BOTTOM_MIN) & (label_bottom < LABEL_BOTTOM_MAX)) & \ ((label_height > LABEL_HEIGHT_MIN) & (label_height < LABEL_HEIGHT_MAX))
We check the volume of the liquid in the bottle, comparing with the specified limits:
level_ok = False
    if volume != None:
        level_ok = (volume >= VOLUME_MIN) & (volume <= VOLUME_MAX)
And apply the obtained results to the image:
recognize_info = liquid_level_y, bottle_x1, bottle_x2, bottle_y1, bottle_y2, \
                     min_label_y, max_label_y, label_ok, level_ok, volume
    result_img = draw_result(original_img, recognize_info)
def draw_result(img, recognize_info):
   img = draw_colored_rectangles(img, recognize_info[:7])
   label_ok, level_ok, volume = recognize_info[-3:]
   img = draw_text_result(img, label_ok, level_ok, volume)
   return img
I will not mention draw_colored_rectangles(), draw_text_result() – here, I will just remark that cv.line() is used for drawing a line, cv.rectangle() is used for drawing a rectangle, and to draw the text cv.putText() is used.


We save the result using cv.imwrite()
Finally, as I promised, here is the code of the function to get images from the webcam, for their processing, displaying and saving in the directories specified by the parameters captures_path (for raw images), result_path (for the processed ones):
def capture_cam(captures_path, result_path):
   cap = cv.VideoCapture(0)
   cap.set(3, 1280)
   cap.set(4, 960)
   recognize_info = None
   while (True):
       ret, frame = cap.read()
       if not ret:
           print("No capture")
           break
       if recognize_info:
           frame = cv.cvtColor(frame, cv.COLOR_RGB2BGR)
           frame = draw_result(frame, recognize_info)
           frame = cv.cvtColor(frame, cv.COLOR_BGR2RGB)
       cv.imshow('Bottle check', frame)
       k = cv.waitKey(100)
       if k == 27:  # Esc key to stop
           break
       elif k == 32:  # Space key to recognize
           if recognize_info:
               recognize_info = None
           else:
               file_name = datetime.now().strftime("%Y%m%d-%H%M%S-%f.png")
               cv.imwrite(os.path.join(captures_path, file_name), frame)
               result_image, recognize_info = handle_image(frame)
               save_img(result_image, result_path, file_name)
   cap.release()
   cv.destroyAllWindows()
Upon the initial click of <Space> the current frame is recognized, the rendering of the results in the display window received from the webcam and saving of the images are performed.
The second click on <Space> will clear the rendering of the results of recognition and make the process ready to repeat itself.
Exit is done by pressing <Esc>
Conclusion
It should be noted that to obtain stable results, it is necessary to provide favorable conditions for the operation of the system, that is pick a uniform contrasting background, work on lighting, reduce glare and shadows to the minimum, fix the camera. But, as you can see, even in such imperfect conditions, it is possible to achieve good results.
Adjustment of the system to specific conditions is carried out by specifying the necessary parameters in the settings file without having to intervene in the source code, it is possible to track the performance of the system in real time and save the results obtained.