The advantages of using Playwright for UI testing?
In the modern trends of web applications development the great advantage is to have an opportunity to create automated tests quickly, launch them and get representative execution results for the analysis. That's why to achieve it and gain the edge over the popular webDriver and Chrome DevTools protocol technologies, Microsoft started its open source project Playwright, which provides QA engineers with following features in UI automated testing:
- Playwright supports 3 main browser engines: Chromium (Chrome, Opera, Edge browsers), WebKit (Safari browser) and Gecko (Firefox browser). If it is necessary to test a web application in the mobile version of these browser engines – no problem, use device DescriptorsSource.json file which Playwright developers keep in the updated state to emulate mobile, tablet or desktop devices;
- Playwright supports Linux, Windows and Mac OS operating systems;
- Playwright launches tests in headless or headful modes;
- Playwright works with popular browser automation protocols: Chrome DevTools Protocol (Chromium engine), WebInspector protocol (WebKit engine) and Juggler protocol (Gecko engine) to let your tests have access to Permissions, Geo location, ServiceWorkers and Networks data inside of your browsers;
- Playwright works with its own built-in locators and, of course, supports CSS and XPath locators, which are used in Selenium + WebDriver testing tools;
- Playwright comes with a Test Generator out of the box. This generator will help you to generate multiple tests using browser GUI, save the Typescript code for them and quickly get all locators for your tests;
- Playwright has an official extension for Visual Studio Code, so test code development, debugging and execution is very easy and straightforward.
If you are ready, let's start with Playwright installation and VS Code extension setup. This article includes video tutorials in Full HD (1080p) resolution for most of the steps to view and understand how to work with Playwright from the very beginning. Additionally, all the Typescript code demonstrated in the article is available in our public repository on the GitHub.
By default, playwright documentation describes installation for Node.js package manager and we are going to use it too. The documentation also includes documentation for Python, Java and .NET. To get it just select the required programming language at the top of the navigation menu. In this article Playwright installation is demonstrated for Ubuntu 22.04 LTS OS, but Playwright can be installed on Windows and Mac operating systems too, as we have mentioned above.
Playwright tool installation
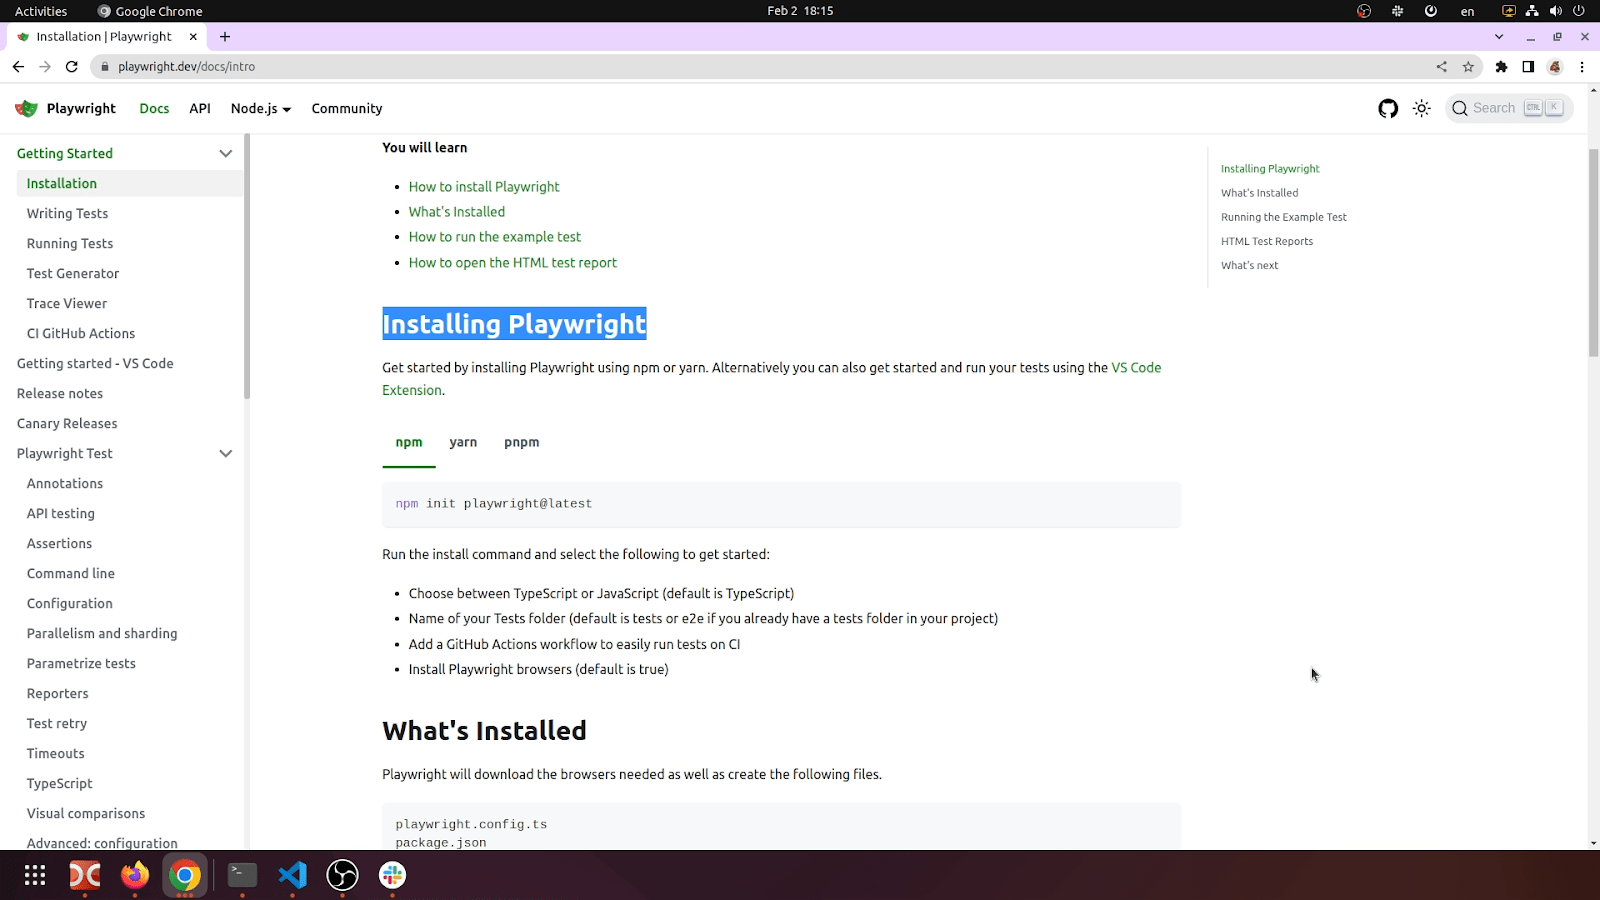
Create a new folder in your home directory, let's call it "playwright". Open terminal and paste this command to install Playwright:
npm init playwright@latest
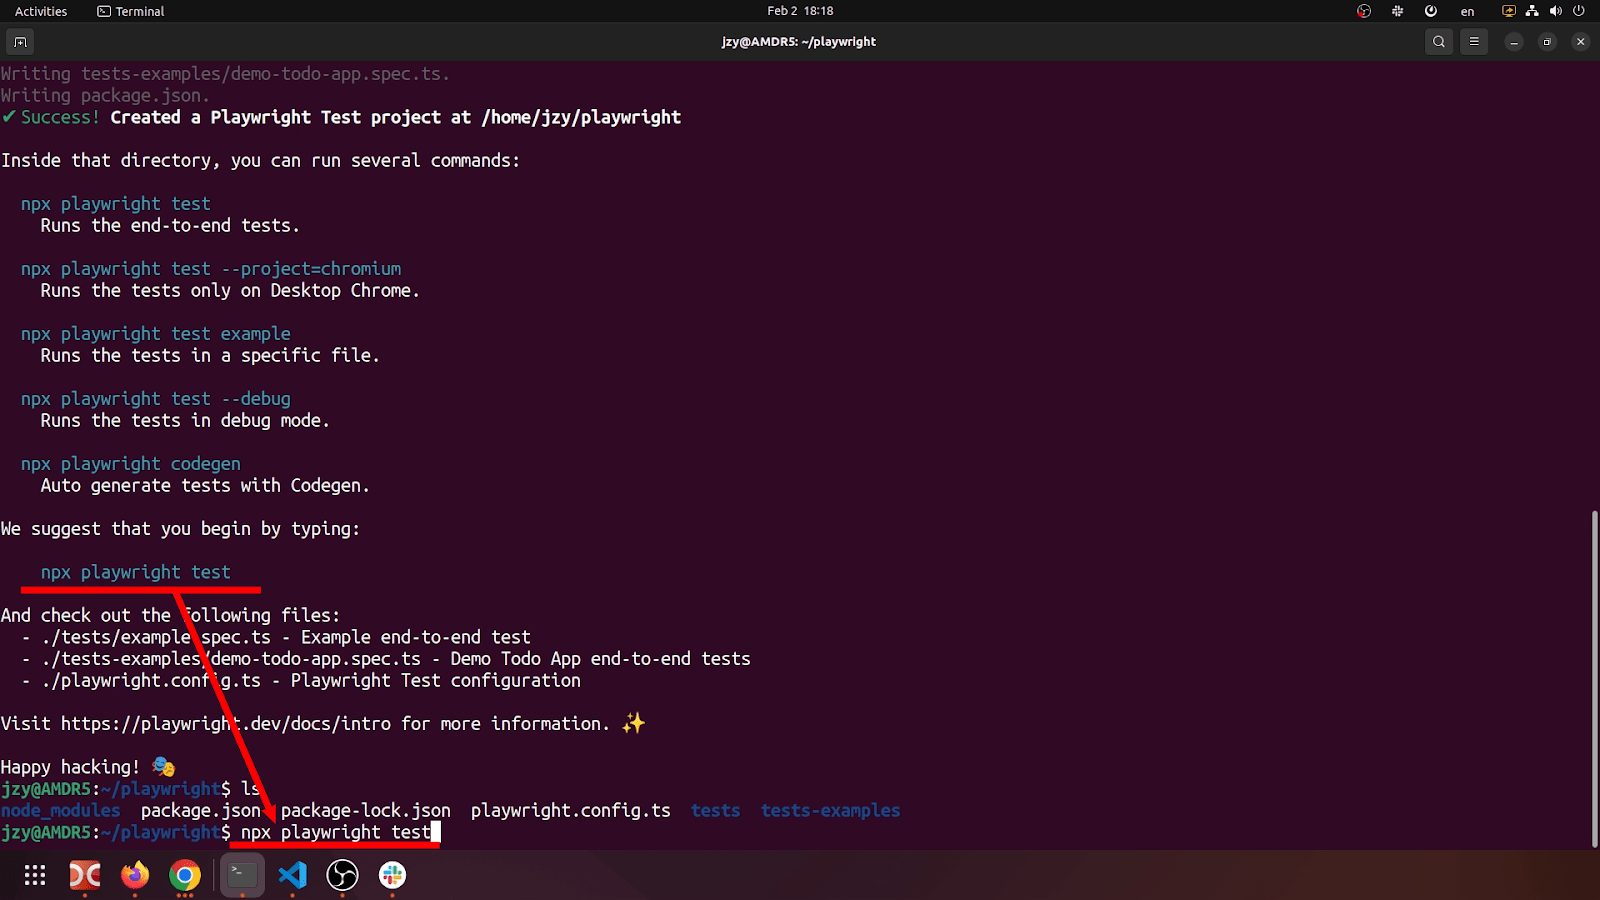
Then, select "Typescript" as the default language, "tests" folder name, "false" for GitHub Actions workflow, "true" to install all 3 Playwright browsers and "false" to install Playwright system dependencies. These are the steps for the default Playwright installation. That's all! After the installation is finished, we can see a command in the Terminal window to run Playwright test example:
npx playwright test
npx playwright show-report
This command will open the default browser on the "http://localhost:9323" report URL and display results for passing 2 tests in 3 browsers – Chromium, Firefox, WebKit – 6 tests in total.
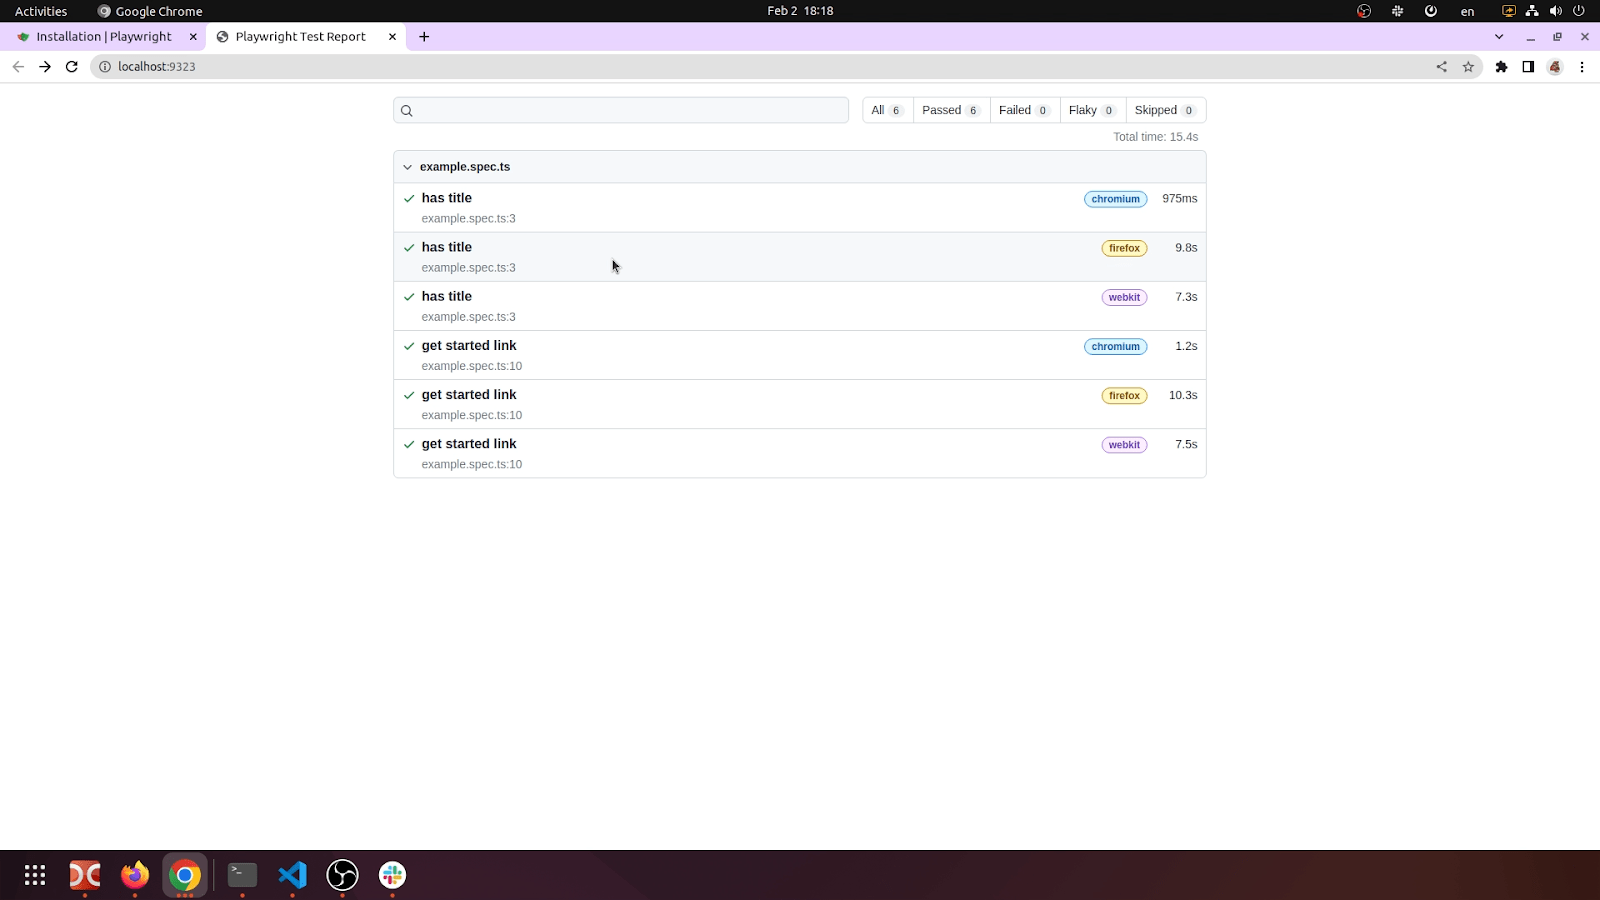
These two tests are placed in the "example.spec.ts" file, the configuration for the test run is placed in "playwright.config.ts" file in which we can configure Playwright to specify browsers to run tests. The report URL page contains clickable links for each of 6 tests – passed or failed. We can click on each link to view all steps of every test with time spent for each test operation in the Typescript code.
The "playwright.config.ts" file is called the Global configuration file. It provides many options to run Playwright end-to-end tests: timeouts, baseURLs, browsers, mode headless or headful, time zones, permissions, geolocations, etc. – all the features adjusted for the test from the Playwright tool developers.
All these steps, describing the installation, are shown in the video.
Playwright extension installation in the Visual Studio Code
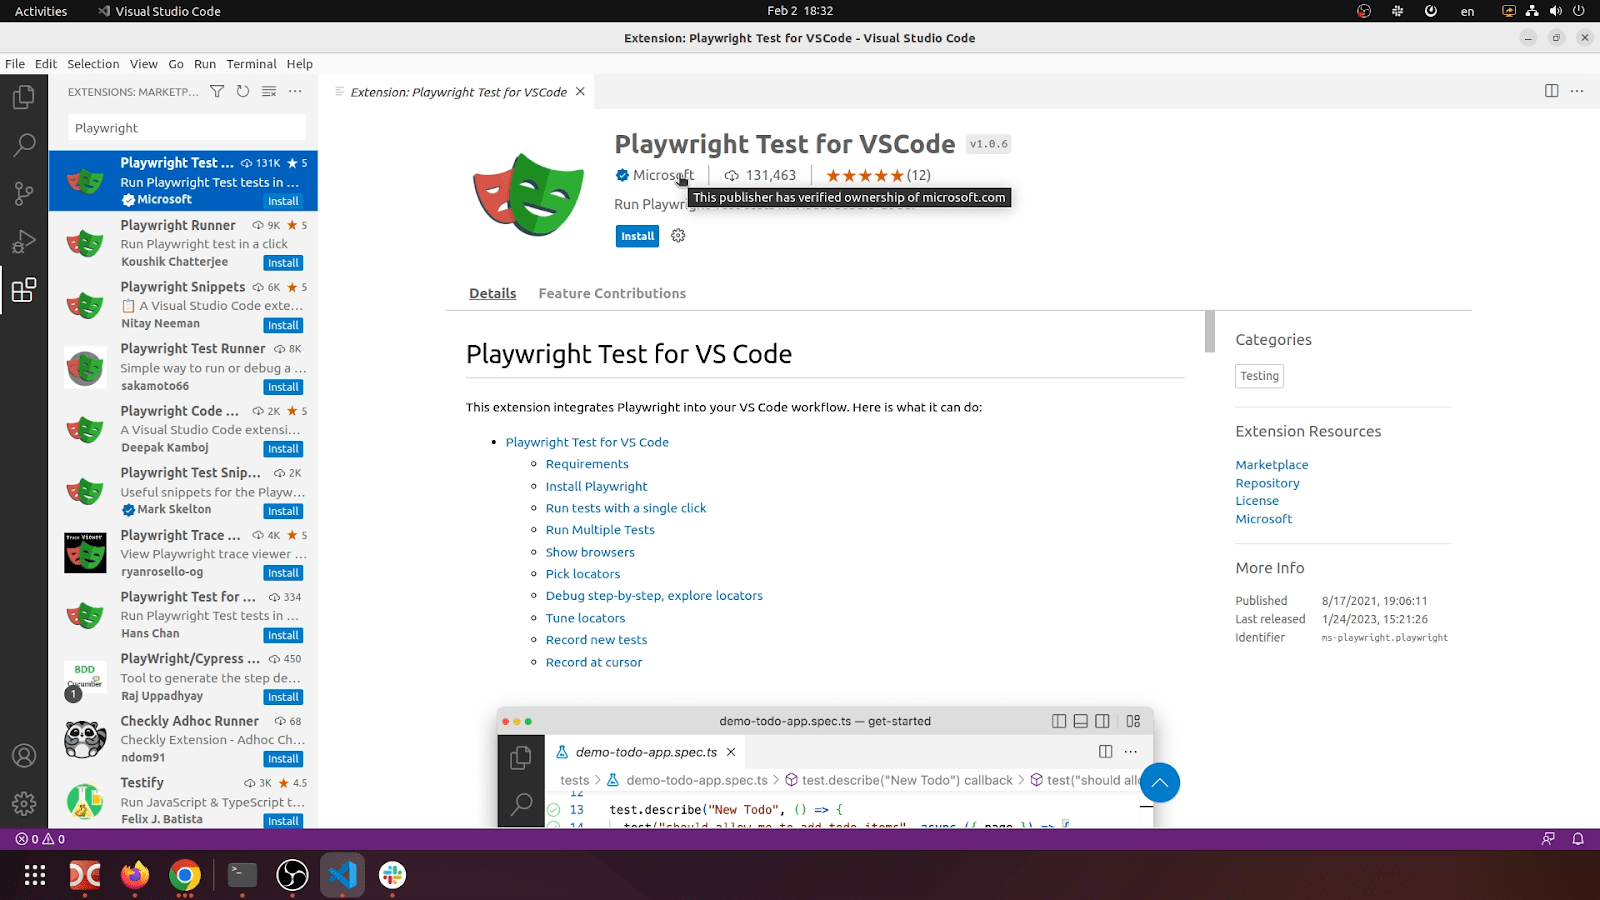
To write, record, debug and run new tests Playwright tool developers recommend using open-source Visual Studio Code IDE and install official Playwright extension from the VS Code marketplace. VS Code could be downloaded and installed from the official VS Code website for Linux, Windows or Mac OS systems. Install VS code to follow test examples in this article.
Windows or Mac OS systems. Install VS code to follow test examples in this article. Launch Visual Studio, click on the "Extensions" menu in the left tab of the IDE and search for "Playwright" extension. "Playwright Test for VS Code" is the official name of the Playwright extension from Microsoft. Press the "Install" button to proceed with installation of the Playwright extension. After the installation is finished, a new "Testing" menu will appear in the left tab. Now, VS Code is ready to work with Playwright tests. We can use two tests that Playwright has generated during installation and which we have placed in the "playwright" folder to show how to debug and run tests from Visual studio.
Running and debugging tests in the Visual Studio Code

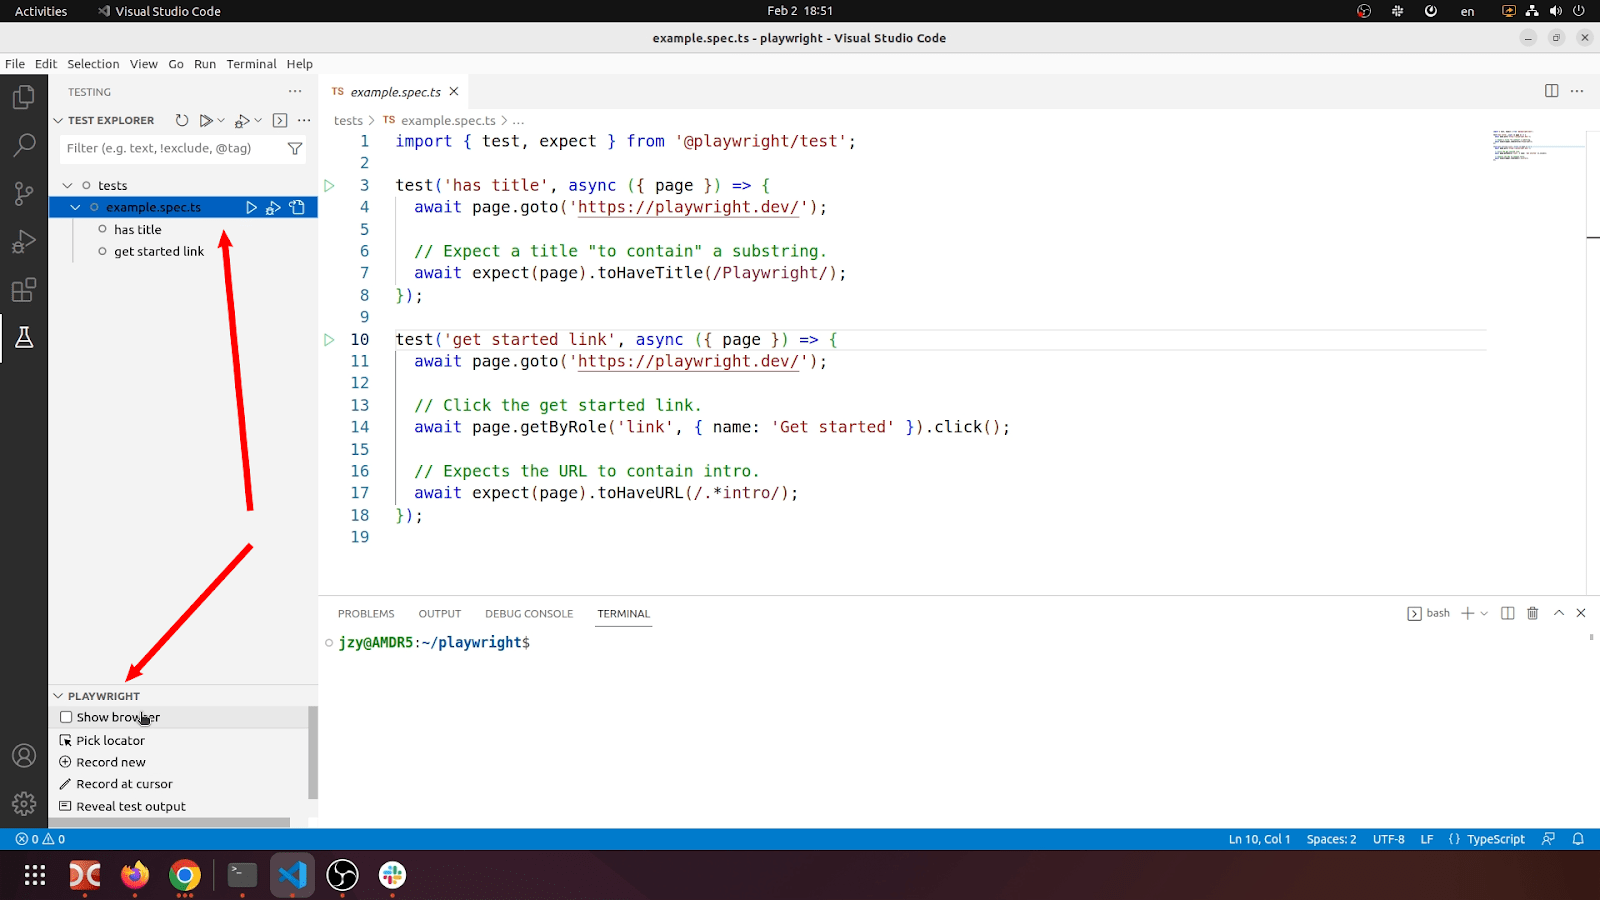
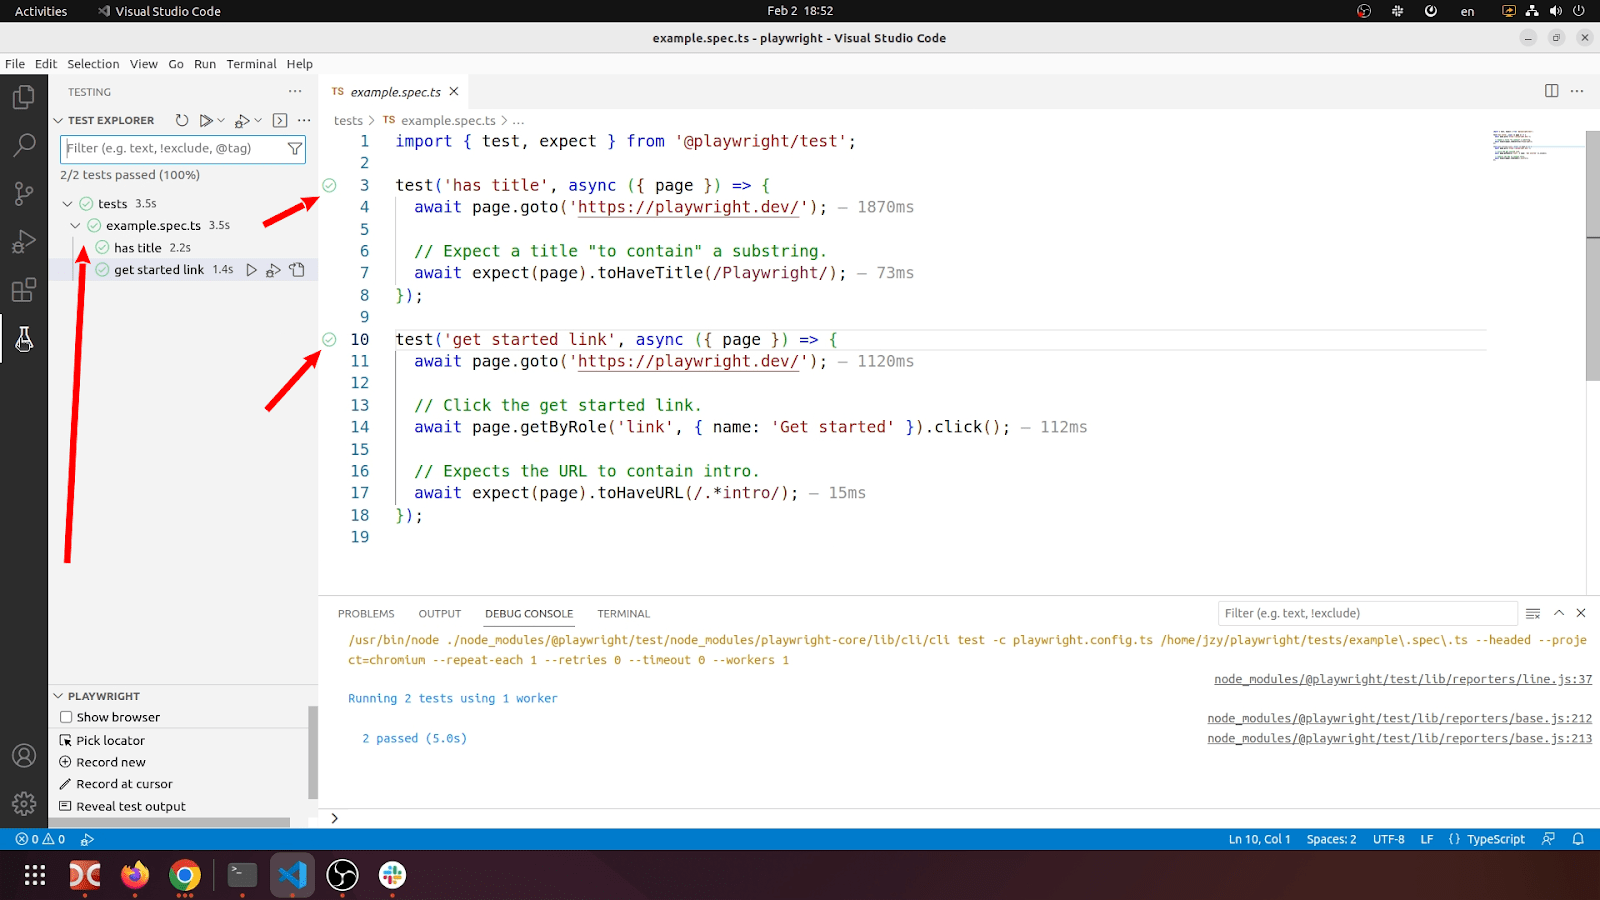
Open the "playwright" folder in VS Code and the default Playwright structure of the folder and files will be displayed. Let's open the "example.spec.ts" file – we can see 2 tests in it:'has title' and 'get started link'. Playwright extension allows you to run any of these tests by clicking the "Run" button from the left column near the rows numbers.
Open the "Testing" menu on the left bar of the VS Code, all the tests from the "tests" folder will be displayed in the "Test Explorer". This "Testing" menu displays main "Playwright" features for test execution: "Show browser" checkbox, "Pick locator", "Record new", "Record at cursor", "Reveal test output".
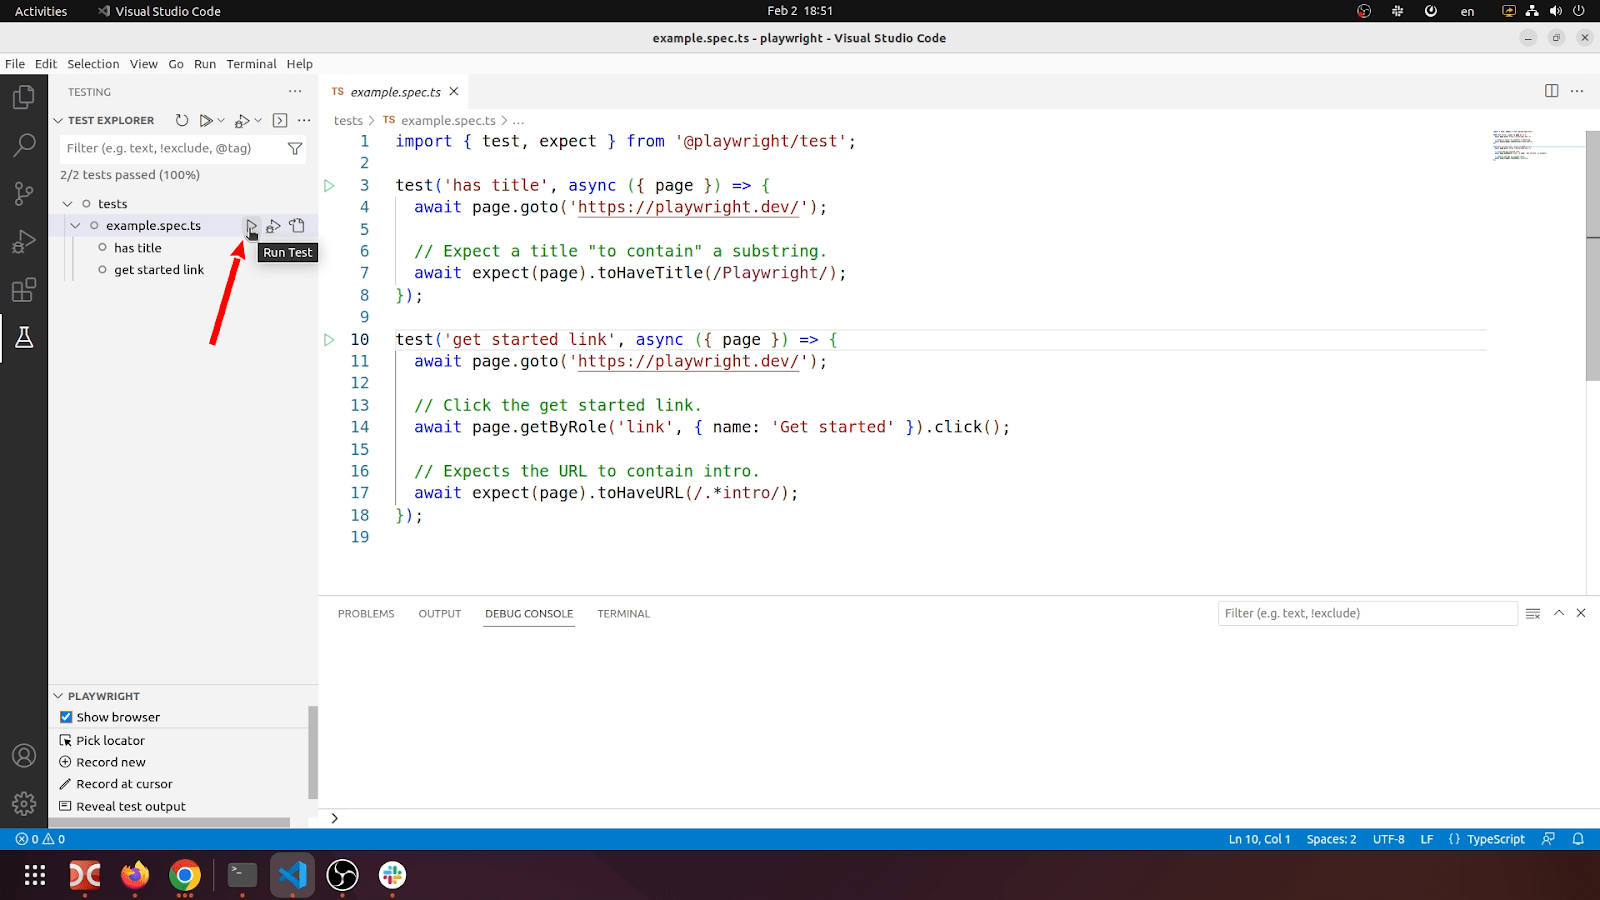
"Test Explorer" allows you to run and debug tests.
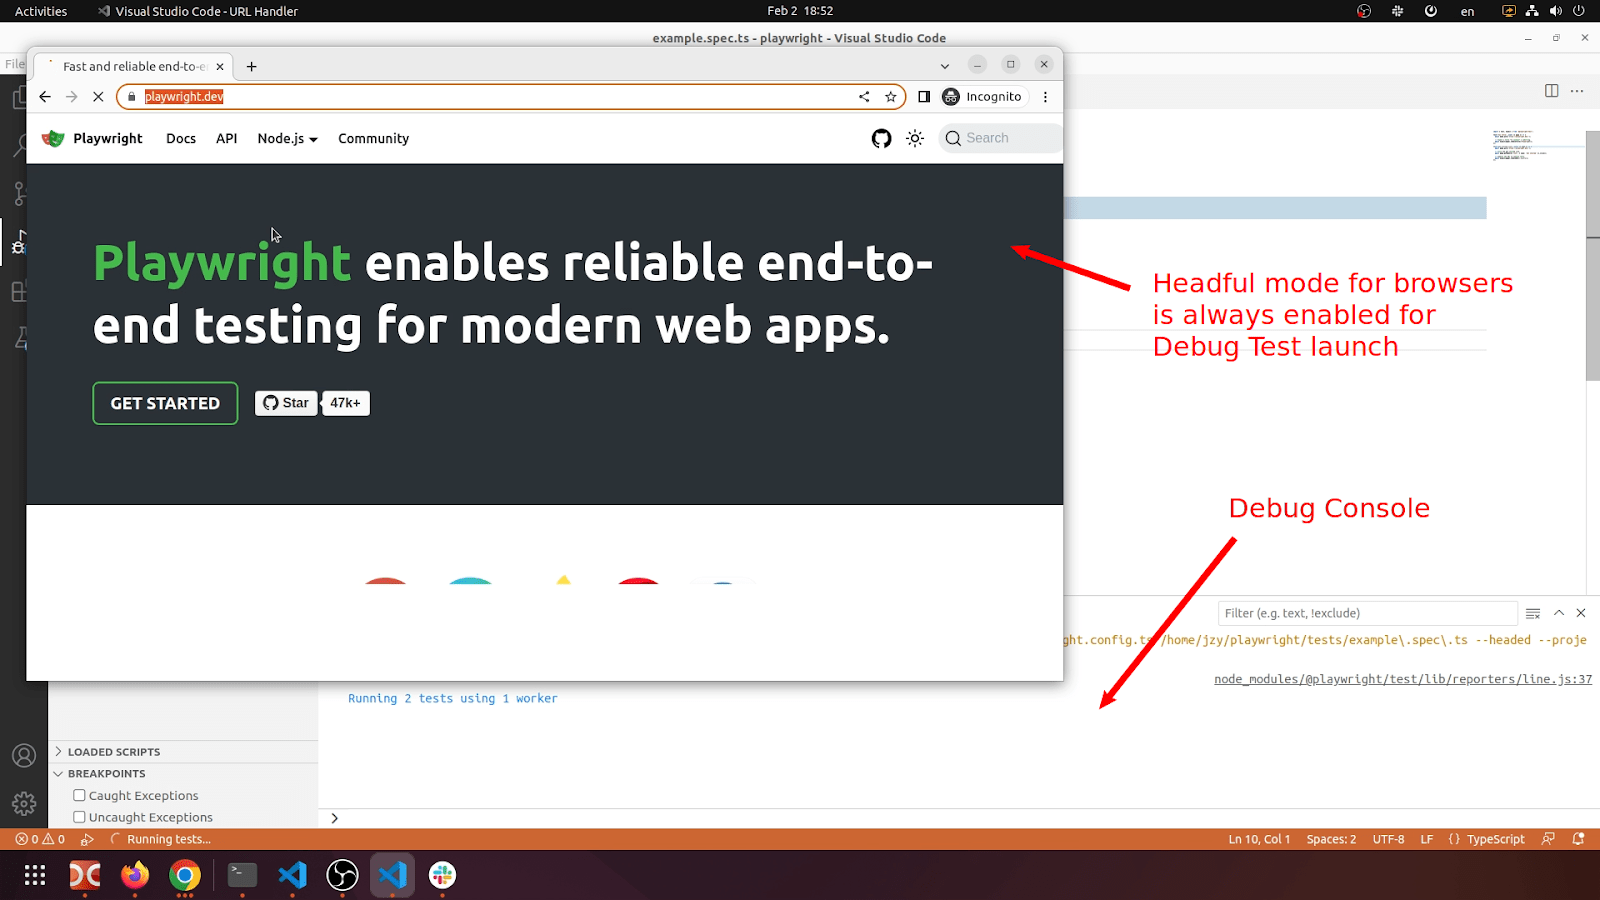
To start debugging, press the "Debug" button in the "Testing" menu. VS Code will start a debugging session for the test.
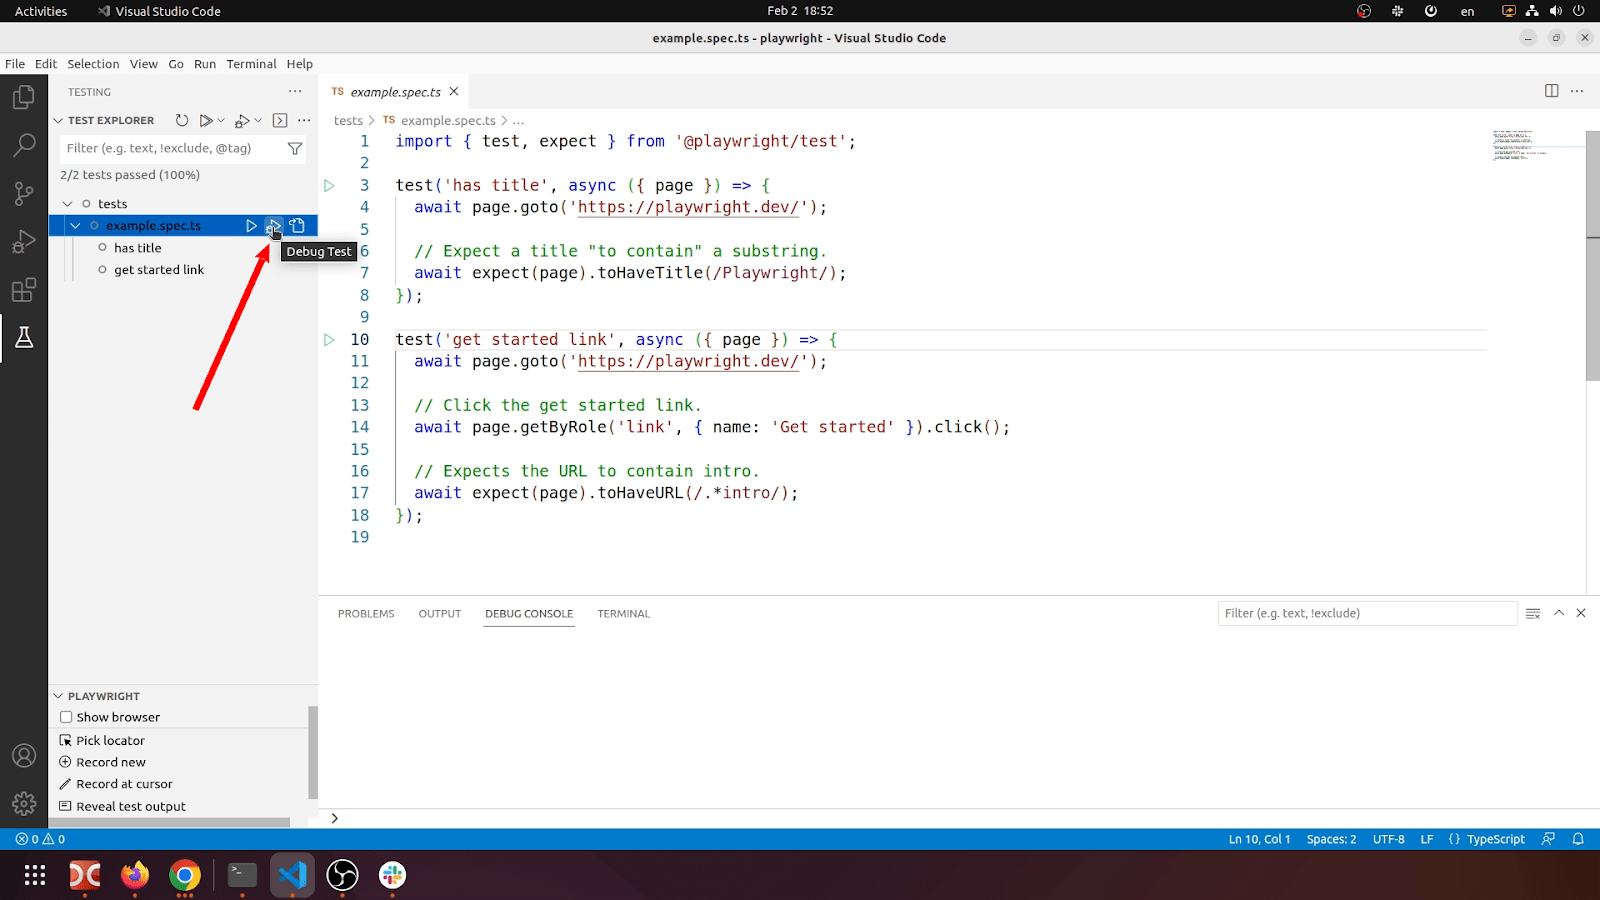
Headful mode is always enabled for browsers for Debug Test launch, even if you have disabled "Show browser" checkbox in the Playwright options sub-menu.
All passed tests will be marked with green checkboxes in the "Testing" menu.
Running and debugging tests in the Visual Studio Code are shown in the next video.
Installation of a web application for demo UI tests with Playwright
Let's try to write a few tests for a real web application. For this purpose we are going to use Mantis Bug Tracker (MantisBT) as a demo application. This application can be easily installed on the local host and used to practice your skills in writing tests in Playwright.
Actually, we are not going to write tests. We will record them mostly! Playwright includes an excellent test recorder, which considerably reduces time for writing code of tests, providing a very easy mechanism for searching for web elements locators and inserting them into the code of tests.
Install MantisBT following this video instruction.
After the installation, add the following string into the "config_inc.php" file which is located in the folder where you have installed Mantis:
$g_enable_email_notification = 'OFF';
Add this string in the email configuration section of the configuration file.
It will help you create new accounts without clicking the confirmation link in the email, sent to every new user.
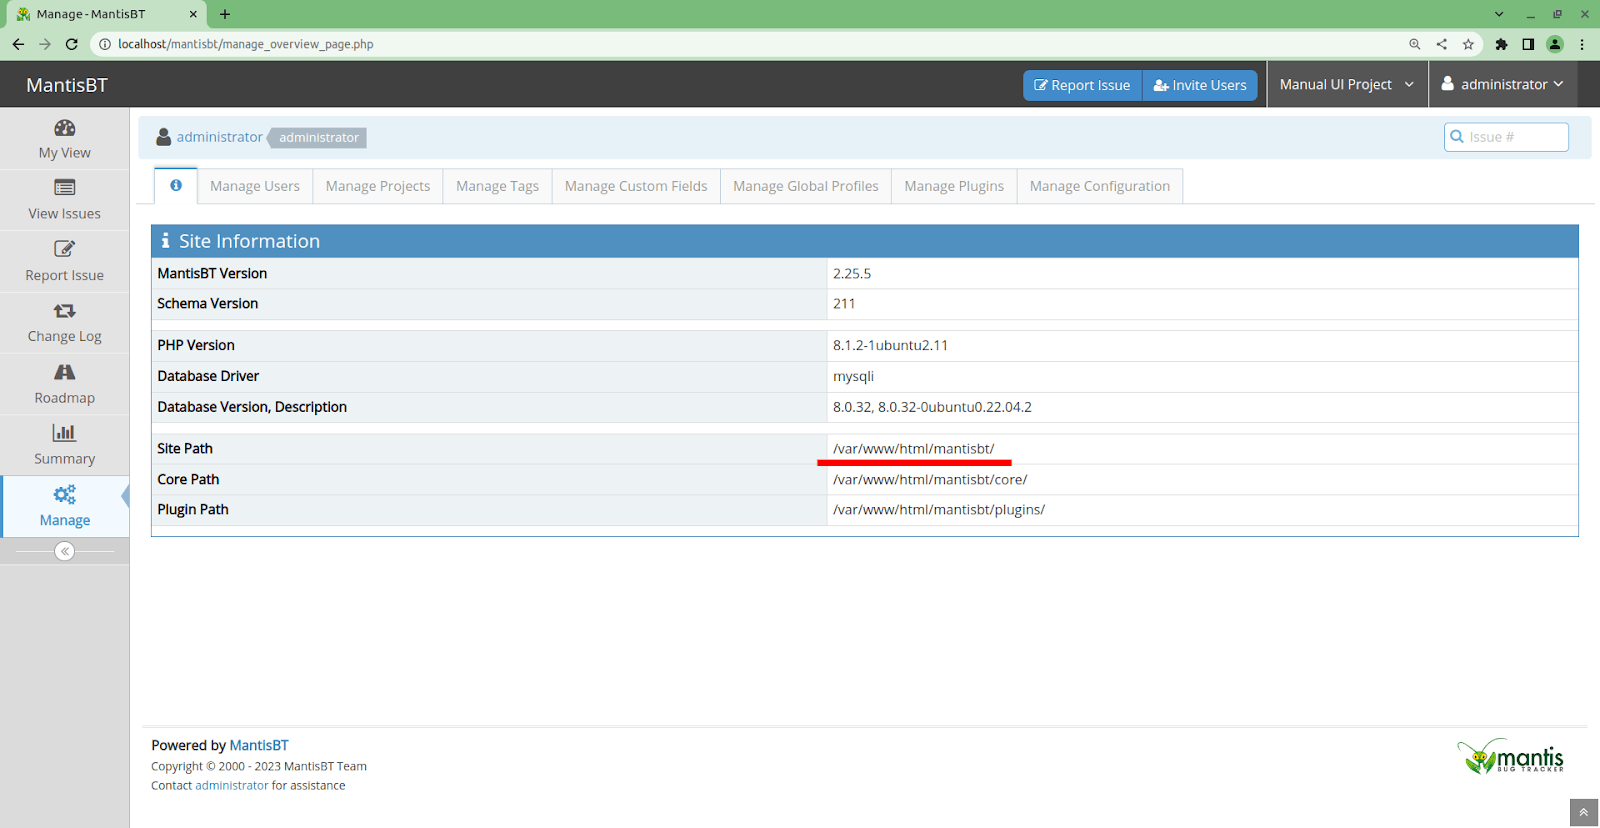
MantisBT installation site path could be found in Mantis. Click Manage – Site information:
Creation of a UI test with the Playwright test recorder
As it is declared above, Playwright gives us an opportunity to record interactions with a web application under a test using an internal test recorder and then to generate ready-to-run (or edit/refactor) code for tests. Let's create a first recorded test in Playwright for adding a new user with a developer role in the MantisBT application and verification that the created user will be able to login to Mantis.
In VS Code click on the "Record new" button in the "Testing" menu. Playwright will create a new "test-1.spec.ts" file with default 'test' and the message, that the "codegen" is started. "Codegen" is the core module of the Playwright Test Generator.
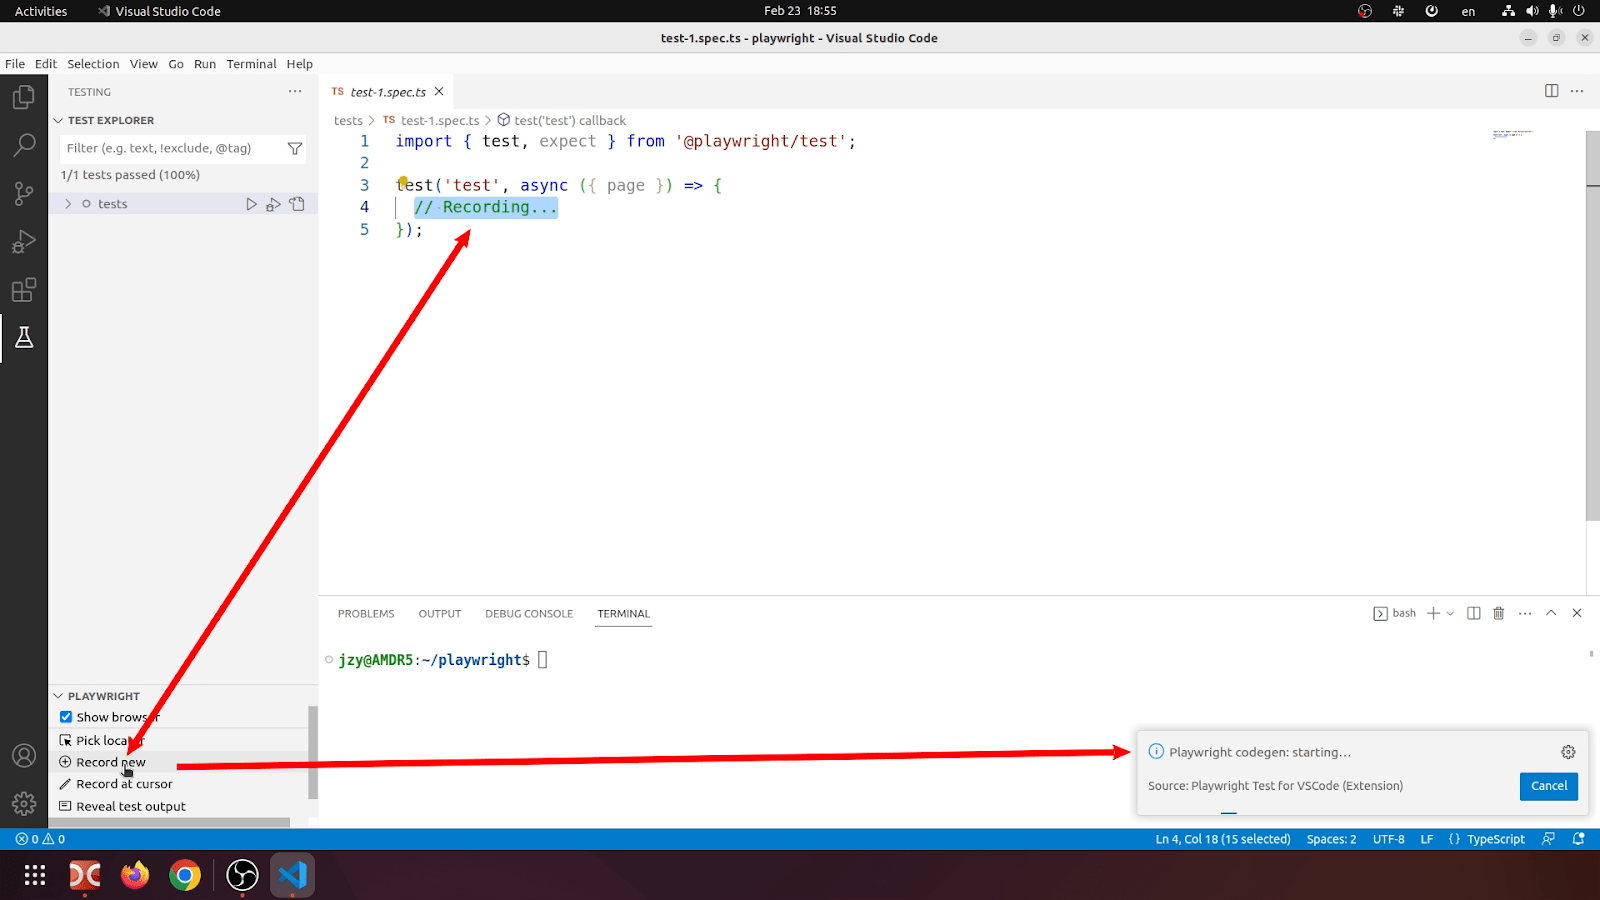
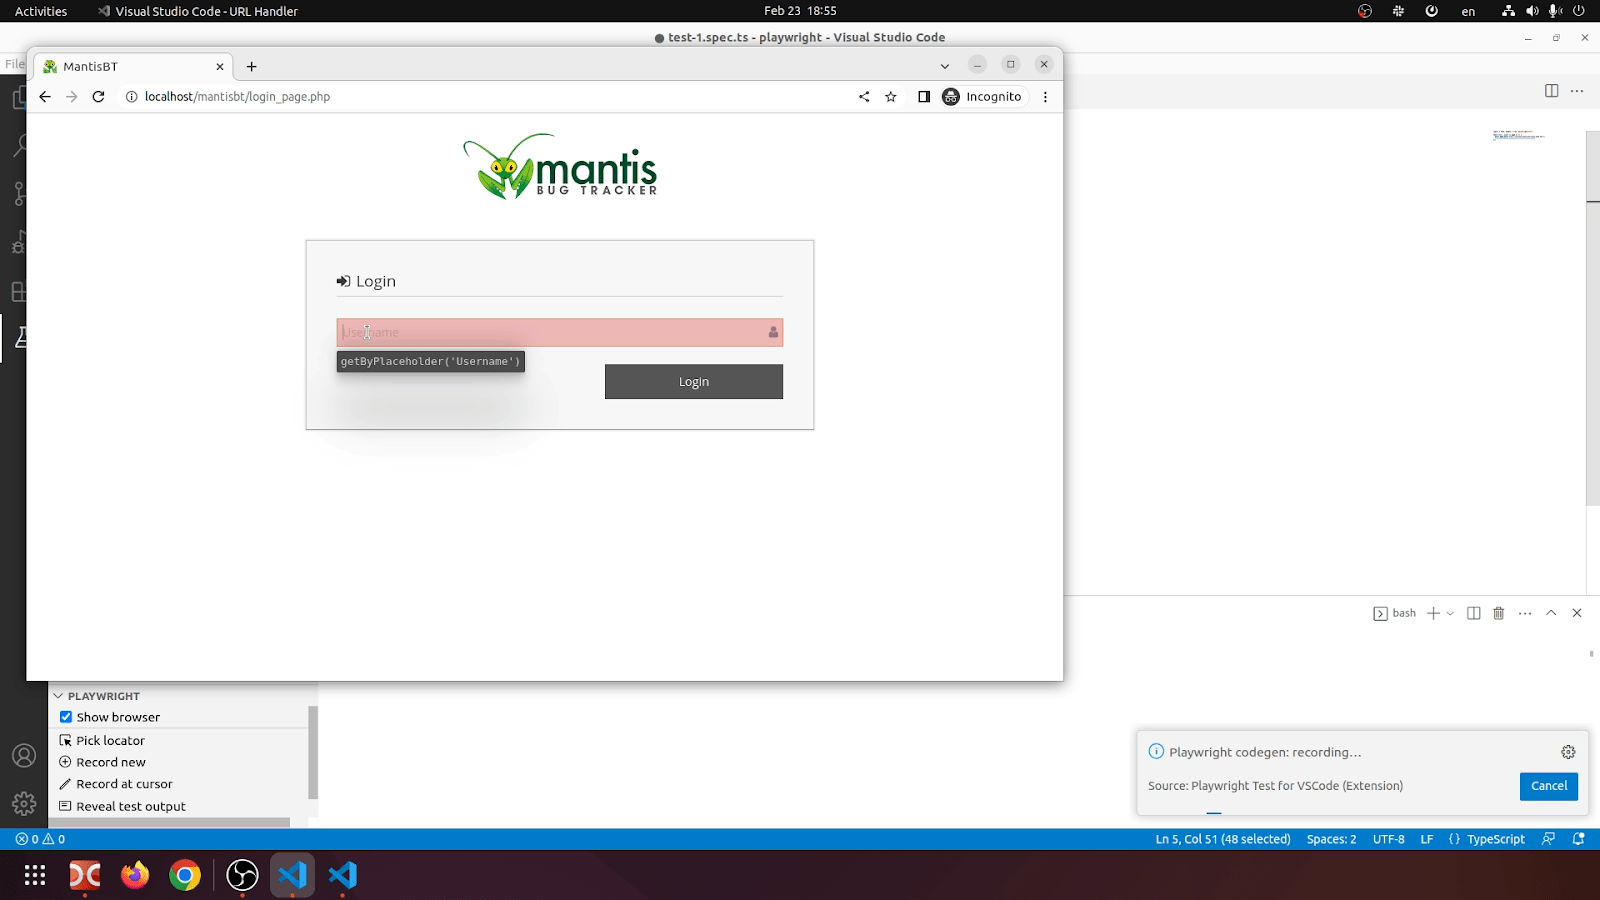
In a few moments Playwright will open the browser window (which you set up as default for the Playwright extension), and then you need to execute each step of the test scenario manually. Fortunately, we need to pass all the testing steps once only, and then, after recording is stopped, we will get a new recorded code for the test.
Open the MantisBT application in the browser tab and click into the "Username" field, which is highlighted with a pink color by the Playwright test recorder. Clicks on the web elements of the page return locators for all web elements you are working with and place them into the code of the test being recorded.
Authenticate in Mantis under the name of "administrator and the password which was defined during the installation of Mantis. After that navigate to the manage section and then to the manage users tab. Create a new user with the developer role, confirming the empty password.
After the new user is created, leave the application and authenticate in it again, but under a newly created user, using an empty password. Set up a new password in the user's account page and authenticate again in the application with the same user, using the created password. This is the use case. For the new user we set the name "developer1".
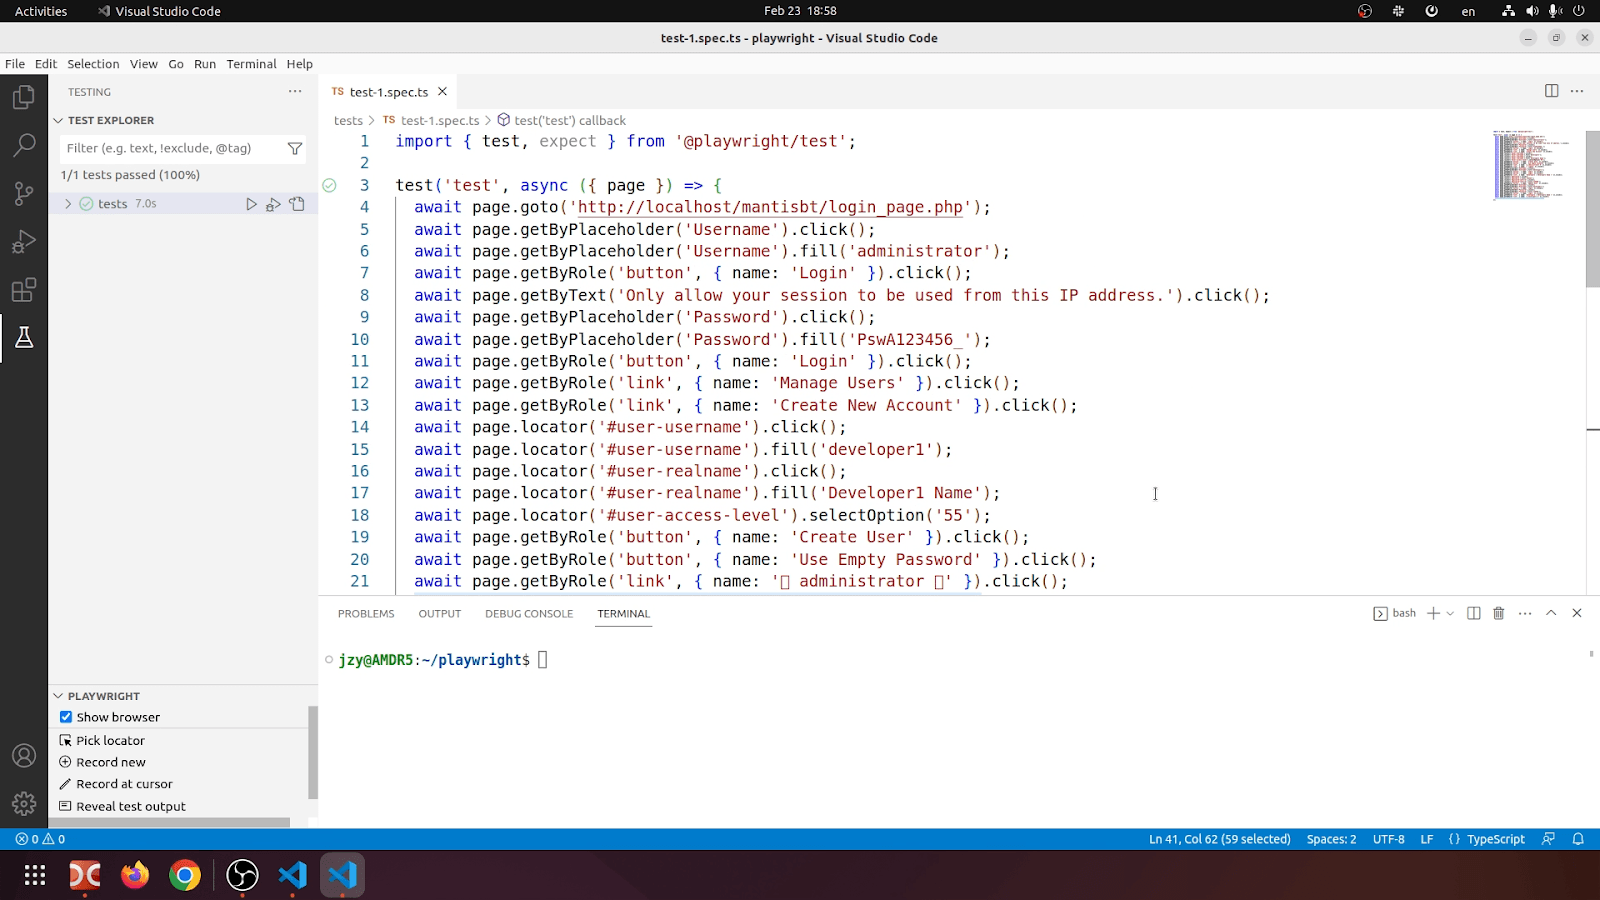
Now, we can close the browser window and stop the test recording using the "Cancel" button in the bottom right of codegen window.
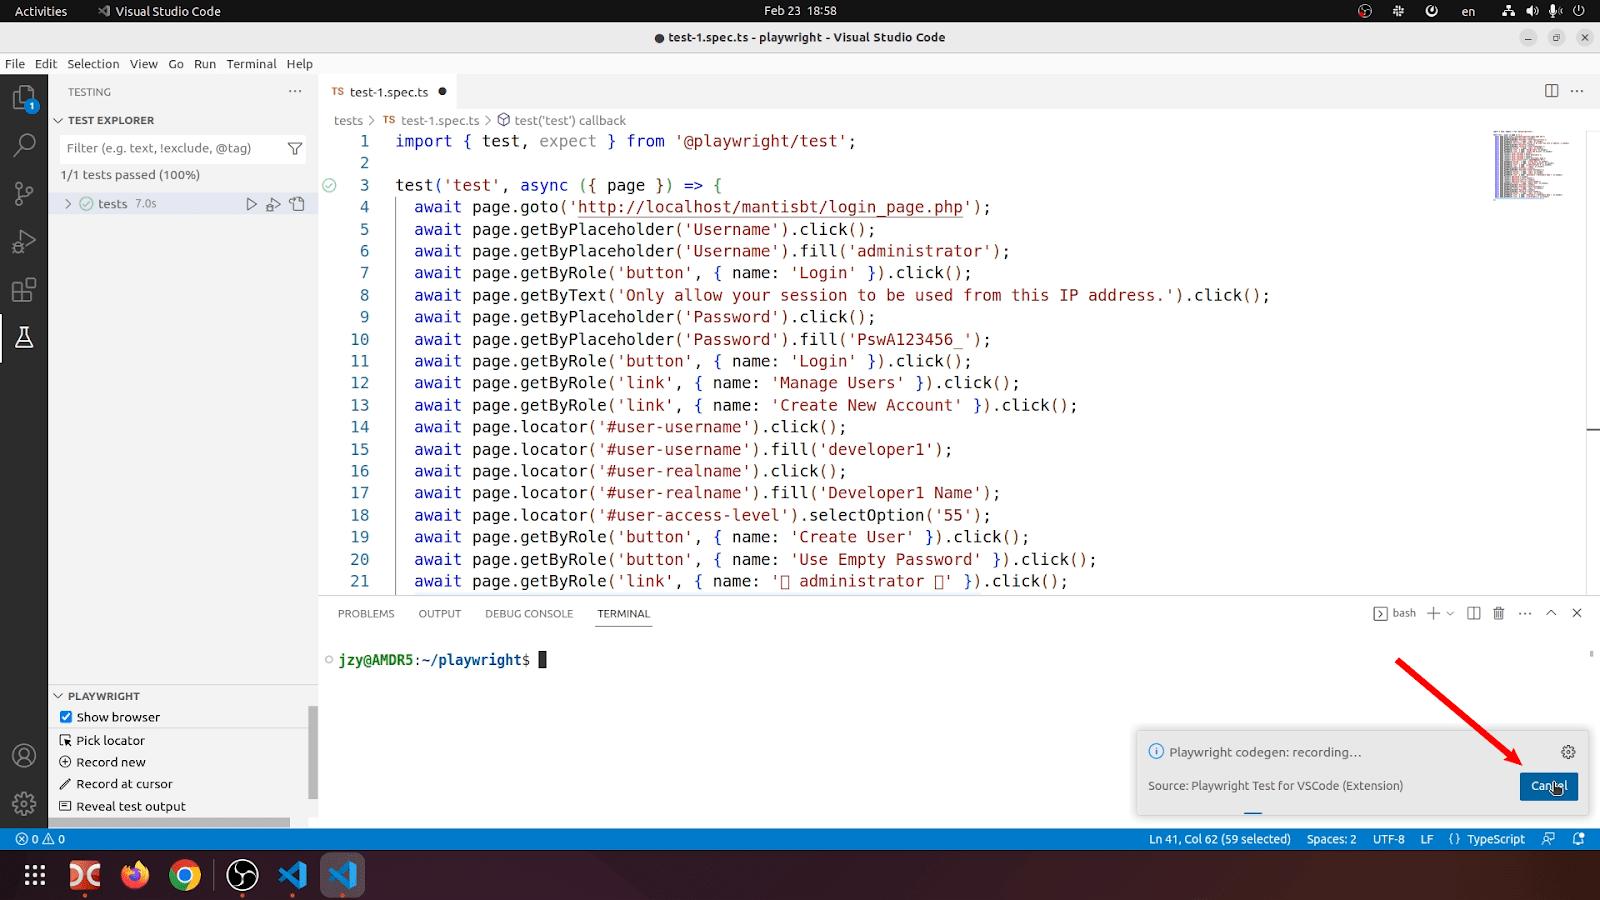
And finally, don't forget to select and click Save All in VS Code from the File menu. The recorded test code will look like in this screenshot:
All the steps of this test have been recorded in this video.
Running the recorded test in the Playwright
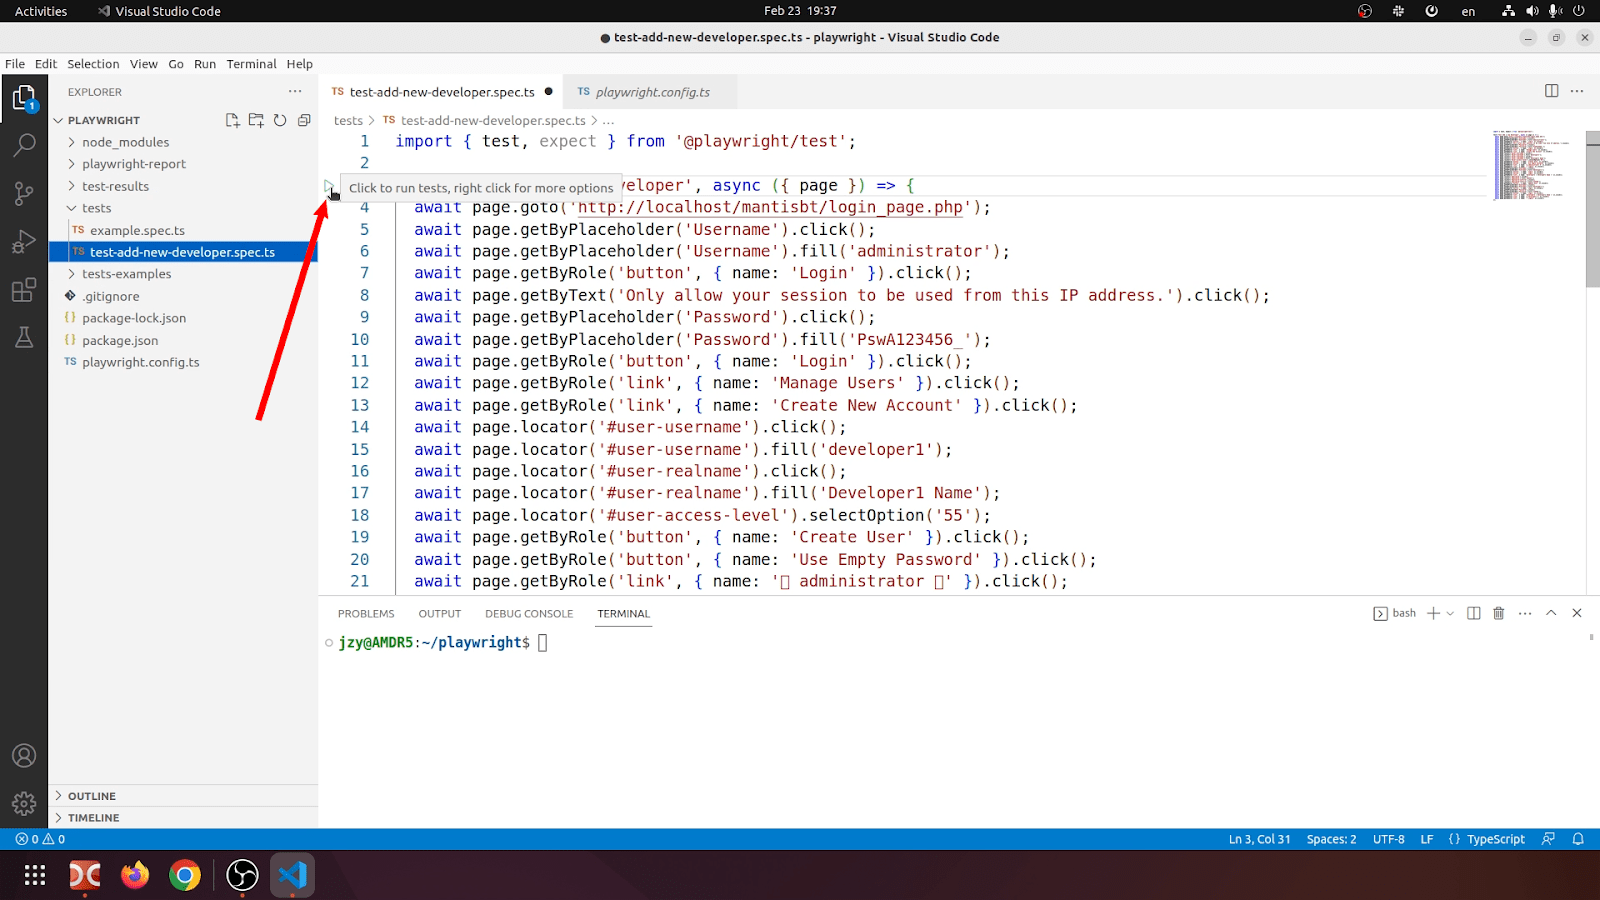
Let's try to run the recorded test. First, select "File Explorer" menu in VS Code, open "test-1.spec.ts" file, change 'test' to the 'Test Add a new Developer' title in the code, rename file in "File Explorer" to the "test-add-new-developer.spec.ts". Then open "playwright.config.ts" and set the following parameter in it:
trace: 'on', //'on-first-retry'
This option allows you to track all steps of the test during recording into the special archive which can be viewed or investigated afterwards using "show-report" command:
npx playwright show-report
Tracking the test code will help you greatly in debugging and checking the execution of each test code line. Don't forget to save all changes.
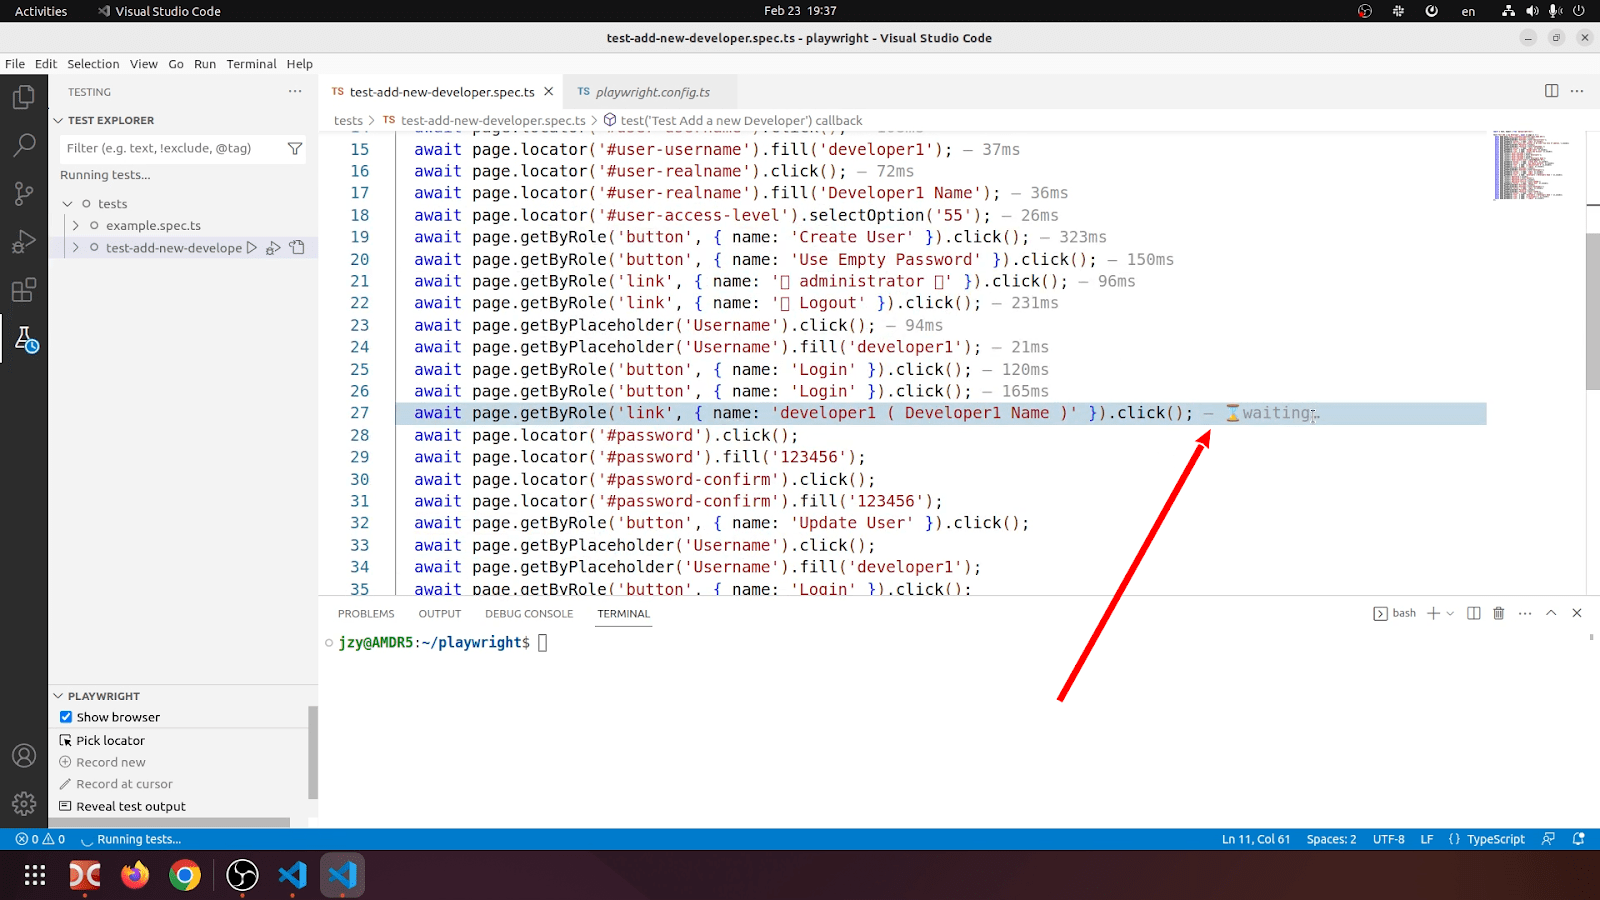
Open again the "test-add-new-developer.spec.ts" file and press the "Run" button in the left column near the rows numbers.
As we have already created the "developer1" user, MantisBT returns an error during the test run, that's why the steps where a new user has the empty password can't be passed. As a result test execution is frozen on this line:
await page.getByRole('link', { name: 'developer1 ( Developer1 Name )' }).click();
npx playwright show-report
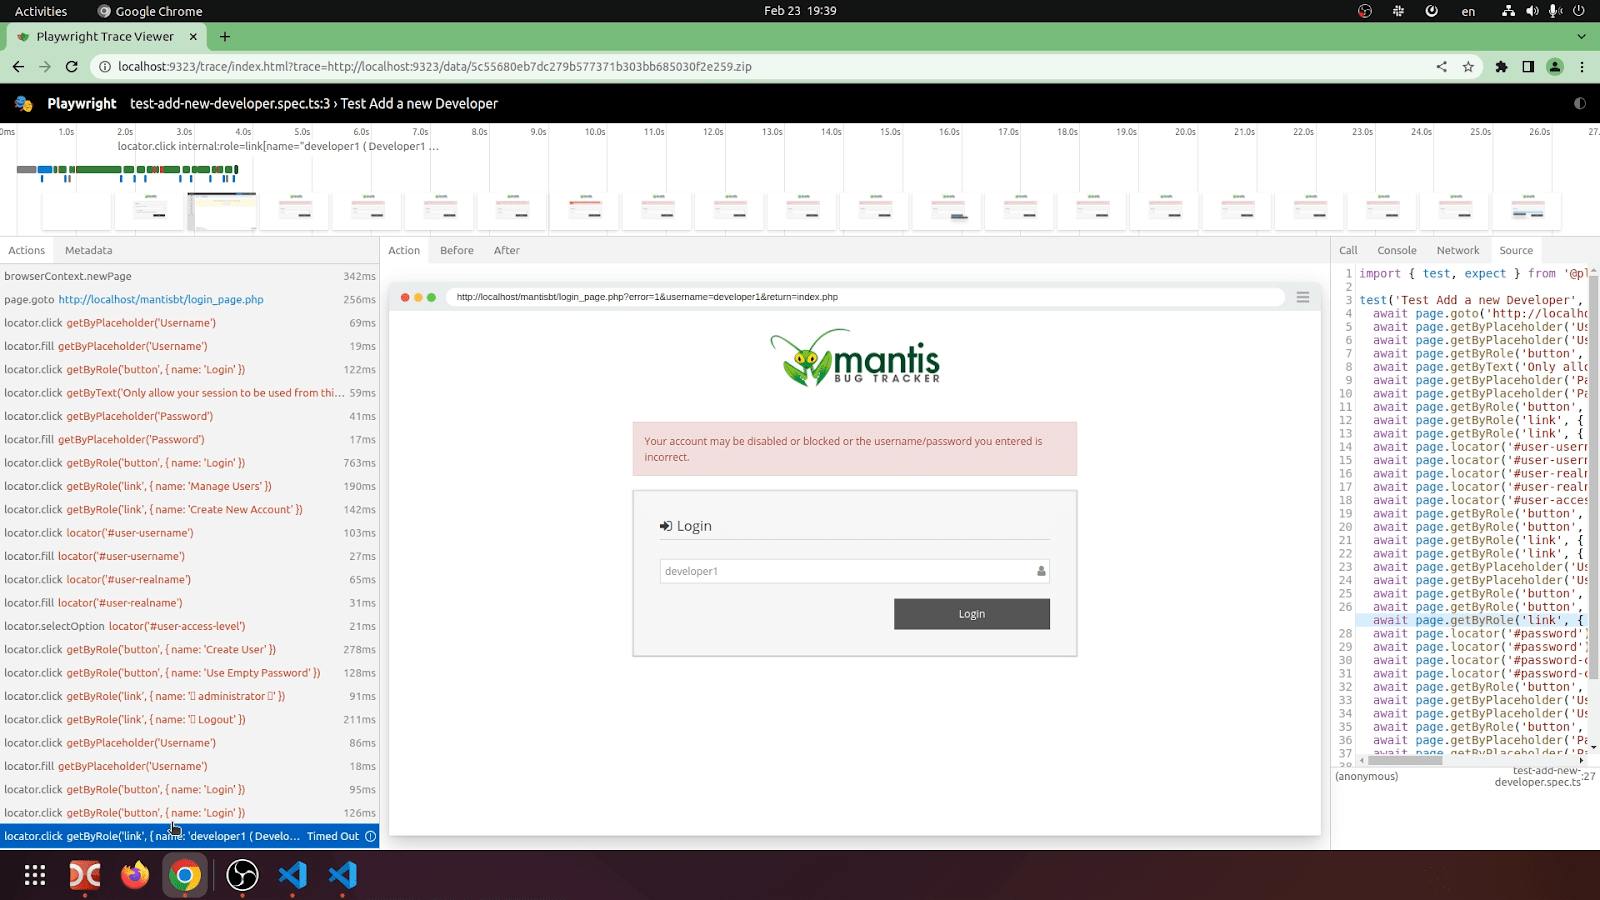
Test trace details will show, all the steps executed and error message, that the "developer1" user already exists:
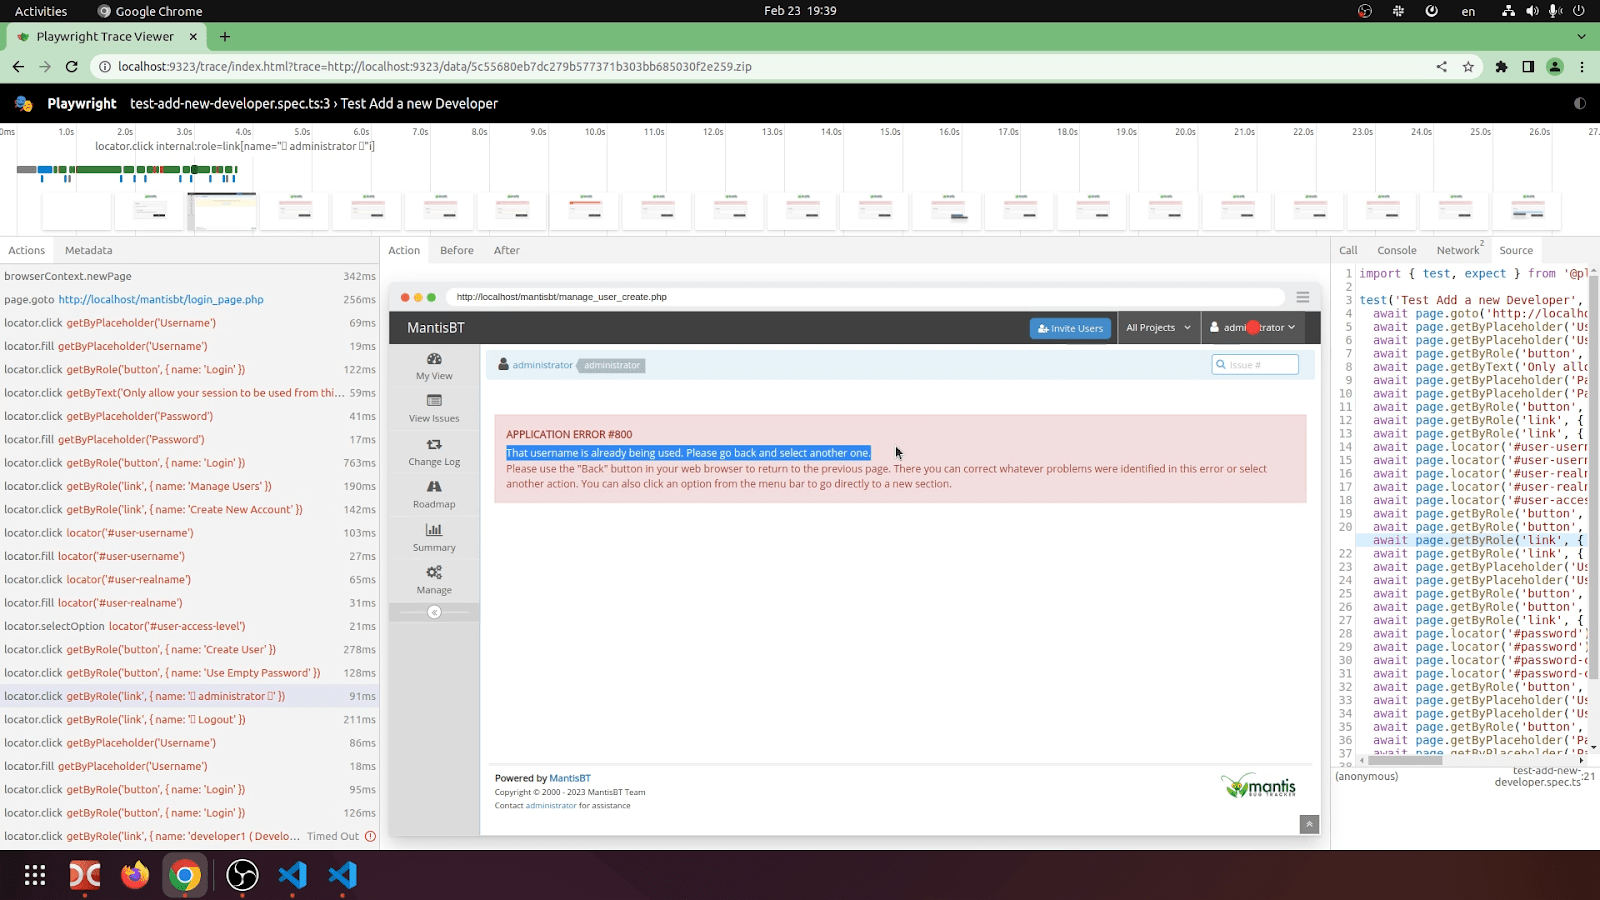
The last recorded line from the test is the line where "developer1" cannot login with the empty password.
Let's fix this recorded test to create a user with a unique name. We need to replace "developer1" to "developer2" string in the "test-add-new-developer.spec.ts" file using VS Code. Use "Edit" – "Replace" – "Replace All" operation to make the replacement and save the changed file. Run again the 'Test Add a new Developer' test and it will pass. Now, we need to refactor this test code to get an opportunity to create a new "developer" user without any manual "Replace All" operations.
All steps to run recorded test are shown in this video
Parametrization of the tests with the help of the .env file
This small part explains why we need to use the .env file with Playwright. In most cases we need to parametrize tests in code refactoring. For example, in this article we start our test on the localhost URL, but in reality there can be a lot of testing environments, hosted on remote servers with real IP addresses or domain names. So, it is better to use environment variables for server host, URLs, logins, passwords, etc, for their subsequent use in the code of tests. That is why the .env file is intended to store all of these environment variables in one place.
Playwright works with environment variables from .env file and we simply need to do these two steps:
Open terminal, change directory to the "playwright" folder, and run this npm command:
npm install dotenv –save
Open "playwright.config.ts" file in VS Code, uncomment the following string and then click Save All Files entry:
require('dotenv').config();
Now, we are ready to proceed with the test code refactoring.
Refactoring code of the 'Add a new Developer' test
Let's change some default preferences in the "playwright.config.ts" file. First, let's change the maximum timeout for one test:
/* Maximum time one test can run for.*/
timeout: 120 * 1000,
Second, let's increase timeout value during which the test should wait for the condition to be met:
expect: {
    /* Maximum time expect() should wait for the condition to be met.
    *  For example in `await expect(locator).toHaveText();`
    */
    timeout: 10000
},
As it's described above, create a new .env file in the default "playwright" folder and paste these variables there:
MANTISBT_URL='http://localhost/mantisbt/'
MANTISBT_LOGIN_PAGE='login_page.php'
MANTISBT_ADMIN_LOGIN='administrator'
MANTISBT_ADMIN_PASS='PswA123456_'
MANTISBT_DEVELOPER_PASS='123456′
They are the values used in the test. Сhange MANTISBT_URL, MANTISBT_ADMIN_PASS, MANTISBT_DEVELOPER_PASS variables, if you use different ones for your MantisBT installation and refactored test code file.
Our goal is to refactor the previous "test-add-new-developer.spec.ts" file so that we would be able to run the test multiple times with environment variables from the .env file. In the demo for this article, we don't plan to use complex object-oriented programming (OOP) structure in the refactoring, but in most cases using OOP architecture is highly recommended for automation with Playwright. It often happens in real testing projects. Let's describe the main sections of code in the new file "test-add-new-developer-refactored.spec.ts".
- Import of external modules for Playwright tests
import { test, Page, expect } from '@playwright/test';
- Import of environment variables from the .env file into Typescript constants:
// Read environment variables from .env file
const {
    MANTISBT_URL: URL = ",
    MANTISBT_LOGIN_PAGE: LOGIN_PAGE = ",
    MANTISBT_ADMIN_LOGIN: ADMIN_LOGIN = ",
    MANTISBT_ADMIN_PASS: ADMIN_PASS = ",
    MANTISBT_DEVELOPER_PASS: DEVELOPER_PASS = ",
} = process.env
- Configuration of the enclosing scope of the test run. The test will be run in 'serial' mode, in a serial sequence. By default, Playwright runs the test in 'parallel' mode.
test.describe.configure({mode: 'serial'})
- Declaration of a variable for the Page object and definition of 2 constants to store "developerName" and "developerFullName" as absolutely new values for every test run using Unix time timestamps in both constants.
let page: Page;
const developerName = 'developer-' + Date.now();
const developerFullName = developerName + '-Name';
- Standard test.beforeAll test hook. This code will be run before all tests once only. Creates browser object and opens page (tab) in the browser with login page on the specified host URL:
test.beforeAll(async ({ browser }) => {
    page = await browser.newPage();
    await page.goto(URL + LOGIN_PAGE);
});
- Main test code. In this code we have removed some unnecessary blocks, which were received during test recording, added "console.log" method, replaced authorization values to environment variables from the .env file, and added the "expect" method to check the final step condition in the test. It is "very soft" refactoring, we have left the similar code which could also be refactored to eliminate it. Additionally, check, that your default encoding for the** "test-add-new-developer-refactored.spec.ts"** file is set to UTF-8, cause MantisBT developers use some Unicode special characters, which are displayed incorrectly in VS Code as □ symbol, but recorded without any problem in Test Recorder (Generator).
test('Test Add a new Developer Refactored', async () => { await page.getByPlaceholder('Username').fill(ADMIN_LOGIN); await page.getByRole('button', { name: 'Login' }).click(); await page.getByText('Only allow your session to be used from this IP address.').click(); await page.getByPlaceholder('Password').fill(ADMIN_PASS); await page.getByRole('button', { name: 'Login' }).click(); await page.getByRole('link', { name: 'Manage Users' }).click(); await page.getByRole('link', { name: 'Create New Account' }).click(); console.log('Developer name:' + developerName); await page.locator('#user-username').fill(developerName); await page.locator('#user-realname').fill(developerFullName); await page.locator('#user-access-level').selectOption('55'); await page.getByRole('button', { name: 'Create User' }).click(); await page.getByRole('button', { name: 'Use Empty Password' }).click(); await page.getByRole('link', { name: ' administrator ' }).click(); await page.getByRole('link', { name: ' Logout' }).click(); // Login with developerName await page.getByPlaceholder('Username').fill(developerName); await page.getByRole('button', { name: 'Login' }).click(); // Empty password here await page.getByRole('button', { name: 'Login' }).click(); const developerTopLink = developerName + ' ( ' + developerFullName + ' )' await page.getByRole('link', { name: developerTopLink }).click(); await page.locator('#password').fill(DEVELOPER_PASS); await page.locator('#password-confirm').fill(DEVELOPER_PASS); await page.getByRole('button', { name: 'Update User' }).click(); // Login with developerName and Password* await page.getByPlaceholder('Username').fill(developerName); await page.getByRole('button', { name: 'Login' }).click(); await page.getByPlaceholder('Password').click(); await page.getByPlaceholder('Password').fill(DEVELOPER_PASS); await page.getByRole('button', { name: 'Login' }).click(); await page.getByRole('link', { name: developerTopLink }).click(); await page.getByRole('link', { name: ' ' + developerName + ' ' }).click(); await page.getByRole('link', { name: ' Logout' }).click(); // Display message with show-report command in console console.log('Copy and paste to show test report: npx playwright show-report') // Finally, expect for Login button is visible expect(page.getByRole('button', { name: 'Login' })).toBeVisible; });
- Standard test.afterAll test hook. This code will be run once only after all tests. It closes page object, so browser object will also be closed, if we have single page object only:
test.afterAll(async () => {
    await page.close();
});
After you finish editing the "test-add-new-developer-refactored.spec.ts" file, don't forget to save all changes. Now we can run this test multiple times and every time the test will pass, because a new developer with a unique name will be created for each test run. Press the "Run" button for 'Test Add a new Developer Refactored' test. Run this test twice, then in the "Testing" menu in VS Code click on the "Reveal test output" sub-menu to view all "stdout" output messages that we sent in our test using "console.log" method. These values are similar to:
Developer name:developer-1677239757968*
Copy and paste to show test report: npx playwright show-report*

Last message will help us copy and paste the Playwright command to show a test run report. Paste this command to the "bash" section of Terminal windows in VS Code to view the test report.
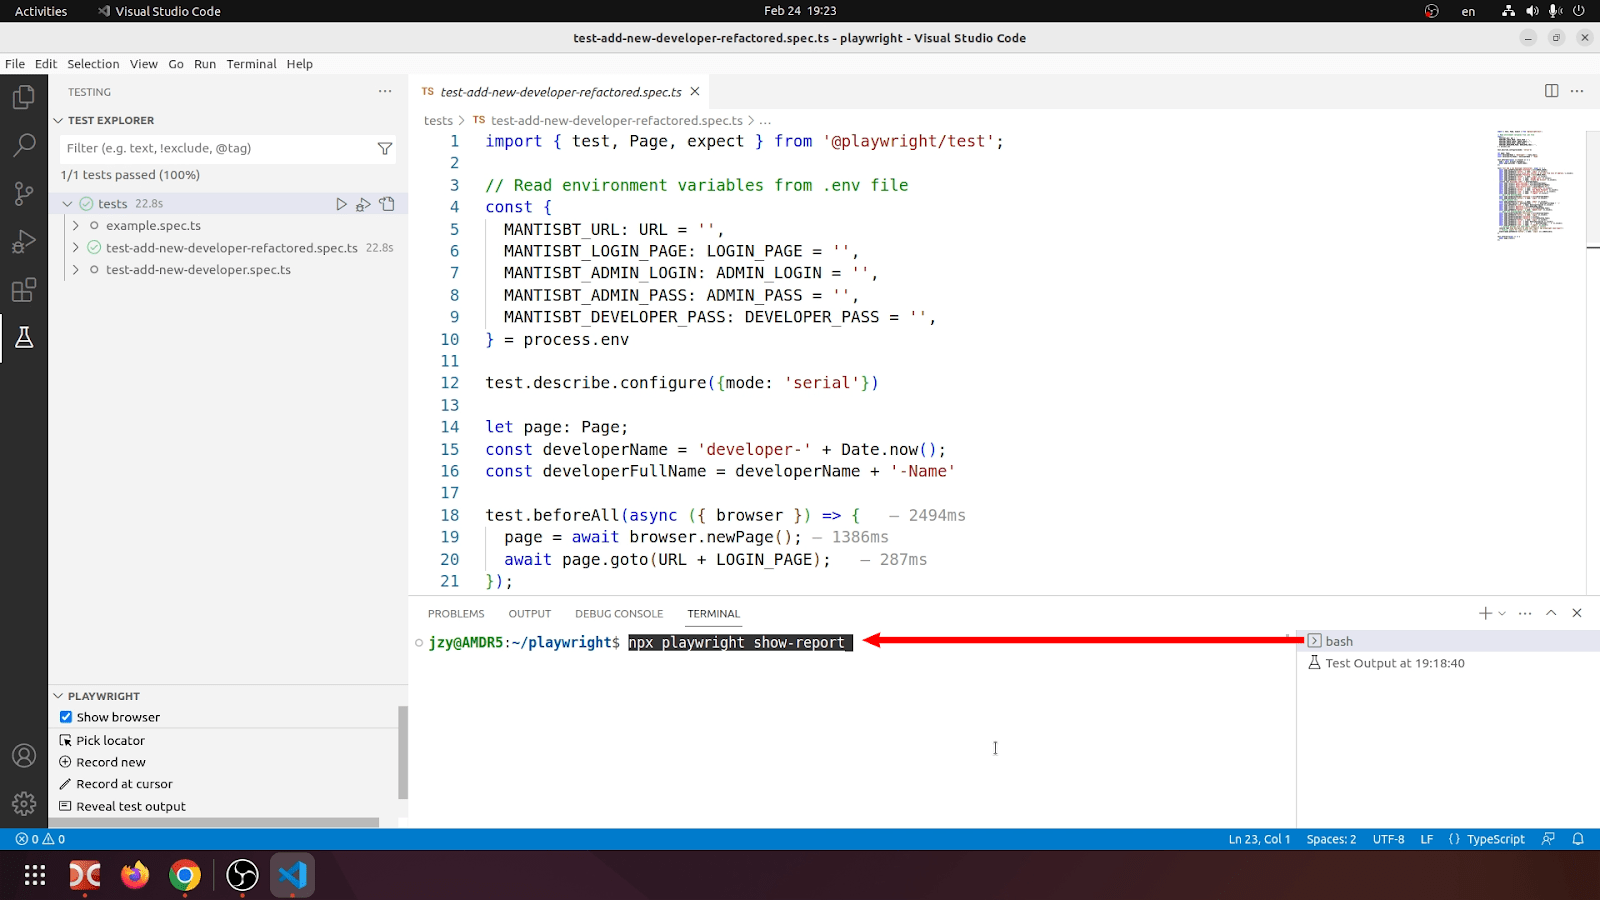
Playwright opens the report with a recorded trace of test steps, where we can see all of them.
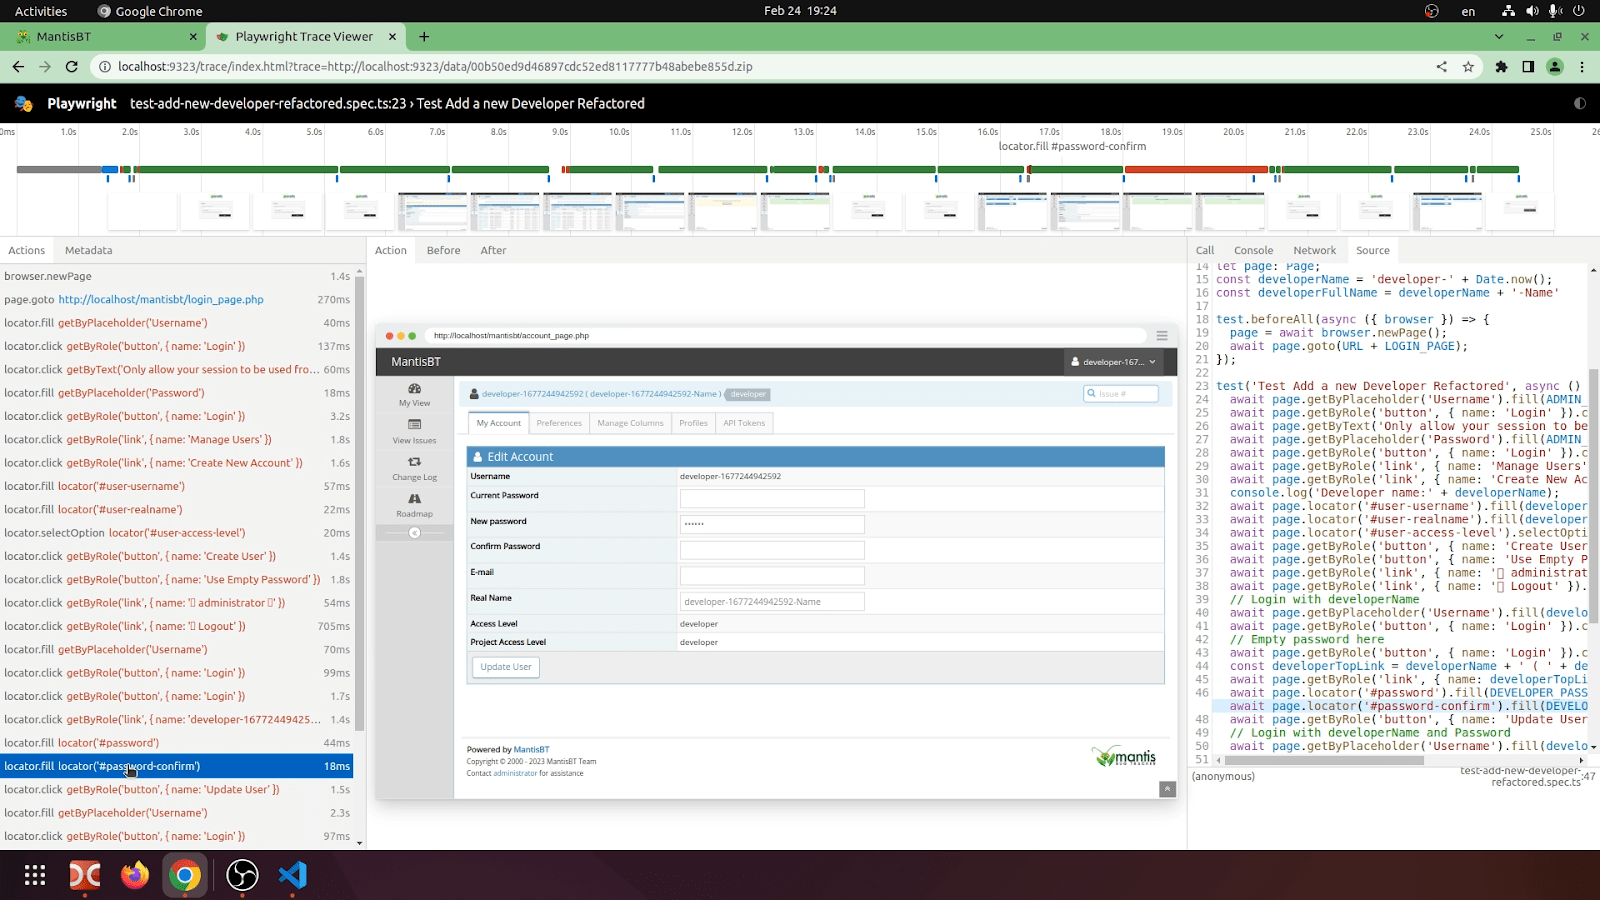
To check that all new "developers" have been created with 'Test Add a new Developer Refactored', authorize with "administrator" username and open the "Manage Users" tab to view all users of MantisBT.
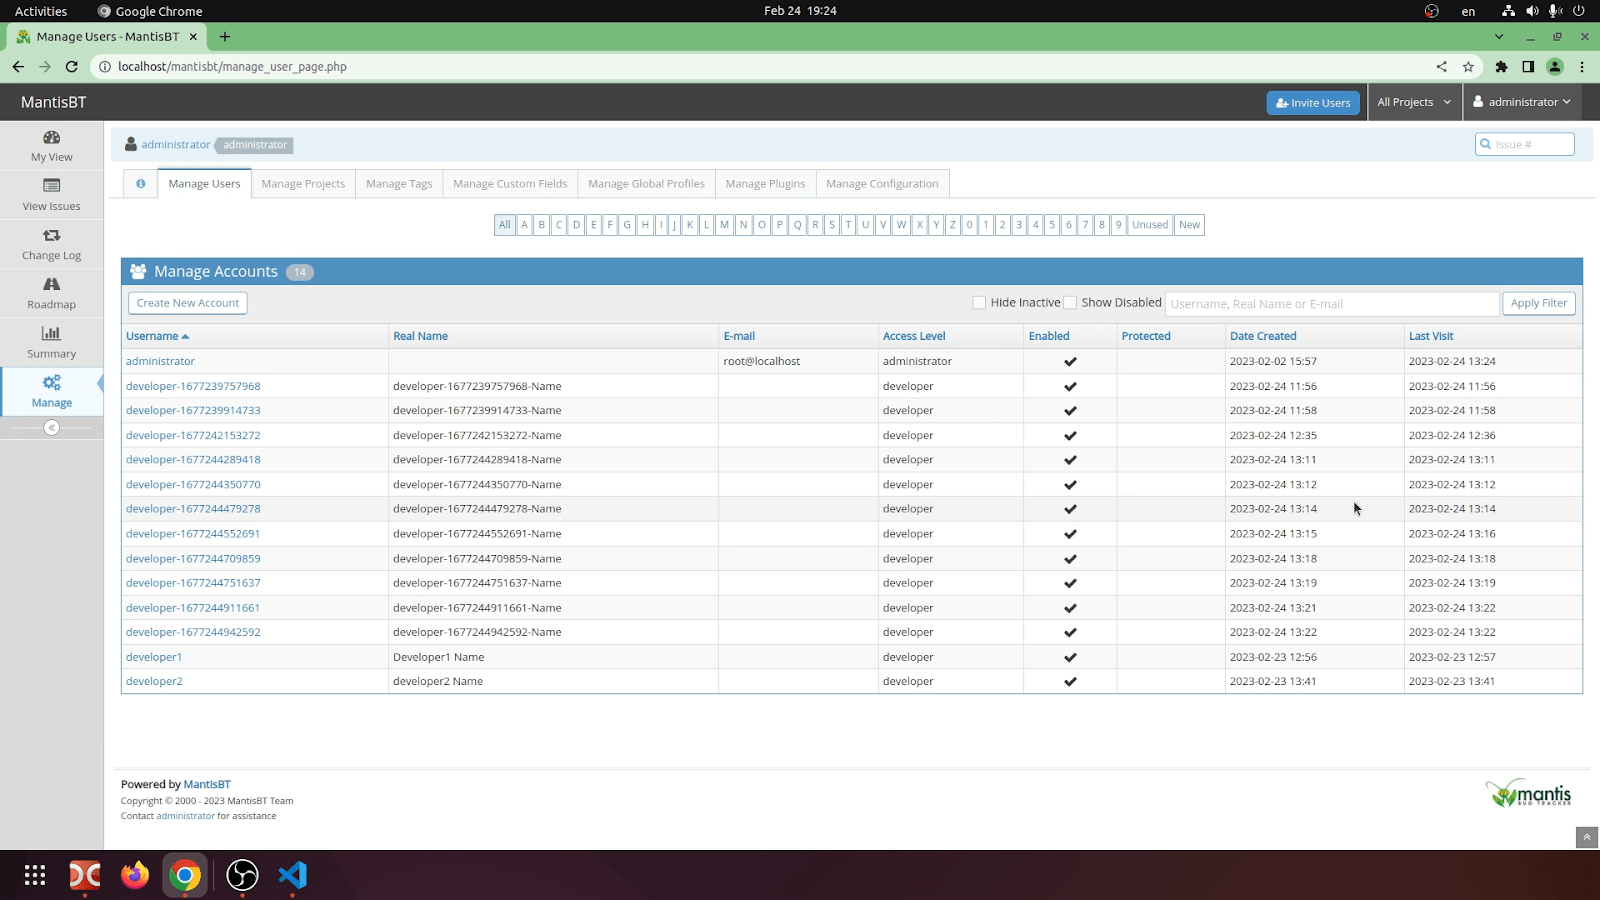
All details for 'Test Add a new Developer Refactored' run are available in this video.
Creation of the test for adding a new project and assigning it
to a user
As we can see "Test Add a new Developer Refactored" code could be executed multiple times. As a result many developers will be added with unique "developerName" and "developerFullName" values. It is not a good practice to leave some working data after a test finishes. So, in this part let's create another test for Playwright in which"administrator" adds a new Project to MantisBT and assigns it to the predefined "developer2" user, then "developer2" checks that the new project is assigned and, finally, "administrator" deletes the project from MantisBT. As a result, after this test finishes, the MantisBT database won't have any data created during test execution.
Let's record this test again using the Playwright Test Generator in VS Code. These are the main steps for the recording: authentication in application under the administrator account, creation of a new project, assignment "developer2" user to the new project, authentication under "developer2" account and verification that the project has been assigned, authentication under administrator account and removal of created project from the system. After these test steps have been recorded, rename "test-1.spec.ts" file to "test-add-project-assign-to-developer-record.spec.ts", and then save all changes.
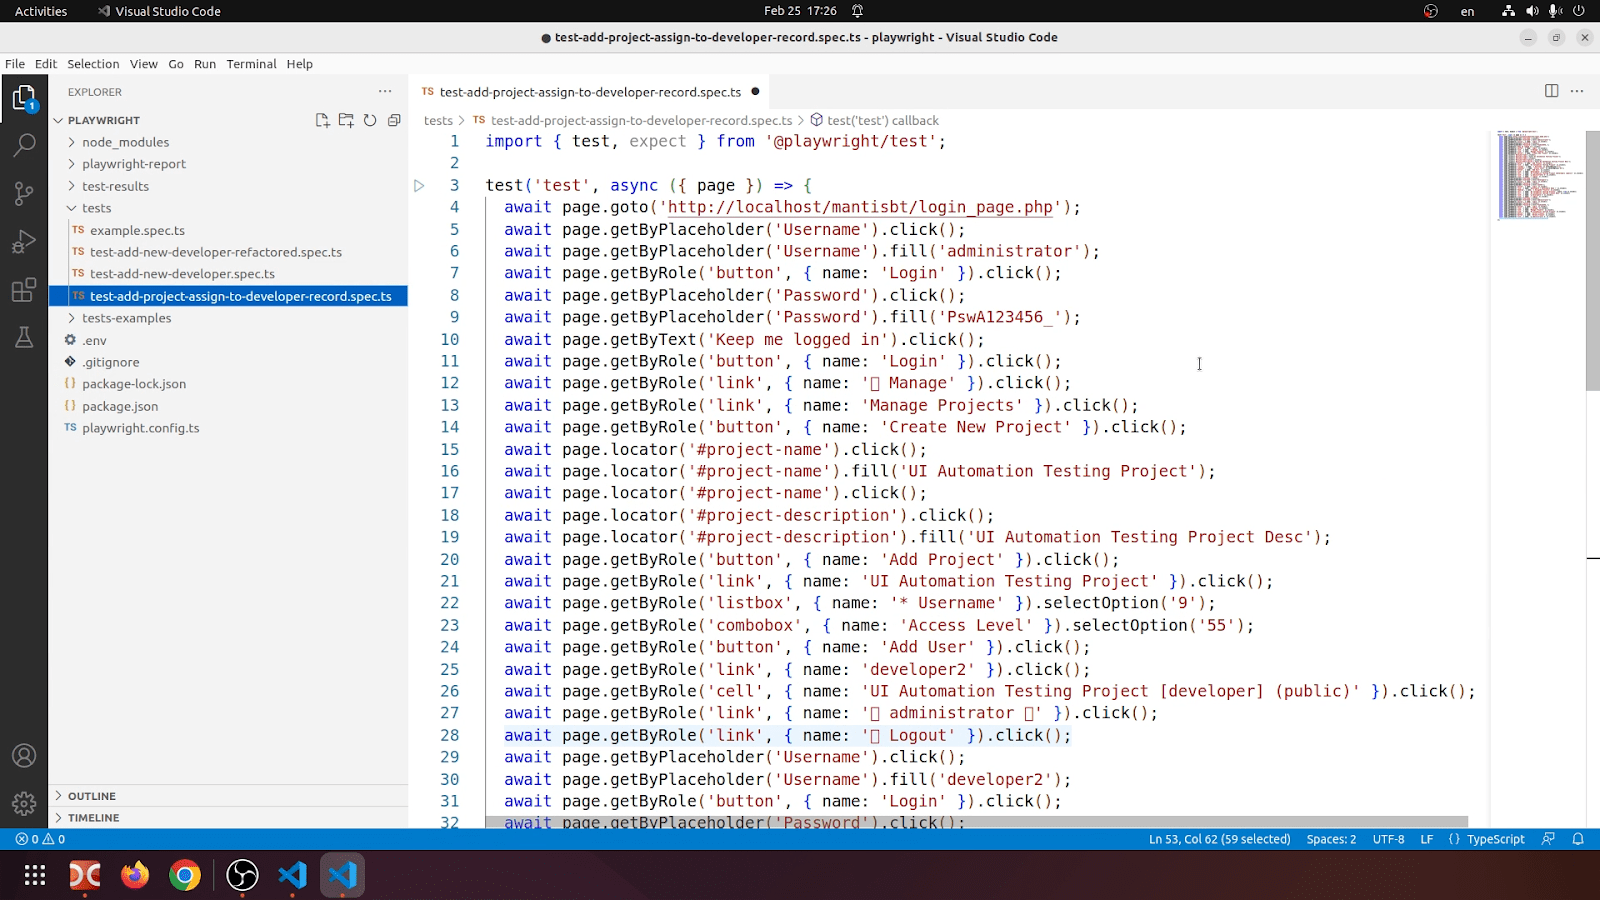
To run this test, press the "Play" button for "test-add-project-assign-to-developer-record.spec.ts" – it could be run multiple times without issues. Video with this test execution is available here.
Refactoring of "test-add-project-assign-to-developer-record.spec.ts" code
Let's refactor "test-add-project-assign-to-developer-record.spec.ts" code. We can use the same approach in the refactoring to reduce repeated operations in the code. In this part we add only necessary comments. Here is the result, which is stored in the repository on the GitHub.In the .env file we have added these two strings:
MANTISBT_EXISTING_DEVELOPER='developer2'
MANTISBT_EXISTING_DEVELOPER_REAL_NAME='developer2 Name'
Code in "test-add-project-assign-to-developer-refactored.spec.ts" is presented below. Import of the necessary modules and environment variables:
import { test, Page, expect } from '@playwright/test';
// Read environment variables from .env file*
const {
    MANTISBT_URL: URL = '',
    MANTISBT_LOGIN_PAGE: LOGIN_PAGE = '',
    MANTISBT_ADMIN_LOGIN: ADMIN_LOGIN = '',
    MANTISBT_ADMIN_PASS: ADMIN_PASS = '',
    MANTISBT_DEVELOPER_PASS: DEVELOPER_PASS = '',
    MANTISBT_EXISTING_DEVELOPER: EXISTING_DEVELOPER = '',
    MANTISBT_EXISTING_DEVELOPER_REAL_NAME: EXISTING_DEVELOPER_REAL_NAME = '',
} = process.env
Test will be run in the 'serial' mode test.describe.configure({mode: 'serial'})*
Let's generate unique "projectName" and "projectDesc " values. it could be useful, if the test fails. Later, this project needs to be removed manually by "administrator", but the next test run will not fail on the project creation step.
let page: Page;
const projectName = 'UI Automation Testing Project ' + Date.now();
const projectDesc = projectName + ' Desc';
In our recorded test we execute the login operation 3 times, so let's create an async login function.
// User login function for all tests
async function userLogin(userName: string, userPass: string) {
    await page.getByPlaceholder('Username').fill(userName);
    await page.getByRole('button', { name: 'Login' }).click();
    await page.getByPlaceholder('Password').fill(userPass);
    await page.getByRole('button', { name: 'Login' }).click();
}
The same applies to logout. Async logout function was added.
// User logout function for all tests async function userLogout(userName: string) { await page.getByRole('link', { name: ' ' + userName + ' ' }).click(); await page.getByRole('link', { name: ' Logout' }).click(); }
Add test hooks – "beforeAll", "beforeEach", "afterEach"
test.beforeAll(async ({ browser }) => {
    page = await browser.newPage();
});

test.beforeEach(async ()=> {
    await page.goto(URL + LOGIN_PAGE);
})

test.afterEach(async ()=> {
    // Finally, expect for Login button is visible
    expect(page.getByRole('button', { name: 'Login' })).toBeVisible;
})
We divided recorded test into 3 tests – the first is 'Test Add Project' in which we have changed selection of a developer in the listbox from fixed position in the list to the label which is equal to EXISTING_DEVELOPER
test('Test Add Project', async () => { userLogin(ADMIN_LOGIN, ADMIN_PASS); await page.getByRole('link', { name: ' Manage' }).click(); await page.getByRole('link', { name: 'Manage Projects' }).click(); await page.getByRole('button', { name: 'Create New Project' }).click(); await page.locator('#project-name').fill(projectName); await page.locator('#project-description').fill(projectDesc); await page.getByRole('button', { name: 'Add Project' }).click(); await page.getByRole('link', { name: projectName }).click(); // Select EXISTING_DEVELOPER position in the listbox by label await page.getByRole('listbox', { name: '\* Username' }).selectOption({label:* *EXISTING_DEVELOPER}); await page.getByRole('combobox', { name: 'Access Level' }).selectOption('55'); await page.getByRole('button', { name: 'Add User' }).click(); await page.getByRole('link', { name: EXISTING_DEVELOPER }).click(); await page.getByRole('cell', { name: projectName + ' \[developer\] (public)' }).click(); userLogout(ADMIN_LOGIN); });
Second test is the 'Test Check Project by Developer'. We simplified the test on the recording step – a developer needs to find a table cell, where the "projectName" is displayed. In a more strict coding style, we need to check that "projectName" is placed in the appropriate HTML table.
test('Test Check Project by Developer', async () => { userLogin(EXISTING_DEVELOPER, DEVELOPER_PASS); await page.getByRole('link', { name: EXISTING_DEVELOPER + ' ( ' + EXISTING_DEVELOPER_REAL_NAME + ' )' }).click(); await page.getByRole('heading', { name: ' Assigned Projects' }).click(); await page.getByRole('cell', { name: projectName, exact: true }).click(); await page.getByRole('cell', { name: projectDesc }).click(); userLogout(EXISTING_DEVELOPER); });
And the final test 'Delete Project by Admin' – simply deletes the "projectName" project by "administrator".
test('Delete Project by Admin', async () => { userLogin(ADMIN_LOGIN, ADMIN_PASS); await page.getByRole('link', { name: ' Manage' }).click(); await page.getByRole('link', { name: 'Manage Projects' }).click(); await page.getByRole('link', { name: projectName }).click(); await page.getByRole('button', { name: 'Delete Project' }).click(); await page.getByRole('button', { name: 'Delete Project' }).click(); userLogout(ADMIN_LOGIN); });
Final test hook closes the "Page" object and the browser, then outputs to the console "show-report" command.
test.afterAll(async () => {
    await page.close();
    console.log('Copy and paste to show test report: npx playwright show-report');
});
Now, we could start the test multiple times without any issue. Full process is presented in the video.
Creation of the test for the comparison of the access rights.
In this test we compare which pages are available for users with the developer role. Given that the administrator has access to all pages of the demo application, we check if a user with the developer role is able to open all of these pages. URL of the pages available for the administrator we place into the file "admin_all_menu_links.txt". As usual we record all the steps using the Playwright Test Generator in VS Code. The steps of the test include opening all pages of the application under administrator and then under a user with the developer role. Then that user will open administrator pages URL, picking the links from the file and following them. For those pages we'll assert the "Access Denied" message if the pages are not accessible.
After the test is recorded, rename this file into "test-compare-admin-developer-access-record.spec.ts". Then save all changes.
f we try to run tests in Playwright, some bugs will occur related to current test configuration: tracing.stopChunk: Must start tracing before stopping
This bug is added to the Playwright repository. To avoid it we need to uncheck "Show browser" and then use the "Debug Test" button in the VS Code "Testing" menu. In debug run mode Playwright always shows the browser window.
est from "test-compare-admin-developer-access-record.spec.ts" file can be run, all steps are shown in the video.
Refactoring "test-compare-admin-developer-access-record.spec.ts"
As for other tests in this article, let's do some code refactoring. Before learning of comments in refactored code, please add these 2 strings to **.env **file:
MANTISBT_SUMMARY_PAGE='summary_page.php'
MANTISBT_MANAGE_PAGE='manage_overview_page.php'
Resulting code for the test is stored in "test-compare-admin-developer-access-refactored.spec.ts" file:
- Import modules and environment variables, then set configuration for 'serial' test run:
import { test, Page, expect } from '@playwright/test';

// Read environment variables from .env file
const {
    MANTISBT_URL: URL = ",
    MANTISBT_LOGIN_PAGE: LOGIN_PAGE = ",
    MANTISBT_ADMIN_LOGIN: ADMIN_LOGIN = ",
    MANTISBT_ADMIN_PASS: ADMIN_PASS = ",
    MANTISBT_DEVELOPER_PASS: DEVELOPER_PASS = ",
    MANTISBT_EXISTING_DEVELOPER: EXISTING_DEVELOPER = ",
    MANTISBT_EXISTING_DEVELOPER_REAL_NAME: EXISTING_DEVELOPER_REAL_NAME = ",
    MANTISBT_SUMMARY_PAGE: SUMMARY_PAGE = ",
    MANTISBT_MANAGE_PAGE: MANAGE_PAGE = ",
} = process.env

test.describe.configure({mode: 'serial'});
- Create "Page" object and add async "userLogin" and "userLogout" functions:
let page: Page; // User login function for all tests async function userLogin(userName: string, userPass: string) { await page.getByPlaceholder('Username').fill(userName); await page.getByRole('button', { name: 'Login' }).click(); await page.getByPlaceholder('Password').fill(userPass); await page.getByRole('button', { name: 'Login' }).click(); } // User logout function for all tests async function userLogout(userName: string) { await page.getByRole('link', { name: ' ' + userName + ' ' }).click(); await page.getByRole('link', { name: ' Logout' }).click(); }
- Test hook methods – "beforeAll", "beforeEach", "afterEach":
test.beforeAll(async ({ browser }) => {
    page = await browser.newPage();
});

test.beforeEach(async ()=> {
    await page.goto(URL + LOGIN_PAGE);
});

test.afterEach(async ()=> {
    // Finally, expect for Login button is visible
    expect(page.getByRole('button', { name: 'Login' })).toBeVisible;
});
- Code for 'Test Check Admin Access' test:
test('Test Check Admin Access', async () => { userLogin(ADMIN_LOGIN, ADMIN_PASS); await page.locator('#breadcrumbs').getByRole('link', { name: ADMIN_LOGIN }).click(); await page.getByRole('link', { name: ' My View' }).click(); await page.getByRole('link', { name: ' View Issues' }).click(); await page.getByRole('heading', { name: ' Filters' }).click(); await page.locator('#sidebar').getByRole('link', { name: ' Report Issue' }).click(); await page.getByRole('heading', { name: ' Enter Issue Details' }).click(); await page.getByRole('link', { name: ' Change Log' }).click(); await page.getByRole('link', { name: ' Roadmap' }).click(); await page.getByRole('link', { name: ' Summary' }).click(); await page.getByRole('heading', { name: ' Summary' }).click(); await page.getByRole('link', { name: ' Manage' }).click(); await page.getByRole('link', { name: 'Manage Users' }).click(); userLogout(ADMIN_LOGIN); });
- Code for 'Test Check Developer Access' test:
test('Test Check Developer Access', async () => { userLogin(EXISTING_DEVELOPER, DEVELOPER_PASS); await page.getByRole('link', { name: ' My View' }).click(); await page.getByRole('link', { name: EXISTING_DEVELOPER + ' ( ' + EXISTING_DEVELOPER_REAL_NAME + ' )' }).click(); await page.getByRole('link', { name: ' My View' }).click(); await page.getByRole('link', { name: ' View Issues' }).click(); await page.getByRole('heading', { name: ' Filters' }).click(); await page.locator('#sidebar').getByRole('link', { name: ' Report Issue' }).click(); await page.getByRole('heading', { name: ' Enter Issue Details' }).click(); await page.getByRole('link', { name: ' Change Log' }).click(); await page.getByRole('link', { name: ' Roadmap' }).click(); await page.goto(URL + SUMMARY_PAGE); await page.getByRole('link', { name: 'Proceed' }).click(); await page.goto(URL + MANAGE_PAGE); await page.getByRole('link', { name: 'Proceed' }).click(); userLogout(EXISTING_DEVELOPER); });
- Final test hook closes the "Page" object and the browser, then outputs to the console "show-report" command.
test.afterAll(async () => {
    await page.close();
    console.log('Copy and paste to show test report: npx playwright show-report');
});
The recorded test run from "test-compare-admin-developer-access-refactored.spec.ts" file is in the following video.
To be continued…
Now, we gave you an opportunity to make first steps in UI testing automation, using the Playwright tool. This tool is developing, augmenting new and powerful features for end-to-end UI testing. We are looking forward to your feedback on the article. Subscribe to our blog newsletters too.