Introduction to Qase
Are you a QA engineer? If so, you definitely work with the test documentation, don't you? This article will allow you to get a quick start in using Qase - one of the best tools to manage test documentation.
Qase is a cloud-based system that helps test-teams manage the test documentation. Qase can be easily integrated into Jira and it helps manage the test cases, build the test suites, and prepare the defect reports. What functionality Qase has and what the main advantages are we are going to explain below.
Qase has many advantages over the competitive systems. Let’s list some of them:
-
It is easy to design and maintain the tests and easy to perform
tests related to a specific environment;
-
The results of the test runs are presented very simply and visually
in a detailed graphical form which can be shared simply by sending a link. The current status of the individual test and the time spent on the test are also presented.
-
Another feature that may be interesting to managers is the display
of statistics about QA team activities;
-
Qase allows exporting tests in different formats: JSON, XML, CSV,
XLSX, PDF, HTML;
-
Qase also allows importing tests from other sources such as:
TestRail, TestLink, Zephyr, Squash TM, CucumberStudio, TestLodge, TestCollab, Xray, TestCaseLab, TestPad, AllureTestOps, AllureReporter, qTest, PractiTest.
Let’s familiarize with some Qase features you can start using right after the registration in this service.
Workspace
The Workspace is intended for the joint work of the participants (users). Users can participate in several workspaces at the same time and contribute according to their roles. To switch between workspaces, click the profile icon, select «Switch workspace» and choose the name of the workspace you want to switch to. If you don't see your desired workspace, ask the administrator to send you an invitation. The name of the workspace can be specified using the "Settings" button at the bottom of the control panel.
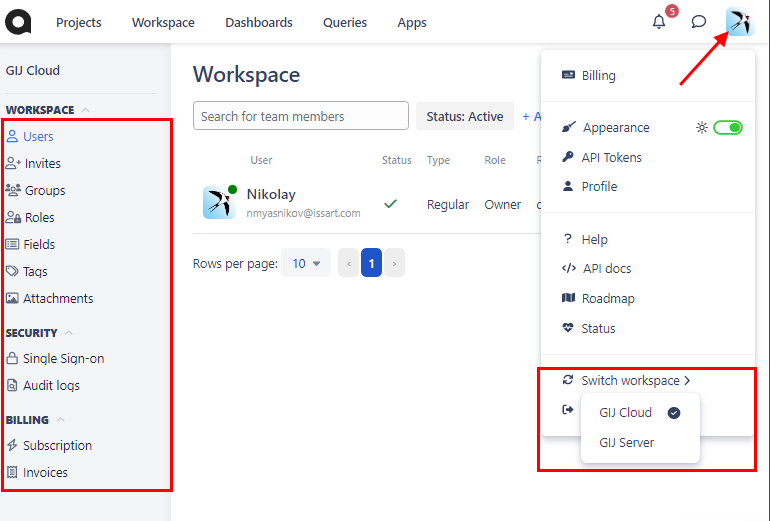
The following sections are available for administrators to manage the workspace:
- Users section allows you to manage workspace users, deactivate or reactivate them, change their type (Regular, Billing, Read-only) and roles (Owner, Admin, Member).
- Invites section allows you to invite new members in your account and find or revoke all the previous invitations.
- Groups - in this section you can manage user associations that you unite by a certain characteristic. For example, manual testing team, autotest developers team.
- Roles feature allows admins to manage access to the testing process. When you define a Role, you can specify restrictions up to a very detailed level according to the team member role.
By default, Qase account has three configured Roles:
-
Owner- the account holder, the person who registered the
account initially, has full control over the account features (including private projects created by other users in the owner's account) and can manage all aspects of the application. Usually it’s the head of the test team or the Project Manager;
-
Admin - an administrative role in an account similar to the
Owner;
-
Member- a common role that grants access to all basic
Qase features. That role is set by default for a new account, meaning that any new member receives this role that can be changed later.
[!IMPORTANT] Custom roles are available in Business and Enterprise subscriptions.
-
Field section allows you to edit or create system fields like Priority, Severity, Pre-conditions, Automation status and others. You can select following field settings:
-
Name
-
Group
-
Entity
-
Type
-
Projects
-
Required
-
-
Tags allows you to label your Test Cases, Defects and Test Runs.
-
Attachments section allows you to view files that have been uploaded to Qase. In this section you will also see a graph showing how much space you have spent. This may be important, as the storage space for attachments is limited:
-
500 MB - for Free plan;
-
250 GB - for Startup plan;
-
unlimited space - for Business and Enterprise plans.
-
-
Single-Sign On security section allows you to set details for SSO/SAML to use for authentication:
-
SAML Sign-in URL;
-
Identity Provider Issuer;
-
Key x509 Certificate;
-
Email domains;
[!IMPORTANT] Note: Single-Sign On is available in a Business subscription with a Qase Access add-on and Enterprise subscription.
-
-
Audit Logs section provides you with a historical record of all actions that have been performed in the workspace. Each log record contains a timestamp for the action, the action performer and a description of the action performed. You can filter logs by the following fields:
-
Type (Team members, Projects, Suites, Cases, Defects, Works, Plans
and Review Requests);
-
Members (all users, members invited to the workspace);
-
Date created (Relative Dates and Absolute Dates);
-
-
With the Subscription section you can upgrade your plan, add payment details.
-
The Invoices section shows the invoice history that can be downloaded as a PDF file.
Project
Project is a container for your test artifacts related to a specific development e.g. website, app, web service etc. It allows you to organize your test suites and test cases related to the same subject.
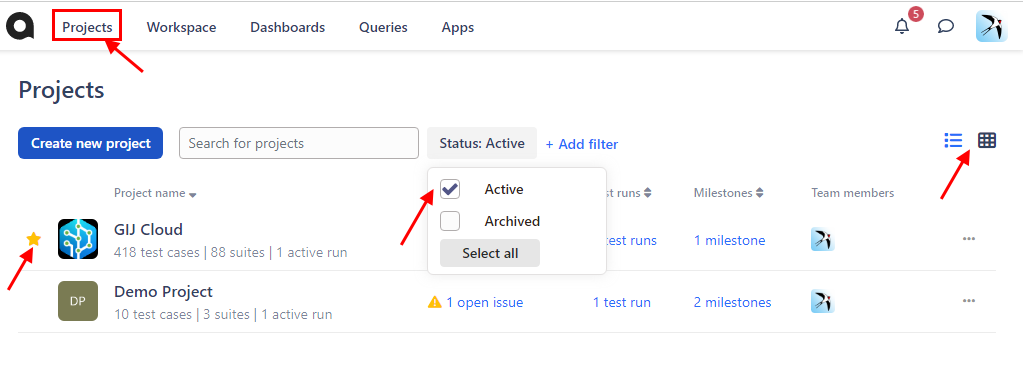
To go to the list of projects, click "Projects" in the upper left corner of the workspace. Projects can be displayed as a list or as cards, so just switch the view using the buttons in the upper right corner. Favorite projects, marked with stars, appear first in the list. By selecting the appropriate position in the “Status” filter, you can filter active or archived projects.
So let’s create your first project!
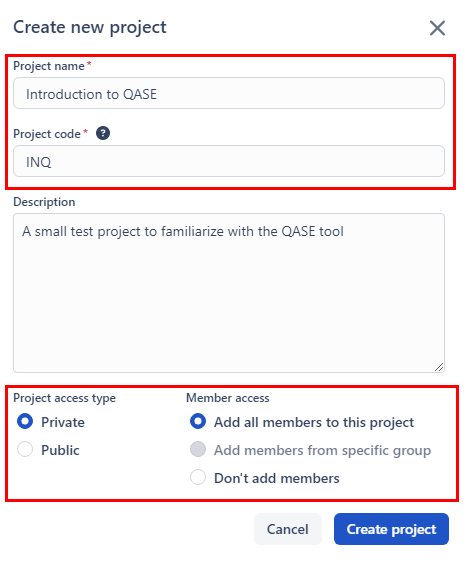
To do this click "Create new project" and fill in the project settings in the form. The required settings are Project Name - a descriptive name for your new project and Project Code - a short name for your project, consisting of several latin characters and digits.This project code will be added later to any test cases created within that project. Select a Public or Private project type paying attention to:
А public project is accessible by all current users of the workspace and all new users who will join later.
In private project you can choose:
-
"Add all members to this project": every user invited will have
access to the project. Every new user will have to be added to this project manually.
-
"Add members from a specific group": you will need to select the
user group you created earlier - each new user joined to the selected user group will have access to your new project.
-
"Do not add members": no members will be added.
After completing the project settings click "Create Project" to see your new project page:
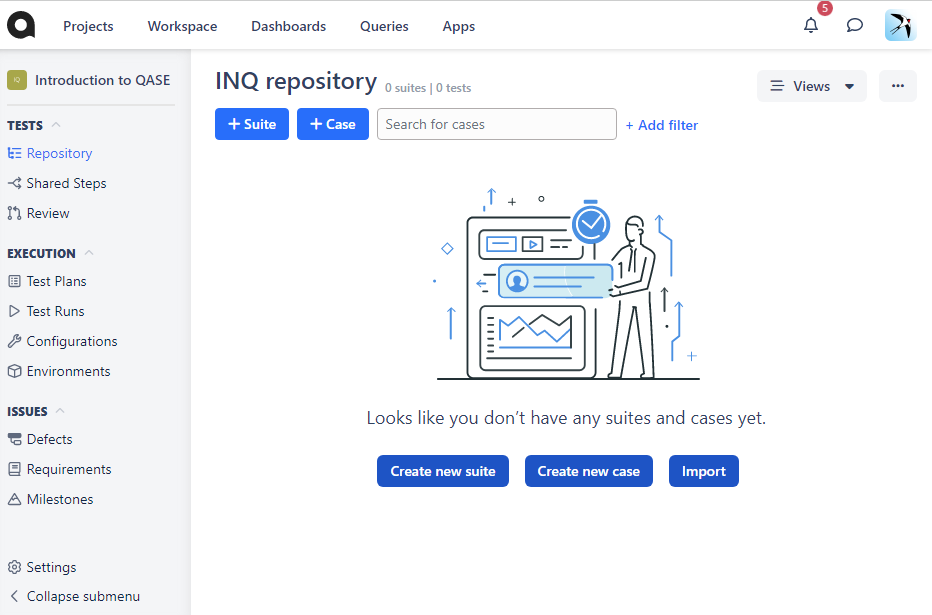
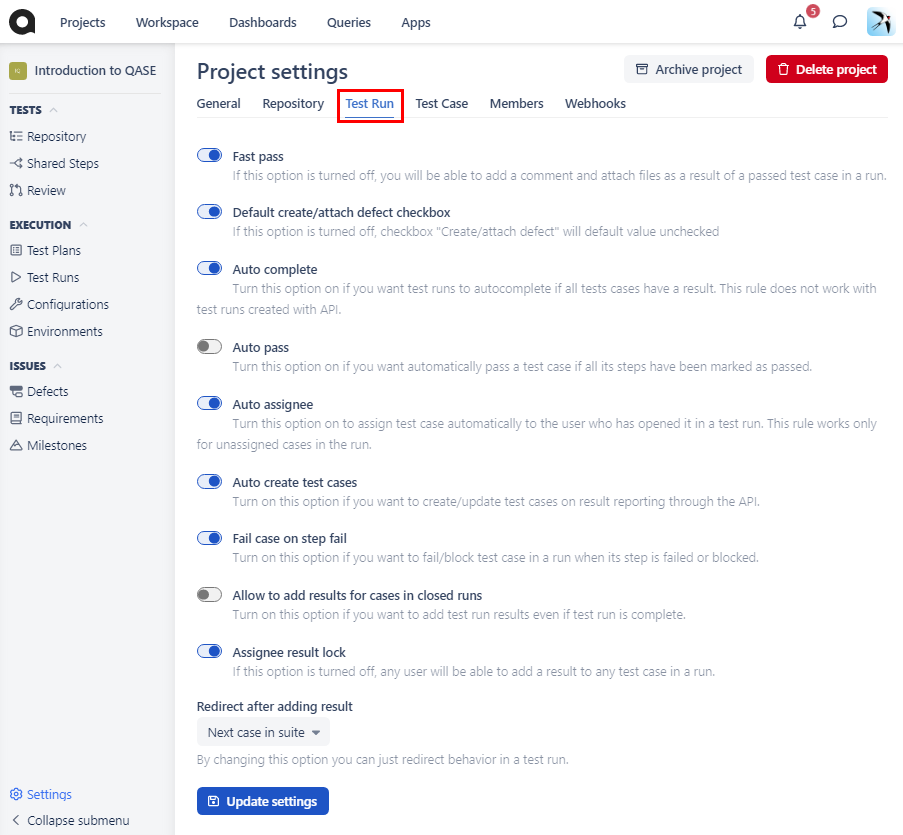
For the first project, we agree with the default settings, but on the "Project settings" page you can also change the following settings for:
-
General;
-
Repository;
-
Test Run;
-
Test Case;
-
Members;
-
Webhooks.
[!IMPORTANT] Webhooks settings are available for paid plans.
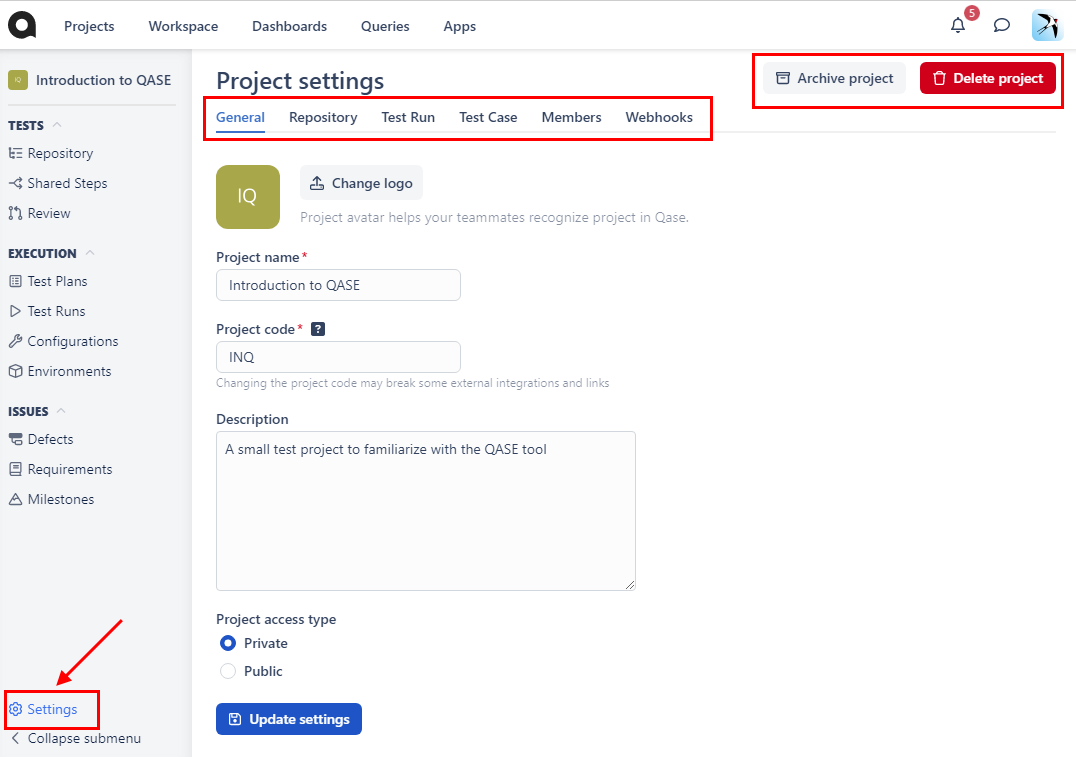
With the buttons in the upper right corner, you can delete or archive your project - then it should still be available for links, but wоn't be displayed in the active project list.
So, the project is created, now you can start filling the project with tests. First of all let’s talk about test Requirements, Environments and Configurations.
Requirements
The “Requirements” section is an important part of test management. This helps to verify that product features are fully implemented and comply with the original requirements.The activity of the test team should be aimed at verifying this compliance.
The Requirements are very simple to manage. For example, to create a new Requirement, you need to go to the "Requirements" section and press the "+Requirement" button. After that a window with configuration fields will appear to specify several properties:
-
Title is the name that will be displayed in the list of
requirements;
-
Description can contain any information that will help the tester be
in context and understand the requirement correctly;
-
Parent - this field indicates whether there is another higher level
requirement associated with the new one. If there are no requirements, only "Root" is available;
-
Status - here you can select one of several requirement statuses -
Valid, Draft, Review, Rework, Finish, Implemented, Not Testable, Obsolete;
-
Types of requirement can be Epic, User history or Feature;
-
Attachment - here you can attach information to demonstrate and
understand the context of the requirements;
-
Test cases is the most interesting thing that helps you quickly
define how to test this requirement. It is possible to add a list of Test Cases that cover the new requirement.
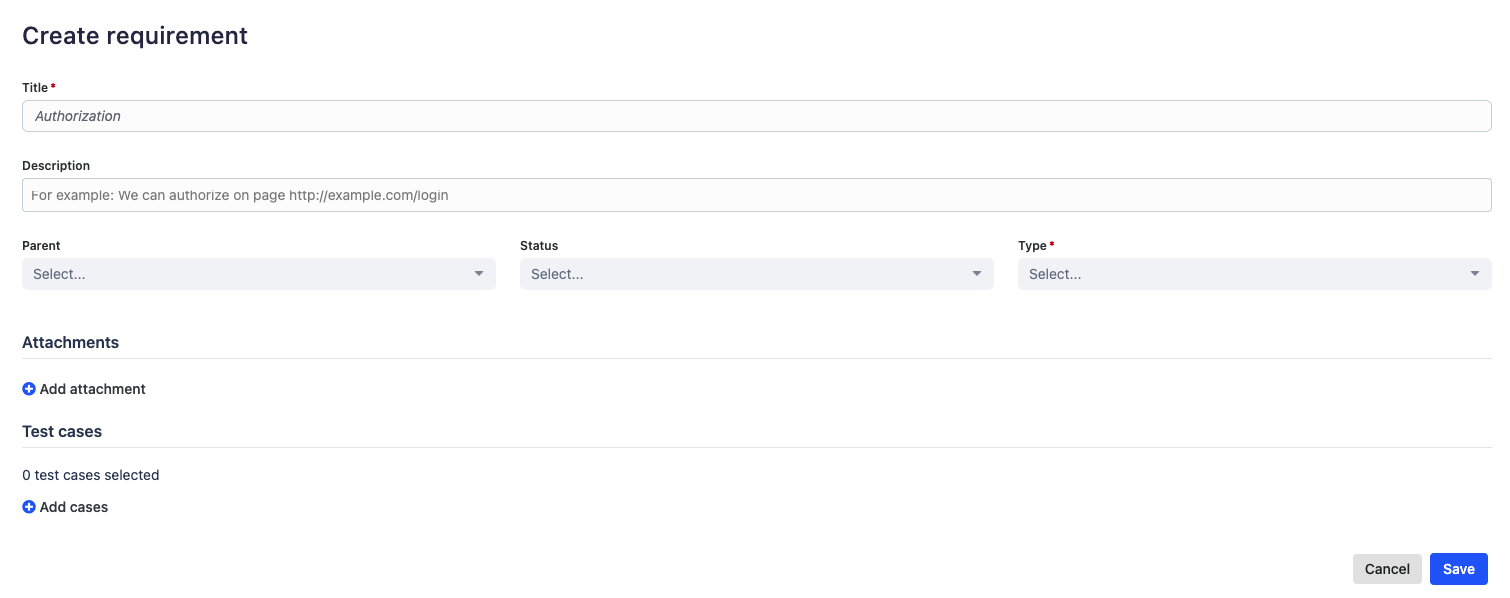
To save new Requirements in the project click the "Save" button. Now you can see all the properties you have specified for the requirement. You can easily change these properties, create a child requirement or delete the requirement.
You can easily jump to the test cases that cover this requirement by clicking on the test case title:
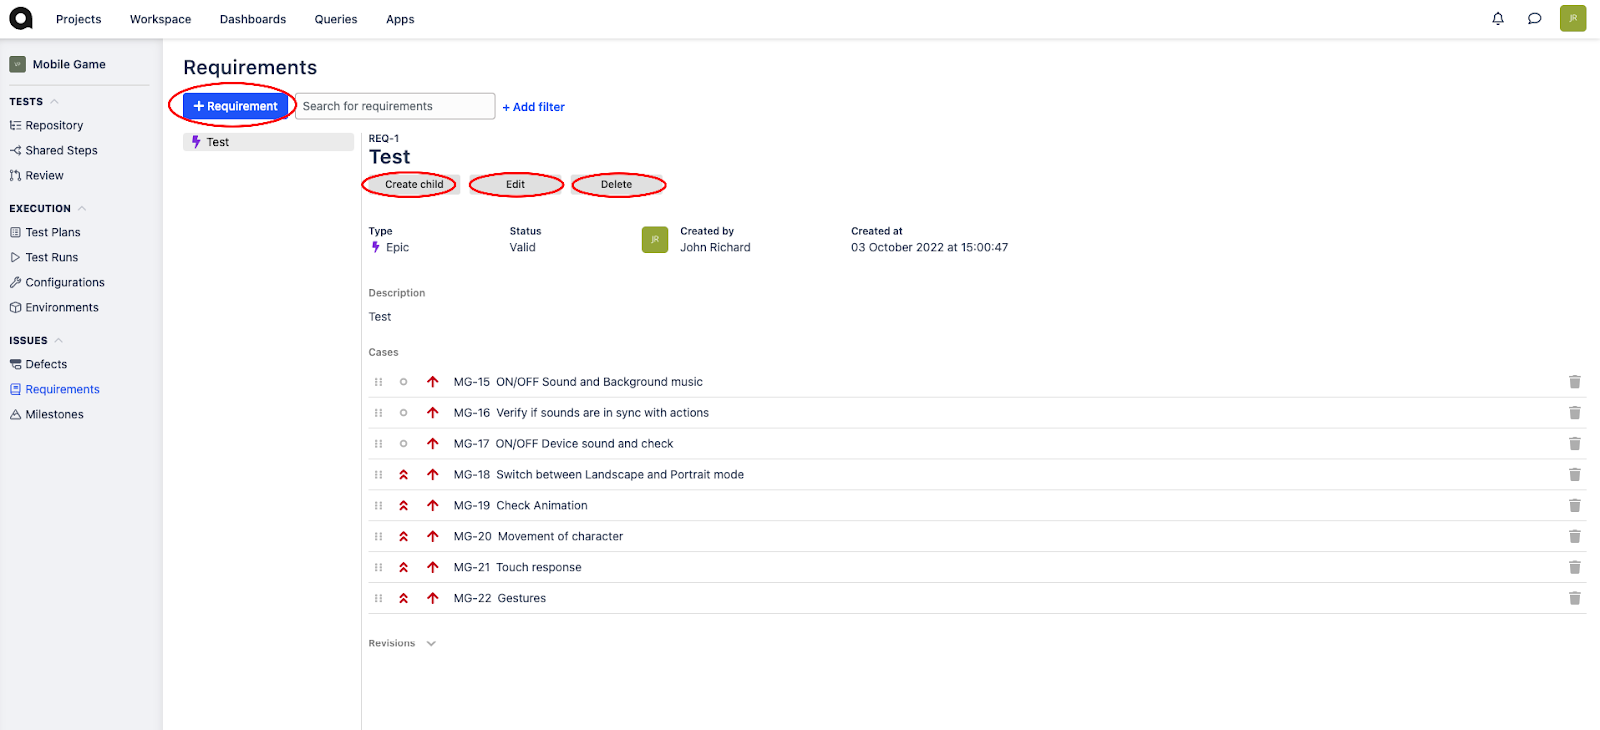
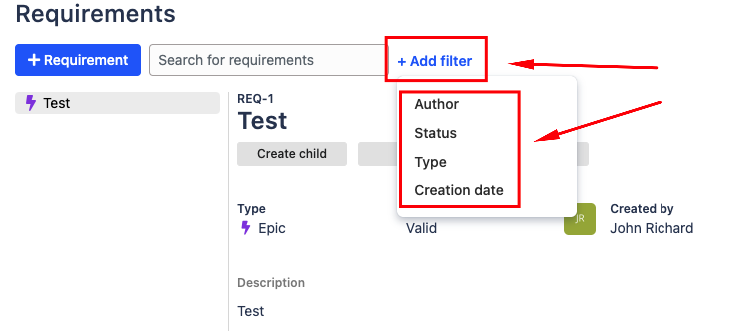
The Requirements section also allows you:
-
to search for items by name or description using the search box,
-
to filter certain requirements by a specific parameter (Author, Status, Type, or Date):
[!IMPORTANT] Requirements are available in Startup, Business and Enterprise subscriptions.
Environments
**Environments **is an additional Qase entity that allows you to represent your real infrastructure environments and then specify in which environment the Test Run should be performed.
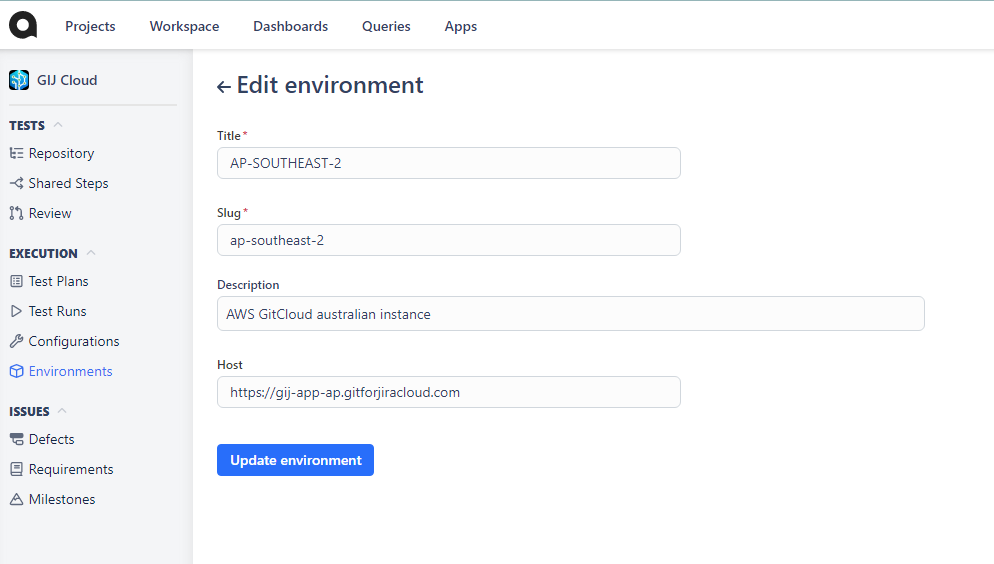
The following properties can be specified for the new Environment:
-
Title is a mandatory, descriptive name of the environment that
appears in test runs (for example, Testing, Production);
-
Slug is a mandatory, shortened version of the title;
-
Description is an optional field for additional environment context and the information for the usage.
-
Host is an optional field, environment URL.
Environment properties can also be modified after they are created:
Configurations
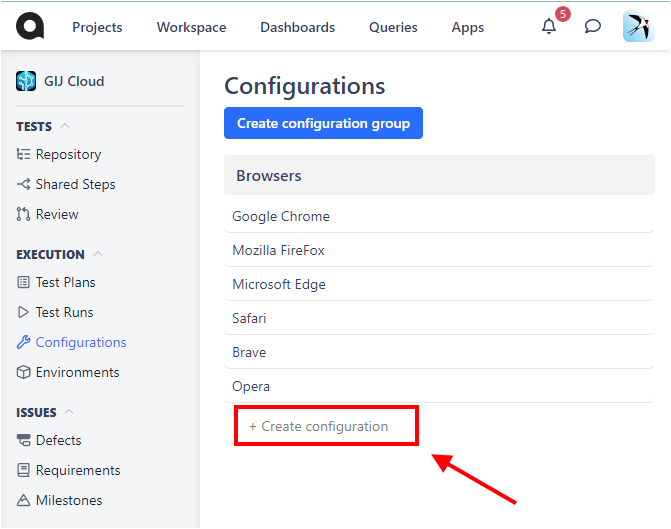
Configurations can be used to specify hardware or software that should be used during Test Run.
If your team develops web applications, you will probably test them in several different browsers. To do this, you can create a configuration group "Browsers" and specify your target browsers for testing there.
After creating a Configuration group and adding all possible individual configurations, we can specify them while preparing the Test Run - all available configuration groups are shown in the "Configurations" section:
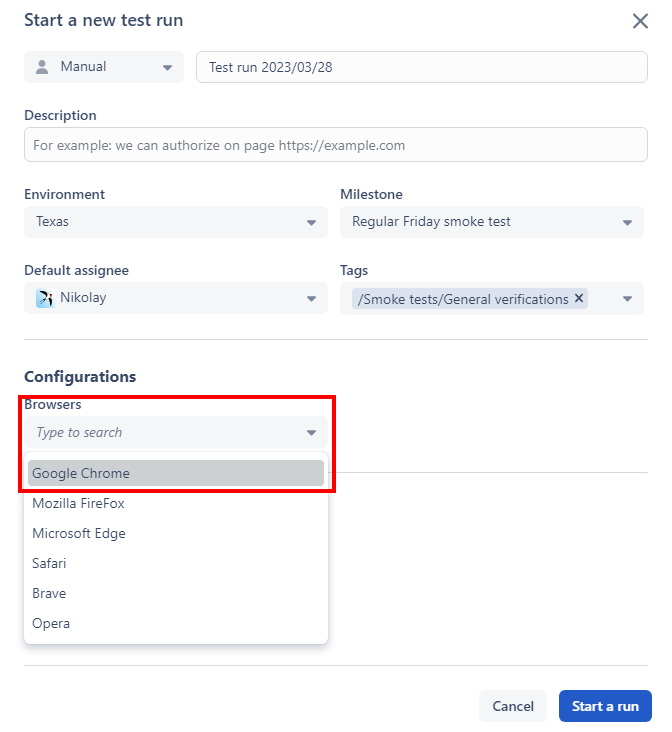
It is possible to create multiple configuration groups and to have combinations such as different browsers and different operating systems. All configuration groups and individual configurations can be edited or deleted after they are created.
Test Case
The Test Case is an entity that includes testing procedures, necessary input data, operating conditions and expected results that determine the test objective. You can create single Test Cases or collect them into Test Suites. During the Test Run, each test case requires separate performing and marking the actual result. This marking allows you to provide test results in a graphical form, track the spent time, and review the history of the test case performing. All details about the test are described in the “Repository” section.
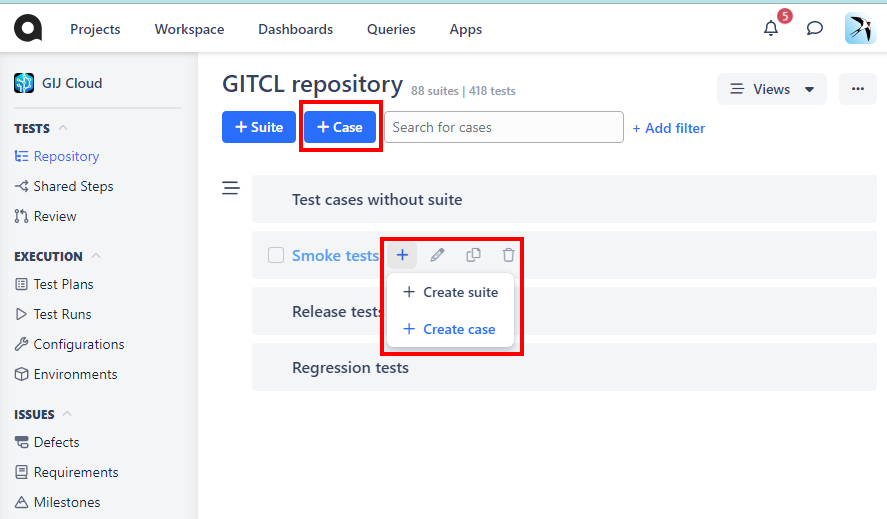
To create a new test case you can:
-
use a quick creation button "+ Create Case" in your target suite.
-
use a creation button "+ Case" in the repository suite structure and describe your test case in detail:
In the creation form you should specify all properties that should be considered:
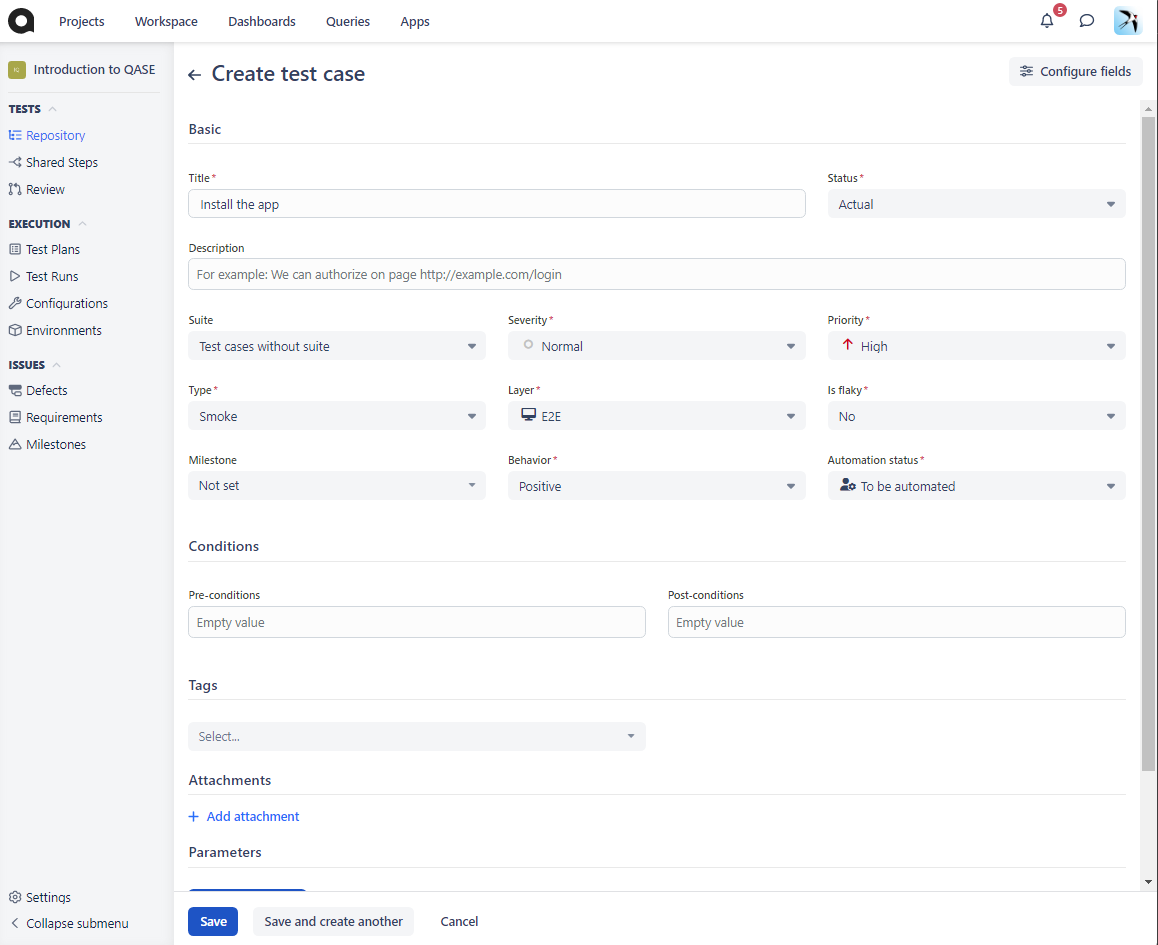
The required fields are marked with “*” symbol. Fields can be additionally switched on and off in the «Fields» section described above. If you want to do this, just click «Configure fields» and select the field you want to customize.
Note: Users of «Startup», «Business» and «Enterprise» plans can change the values of system fields.
Below are short descriptions of the test case properties, let’s consider them.
-
Basic properties:
-
Title specifies the name of a test case;
-
Status can be either Active, Draft, or Deprecated;
-
Description provides additional information for a more detailed
description of the test case;
-
Suite determines which Test Suite the new test case belongs to;
-
Severity can be either Trivial, Minor, Normal, Major, Critical,
Blocker, or Not Set;
-
Priority can be either Low, Medium, High, or Not Set;
-
Type specifies what type of testing is applicable for the test case;
-
Layer can be either End-To-End, API, or an unit test;
-
Is flaky indicates whether the test case is unstable;
-
Milestone specifies whether the test case is related to one of your
Milestones;
-
Behavior can be either Destructive, Negative, Positive, or Not Set;
-
Automation Status: can be either Automated, To Be Automated, or
Not Automated.
-
-
Condition properties:
-
Pre-conditions describes the conditions that must occur before the
test case is performed;
-
Post-conditions describes the conditions that must occur after the
test case is performed;
-
-
Tags allow you to mark your test cases with values that don't require any preliminary configuration.
-
Custom Fields allow you to create your own Custom Fields of various data types to store any additional information about your test cases that are not covered by default properties.
-
Attachments allow you to upload files (max 32 MB for each file) to your Test Case to add clarity or provide extra context. It can be an image, a screenshot, a video snippet or other document.
-
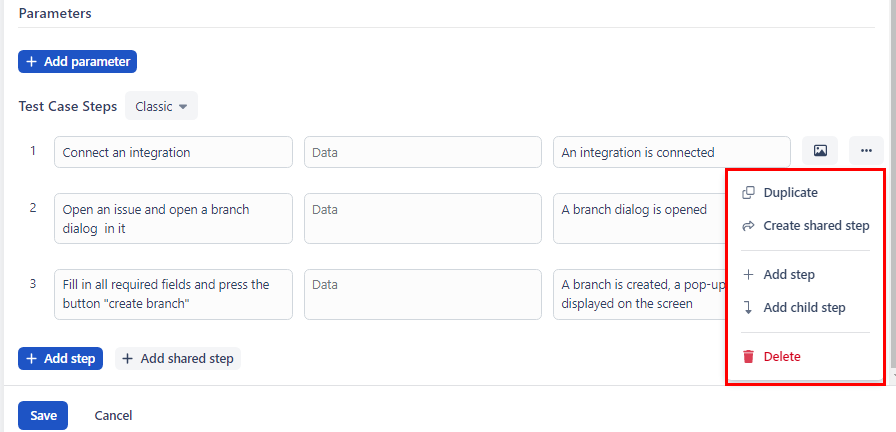
**Parameters **configure your own parameterization for running the test case in multiple iterations depending on its parameter values. You also have the option to add several parameters, and you can have several values in each parameter you create.
-
Test Case Steps is an important section defining which actions should be taken while performing the test case and the expected results for each step. There are two types of steps:
-
Classic;
-
Gherkin:
-
The test case can consist of several steps to be performed. In this case, you must create each new step separately. It is also possible to create nested steps - those that need to be performed in one step. Here the dependence is created "step-parent" + "step-child".
Also you can create Shared steps - these steps can be added to any test case of the projects. After creating a shared step in the "Shared steps" section of your project, you will see the button "+ Add Shared Step".
[!Tip] To quickly customize your steps, use the “...” button next to the "Expected Result" field. It will allow you to: add a new step, add a nested step, delete a step, clone a step, create a Shared Step, attach files.
Have you created several test cases related to your project? If so, you can now create a new Test Suite.
Test Suite
Test Suite is a container of several tests united by some category. Test cases can also be divided into sections and subsections in the Test Suite, for example, functional and non-functional tests or anything else that you would like to highlight in a separate suite of cases.
To create a Test Suite click the "+Suite" or "Create new suite" buttons:
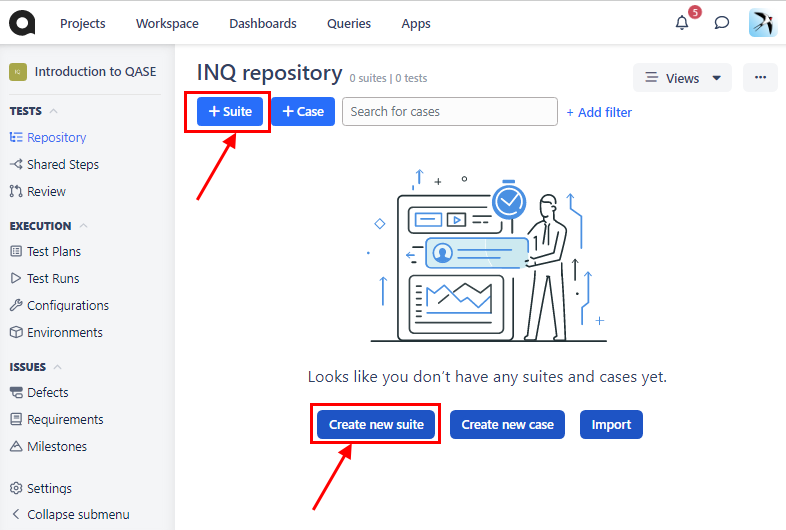
Below are the properties you should specify when creating the test suite. Of these, "Suite name" is a required field, other fields can be filled in later.
-
Suite Name is a descriptive name that uniquely defines the
domain or scope of this suite;
-
Parent Suite is a higher-level hierarchy suite (parent) which
can include a new (child) suite;
-
Description specifies additional details regarding which Test
Cases should belong to a Test Suite.
-
**Preconditions **describe the steps that must be completed before
the tests in the new Test Suite are run.
After successful creation, the Test Suite will be displayed in the “Repository” section. Test Suites and Test Cases can not only be created, they also can be exported to different file formats (CSV, XLS, XML, JSON, PDF, HTML) and imported from other test management systems.
Qase can import test suite data from the following sources: Qase, Test Rail, Test Link, Zephyr Squad/Scale, SquashTM, CucumberStudio, Zephyr Standalone, Zephyr for Jira Cloud, TestLodge, TestCollab, Xray, TestCaseLab, TestPad, AllureTestOps, AllureReporter, qTest, PractiTest.
Test Run
So the test cases and the suites have been successfully created on the previous steps. Now you can test your object and mark the results in the Qase. To do this, you need to start a Test Run - the single run of several test cases.
The Test Run can consist of a separate test case or several test cases, an entire test suite or a Test Plan.
There are two ways to start a Test Run: from the project repository page or from the Test Run page.
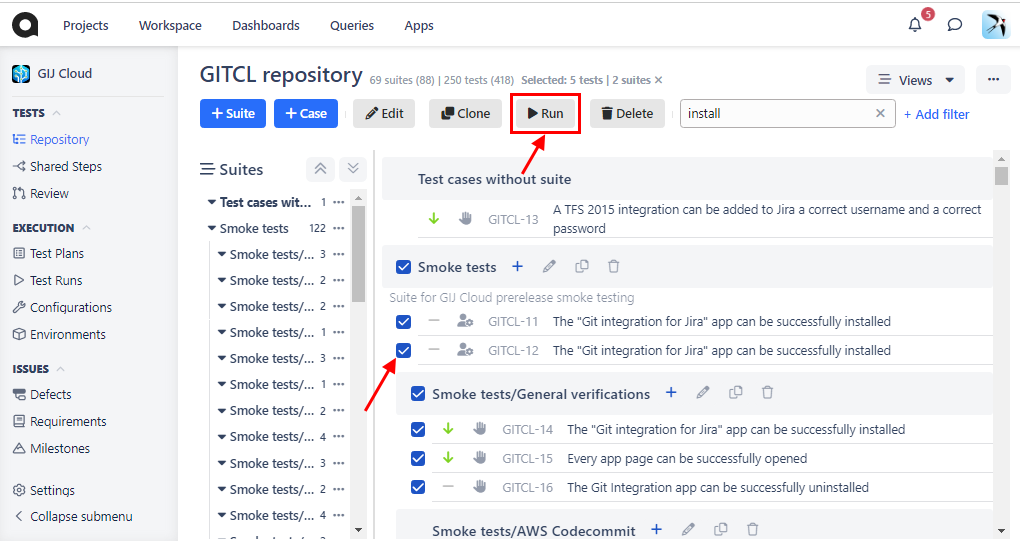
The first way is configured by selecting multiple test cases in the Repository and by clicking the "Run" button. You can choose conditions under which your object should be tested and which stage the test run will be associated with.
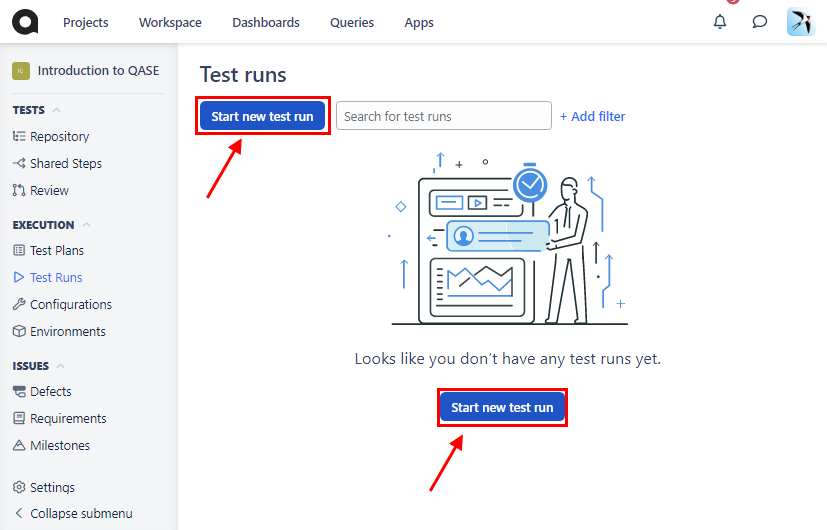
The second way is to create a regular Test Run. To do that, go to the "Test runs" section and click "Start a new test run". You will see the same modal window as when creating a Test Run from the repository page.
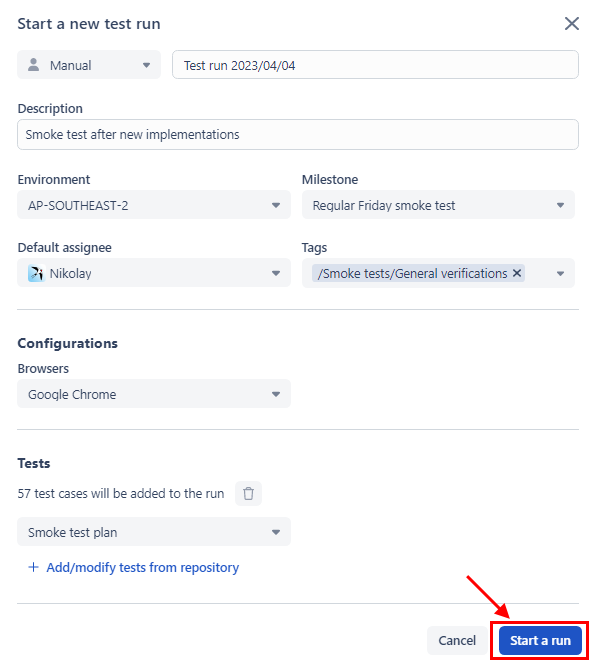
The Test Run has the following fields for properties and settings:
-
Run title specifies the name of your Test Run. The Run title
field is pre-filled with the current date, such names are useful for tracking test run history. You can specify any name.
-
Description - here you can fill in any additional details about
your Test Run.
-
Environment specifies the environment for Test Run performing.
-
Milestone shows which milestone is associated with the current
Test Run.
-
Configurations specify the options from the various
configurations that can be set up in the “Configurations” section.
-
**Custom Fields - **here you can set up custom field values for a
run if you have configured custom fields previously.
-
Tests (Test Cases) can be chosen from an existing Test Plan. You
can also add or modify tests from the Repository. If you selected the Test Plan, all Test Cases contained in this Test Plan would be automatically included in the Test Run, but you can choose which Test Cases from it should be performed, and which shouldn't.
[!TIP] Your Test Run also has the settings from the "Project settings" section:
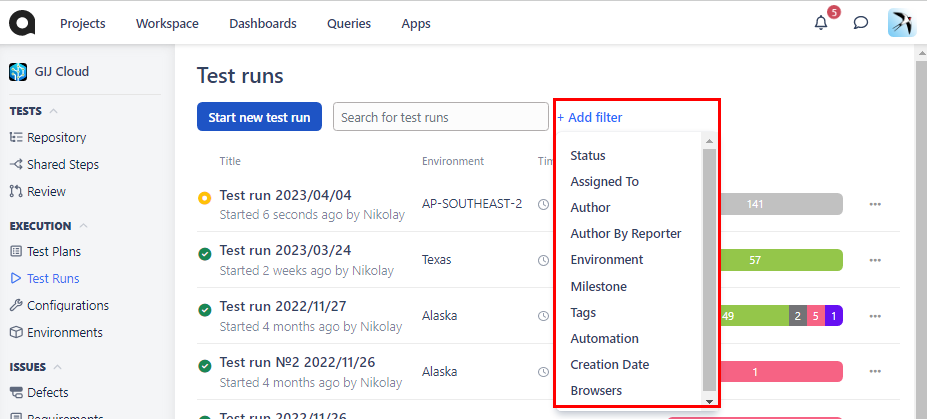
After successful creation you can see your Test Run in the list. You can use the following filters:
-
Status
-
Assigned to
-
Author
-
Author by Reporter
-
Environment
-
Milestone
-
Tags
-
Automation status
-
Creation date
-
Configurations (If it was specified by you previously)
During the testing the tester-performer marks the result of a separate Test Case or a separate Step.
To do this, click “Open wizard” and click one of the buttons corresponding to your result: passed, failed, blocked, invalid, skipped.
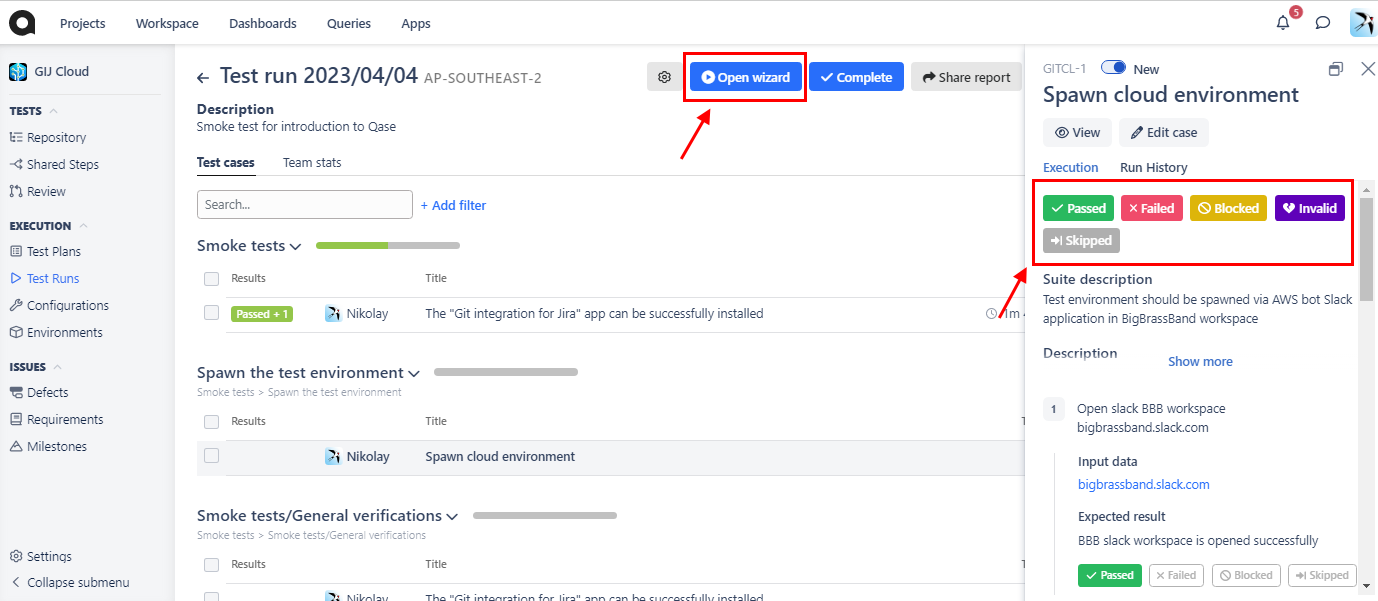
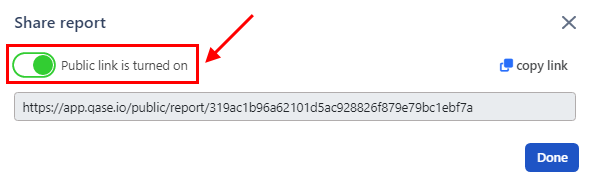
The results influence the overall statistics of the Test Run and will be displayed on the result graph. Do you want to share your test report or show progress? Click "Share Report" and copy the link in the pop-up. To access a user who is not in your workspace the switcher "Public link is turned on" must be enabled.

If a Test Step or a Test Case is failed, you can raise a Defect which will automatically be raised in the "Defects" section. The next section of this article describes how to manage Defects.
Defects
You can use the Defects feature to track issues that you discovered during testing. There are two ways to create a defect in Qase.
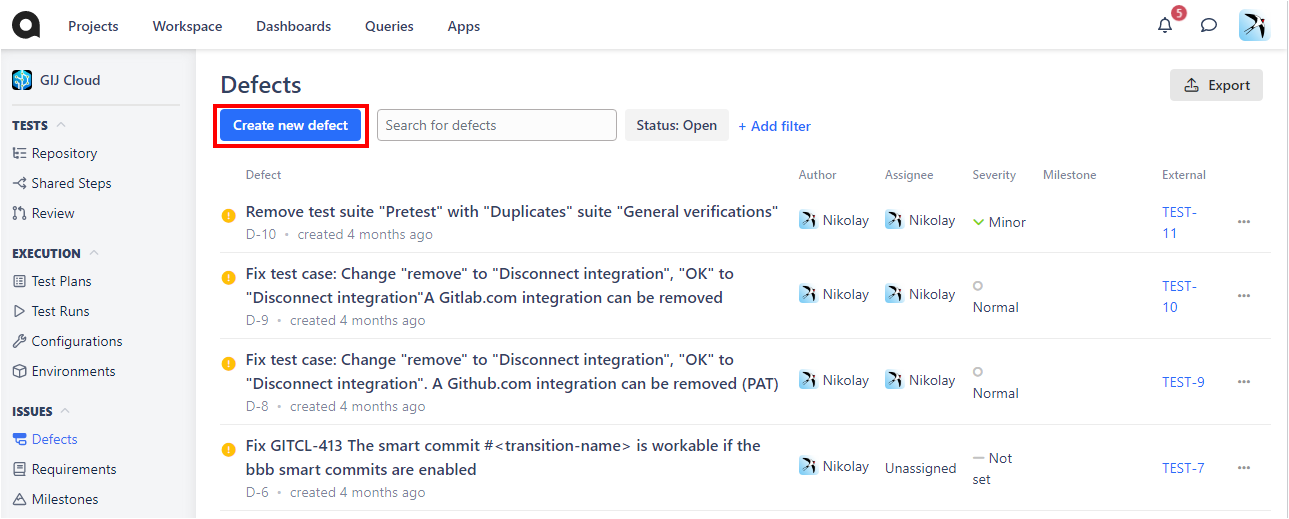
The first way is to create a Defect in the “Defects” section at any time regardless of the Test Case or Test Run. Such a defect can be marked as In Progress, Resolved, Invalidated, or Edited, but it wouldn't have any reference to a Test Case or a Test Run, since it has not been raised from them.
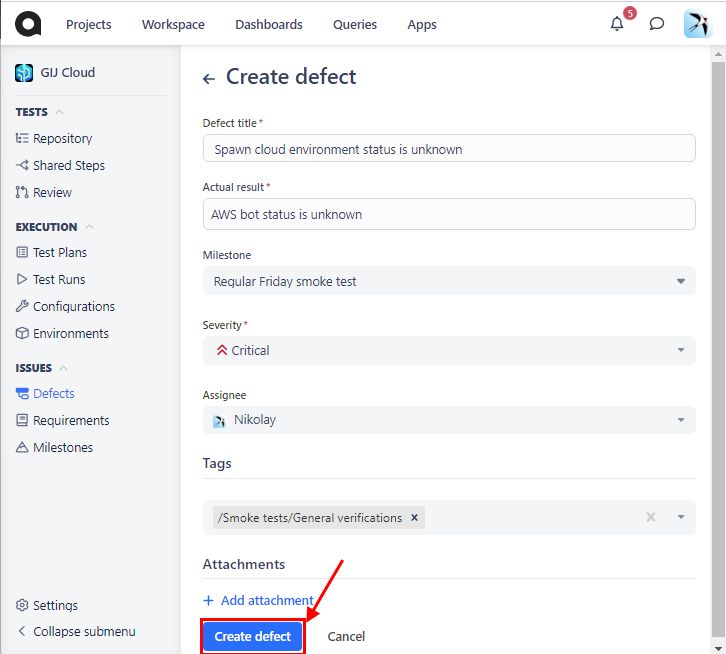
To raise such a defect, click "Create new defect" and add all the necessary details: Defect Title, Actual result, Severity, Assignee, Milestone, Tags - fill in any custom fields applicable to the Defects. You can also add additional attachments if needed. On finishing click "Create defect".
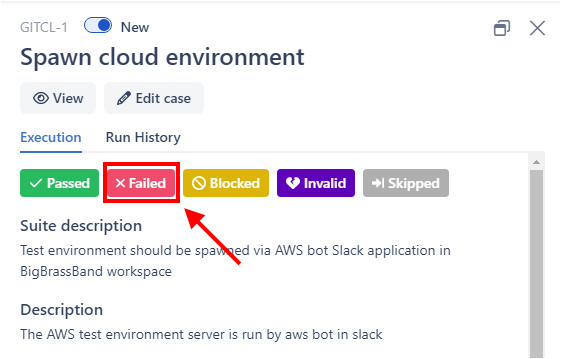
Another way is to raise a Defect when the test fails during the Test Run. If the Test Case or Step failed, mark the Test Case as "Failed" after that you will be prompted to open the run result window, where you can submit additional comments, record how much time was spent on the test case performing.
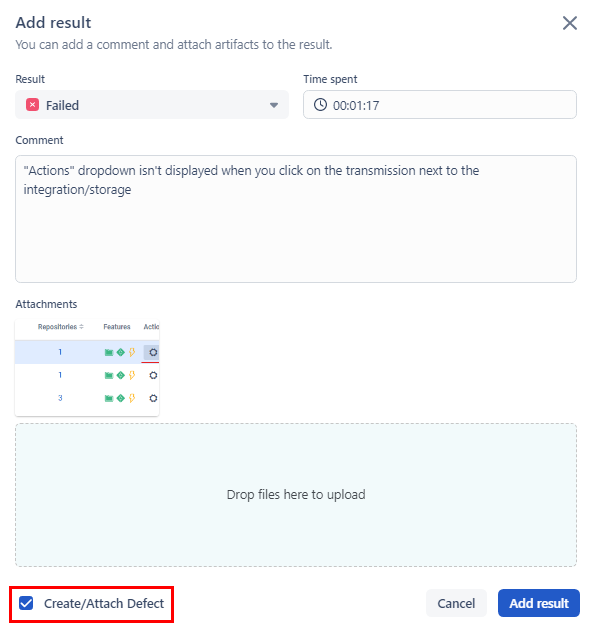
If the "Create/Attach Defect" checkbox is checked, you will be prompted to fill out other remaining Defect properties. You will be able to select whether you want to create a new Defect or attach an existing one to the issue you have found.
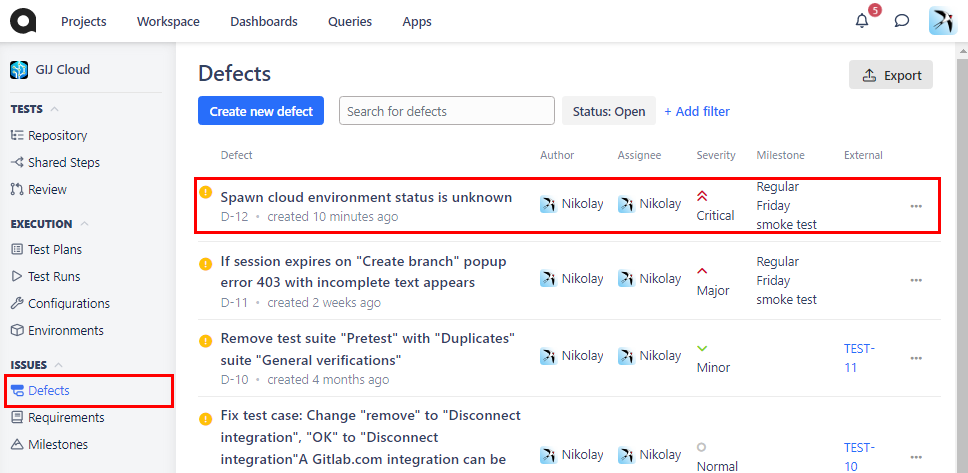
So a new Defect will be created from a Test Run result. You can find this Defect saved under the "Defects" section and the “Defects” tab of your Test Run.
Qase for Jira
It has already been discussed how to raise a Defect. Now let’s consider another advantage related to Defects - the integration of Qase with Jira Cloud. Many developers use Atlassian Jira Cloud to manage their work process. Qase allows you to associate test cases with Jira issues. Found defects lead to automatic opening of new tickets in Jira.
After installing the Qase plugin in Jira Cloud the notification "Congratulations, Qase app is installed and linked with Jira!" will appear. After that you can open new Jira issues by raising the defects in Qase during testing.
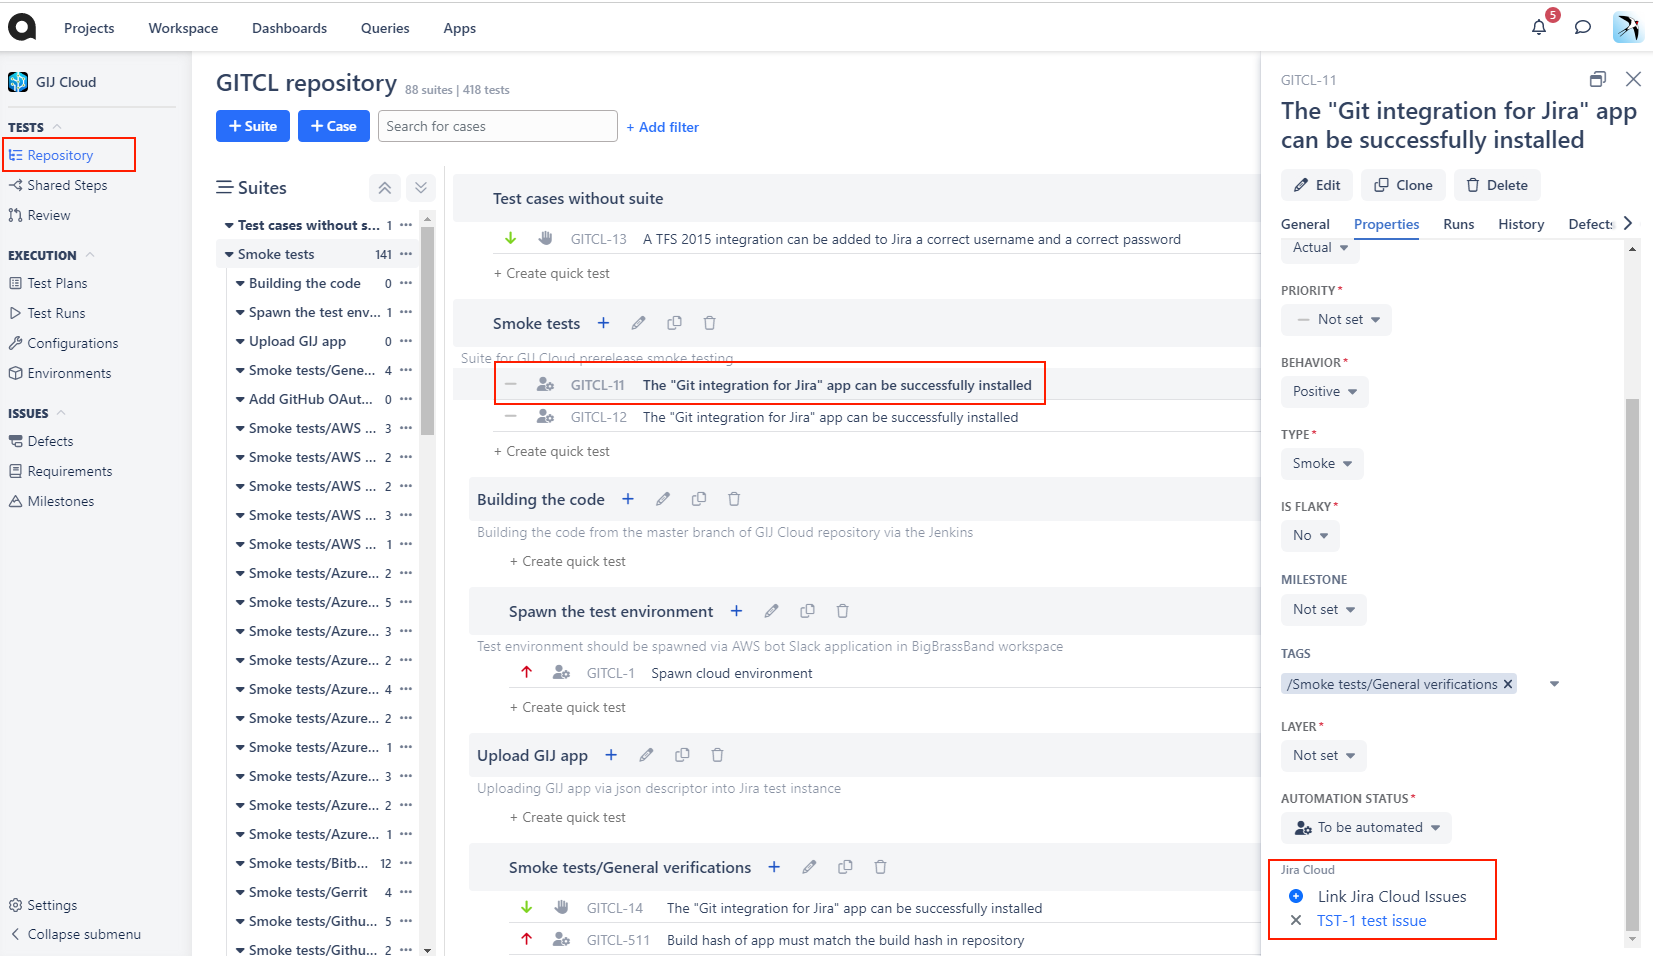
To associate a Jira issue with a Qase Test Case, you need to select a Test Case in the “Repository” section and click «Link Jira Cloud issues» on the side panel.
In the field that appears you must type the Jira issue key (project key) which will be associated with the Test Case after pressing the «Link» button.
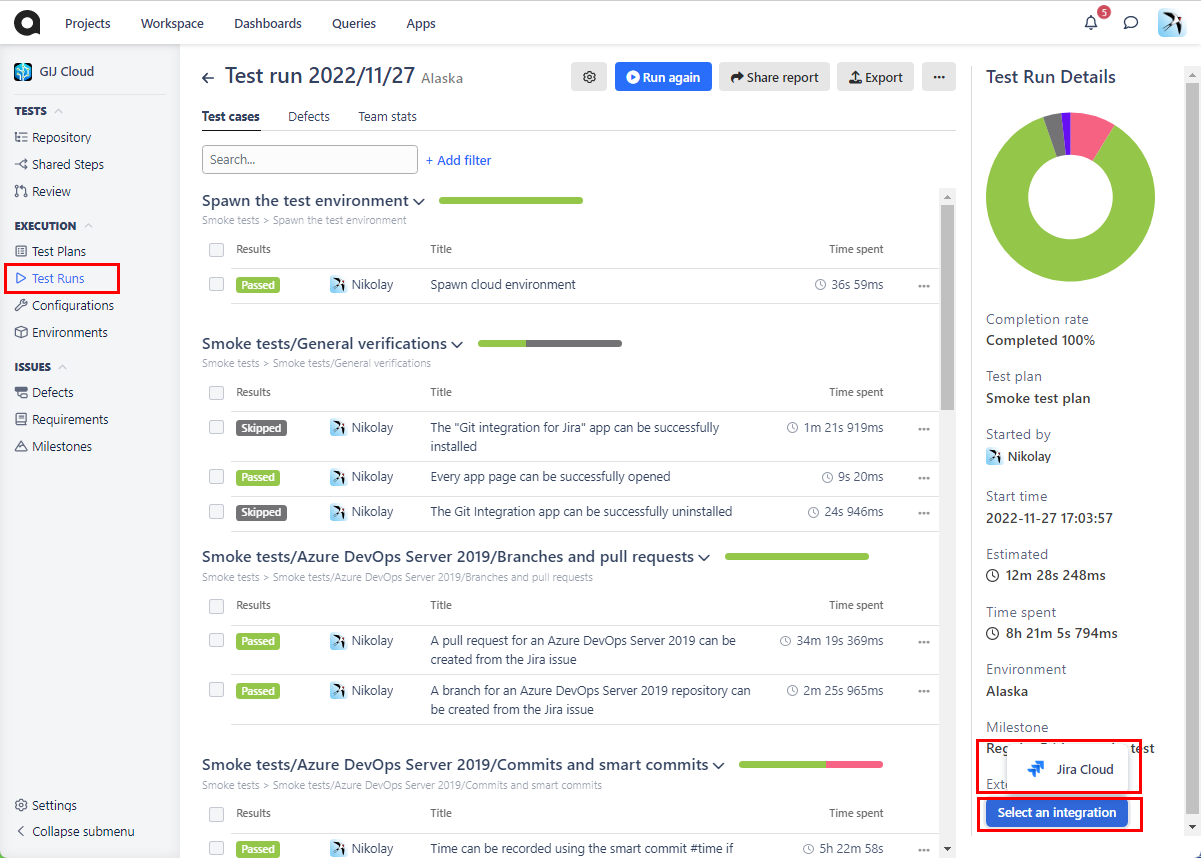
Another useful integration feature is linking Qase Test Runs to Jira issues. It allows you to switch quickly between Jira and Qase via associated links. For this follow the next steps:
-
Navigate to the «Test Runs» page and click «Run» at the
bottom of the side panel;
-
Click «Select an integration» to open integration pop-up;
-
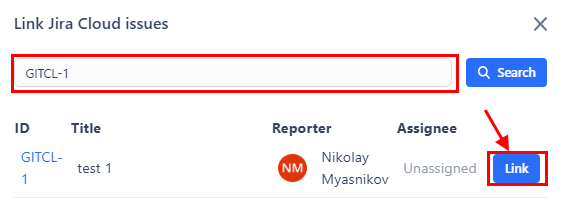
Chose «Jira Cloud» to open the “Link Jira Cloud issues” pop-up;
-
After the issue key is found, click the «Link» button.
Another interesting thing about integration is that the Jira issue status and the associated Qase Defect are synchronized. It is not necessary to track whether the Defect is marked as “Resolved”. If the manager has changed the status of the Jira issue to "Done", the Qase defect will be marked as “Resolved” automatically.
Conclusion
So in this article we talked about the main features of Qase, which will help you to quickly start using this tool. We hope that this article has been useful for you and now you will manage your tests more efficiently with Qase.
You can also read other interesting articles about testing tools in our blog.
Please share in your comments what tools you use and what has determined your choice of test management system.